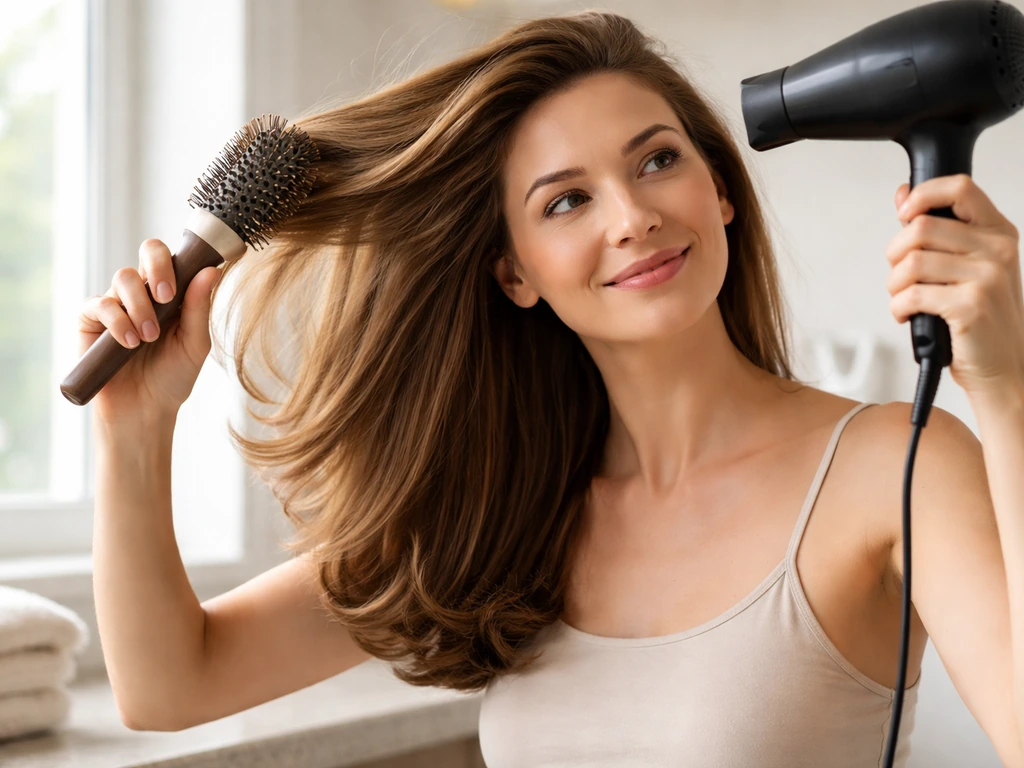
A blowout is a blow-dryer-plus-round-brush technique that sets your hair into a smooth, bouncy, voluminous shape as it dries, rather than just removing water. You can absolutely do it at home, and if you're growing your hair out, it's one of the most useful tools you have for making an awkward in-between length look intentional and put-together. Straight hair can still benefit from the same blowout method, so you can build movement while you grow it out.
How to Grow a Blowout: Step-by-Step Hair Growth Routine

Marcus Vickers
2 Jun 2026
The basic process: rough-dry to about 80–90% dry, then work in sections with a round brush and directed airflow, finish each section with a cool shot, and let it set before touching. TRESemmé also recommends applying a heat protectant first and then using the dryer’s cold air setting for a few seconds to set the style before releasing your hair [finish each section with the cool shot](https://www. tresemme. com/us/en/how-to/how-to-blow-dry-hair-for-volume.
html). That's the whole skeleton. Everything below is just making it work for your specific hair and growth stage.
What a blowout actually is and why it helps during grow-out
A blowout isn't just drying your hair. It's a styling technique where the heat from a dryer and the tension from a round brush work together to direct how your hair sets as it cools. The heat softens the hair's structure temporarily, the brush shapes it, and then the cool air (the 'cool shot' on your dryer) locks that shape in. When you're growing your hair out, this matters a lot: blowouts can visually smooth mismatched lengths, add volume where regrowth is thin or patchy, tame bangs or fringe that won't cooperate, and make layers or an undercut look more cohesive before they've fully grown in.
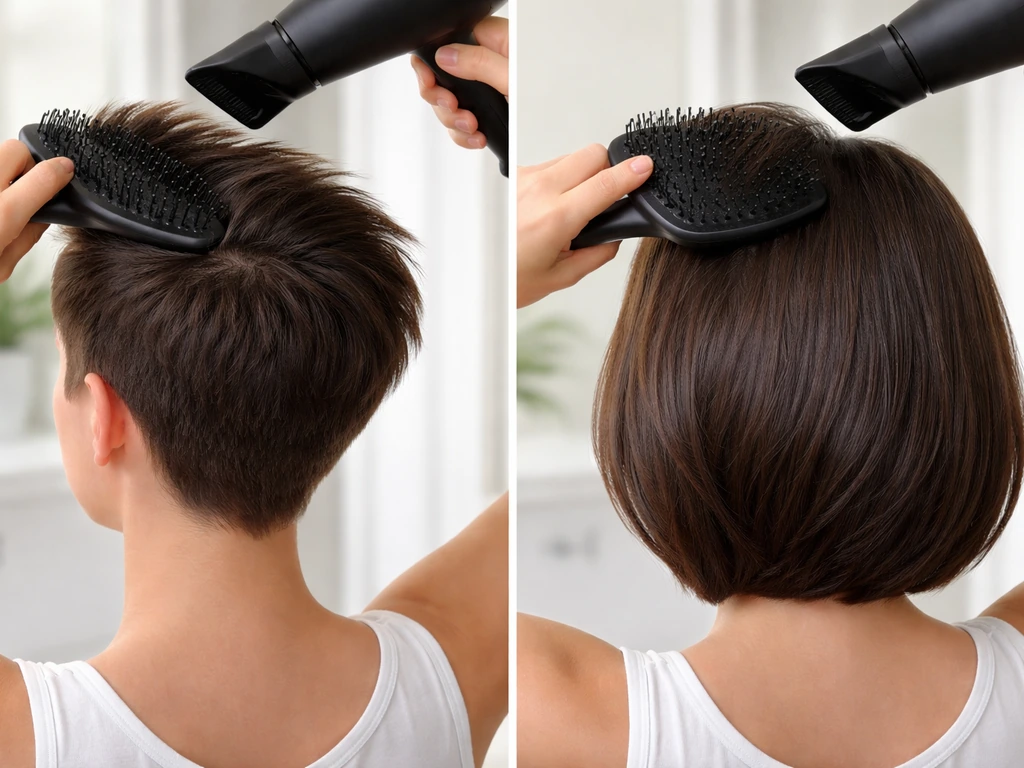
The easiest time to do a blowout during grow-out is once you have at least a few inches of length to work with, roughly the bob stage or longer. That said, it's still worth doing at shorter stages, you just adapt the tools. At pixie or very short lengths, you're mostly using a paddle brush or vented brush instead of a large round brush. As length increases, a round brush becomes more effective. The sweet spot where blowouts become genuinely transformative is around 4–6 inches of length, when you have enough hair to wrap around the barrel and create real bend and movement.
Tools, products, and heat settings to get right first
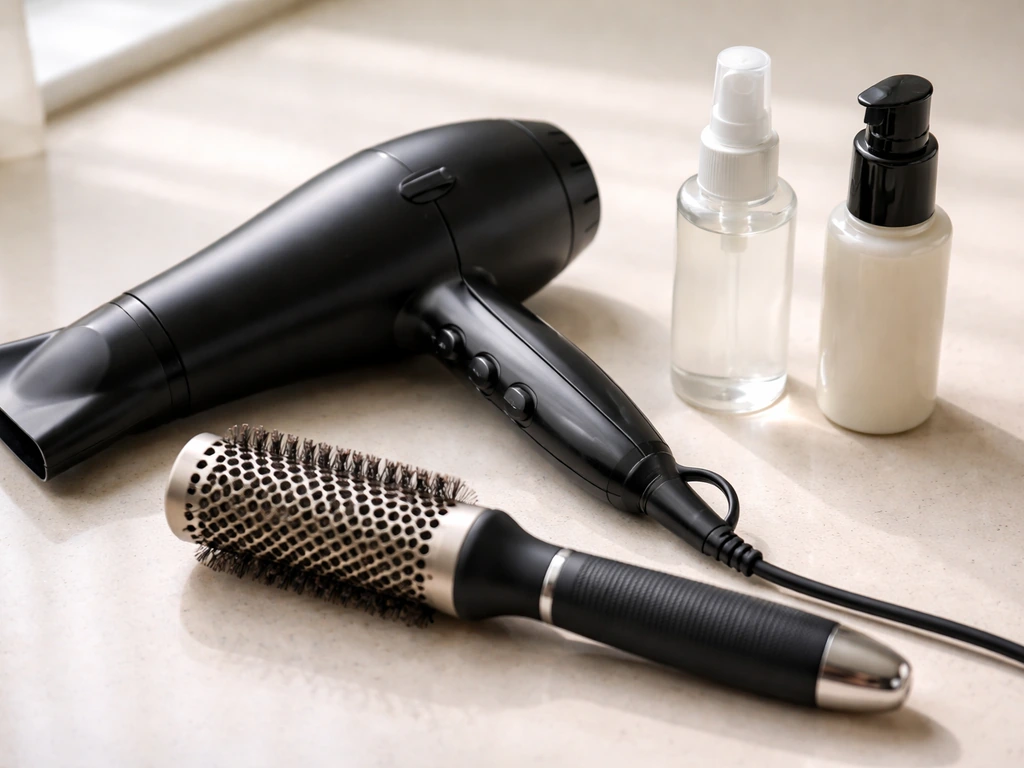
You don't need a professional dryer to get a good result at home, but a dryer with at least 1875 watts, a concentrator nozzle attachment, and a working cool-shot button will make a real difference. The concentrator focuses airflow so you're directing heat down the hair shaft rather than blasting it everywhere, which is what actually smooths the cuticle and reduces frizz.
For the brush, match the barrel size to your length. A smaller barrel (1 inch or under) works for short to medium lengths and gives more curl or bend. A larger barrel (1.5–2 inches) works better for longer hair and creates a looser, bouncier wave. During grow-out you'll probably change brush sizes as your length changes, so it's worth having two.
Heat settings matter more than most people think, especially when you're growing hair out and it may already be stressed from a previous cut, color, or chemical treatment. As a general rule: fine, fragile, or color-treated hair should stay around 280°F (138°C), wavy and curly hair can handle up to 360°F (182°C), and you really don't want to go above 400°F with any hot tool. If your hair is bleached, chemically straightened, or you've recently had color work done, default to medium heat and always finish each section with the cool-shot button.
| Hair Type / Condition | Recommended Heat Setting | Notes |
|---|---|---|
| Fine, fragile, or thin | ~280°F / 138°C | Use medium speed; cool shot after every section |
| Color-treated or bleached | Medium heat, max 350°F | Heat protectant is non-negotiable; low and slow |
| Normal / medium texture | 320–370°F | Standard technique applies well |
| Wavy or lightly curly | Up to 360°F / 182°C | Use tension on brush; diffuse first if preferred |
| Thick or coarse | 370–400°F max | May need more passes; still use cool shot to set |
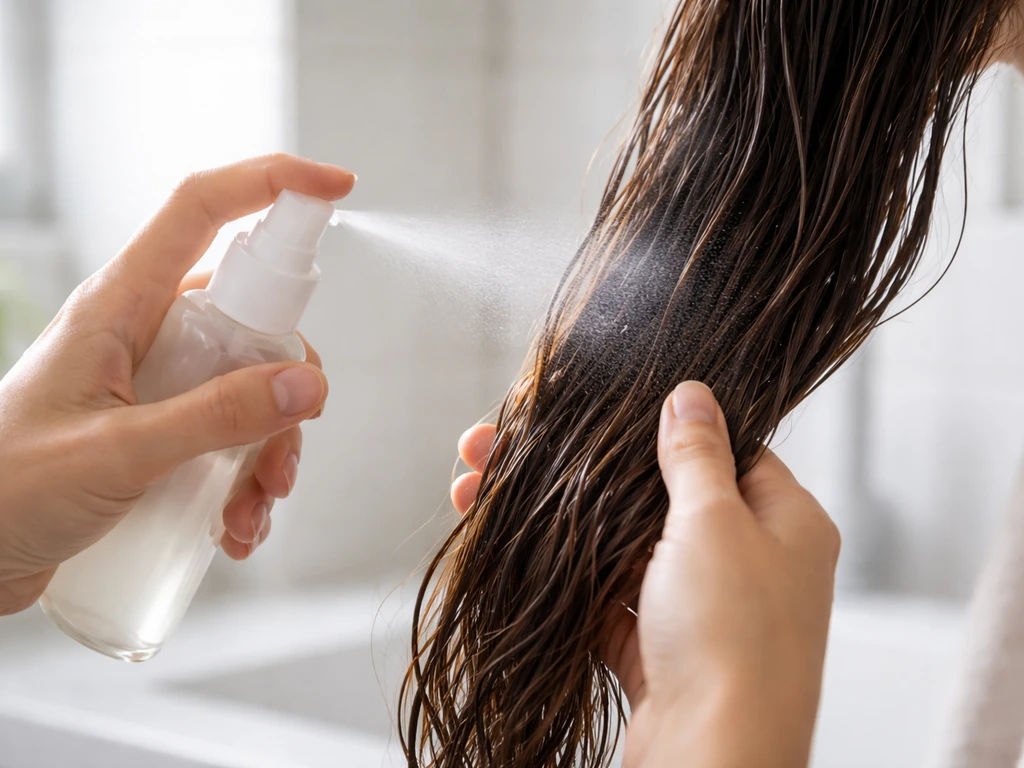
On products: heat protectant is the one thing you genuinely cannot skip when you're growing hair out. Every blowout, no exceptions. Apply it to damp, towel-dried hair before you start. TRESemmé’s usage guide for heat protection spray also explains applying the spray before you begin heat styling, following a step-by-step routine [Apply it to damp, towel-dried hair before you start](https://www.
tresemme. com/uk/hair-tips/how-to-use-heat-protection-spray. html). Options range from lightweight sprays (good for fine hair) to leave-in creams (better for thick or coarse hair).
Some products, like Kérastase's L'Incroyable Blowdry, also have reactivation technology, meaning you can re-apply heat later to reshape or freshen the style, which is useful on day two. Beyond protectant, a light volumizing mousse or blow-dry accelerator spray applied before drying can boost body. Avoid heavy oils or serums before drying since they weigh hair down before it's even set.
Step-by-step blowout technique
Start with freshly washed, towel-dried hair. 'Towel-dried' means damp, not soaking, squeeze or pat rather than rub so you're not roughing up the cuticle before you begin. Apply your heat protectant evenly through the mid-lengths and ends, then a volumizing product at the roots if you want lift.
- Rough-dry first: Use your fingers or a wide-tooth comb and a medium-heat dryer to get hair to about 80–90% dry. This removes the bulk of the moisture fast, reduces total heat exposure, and means you're shaping hair that's almost dry rather than saturating it with heat from soaking wet.
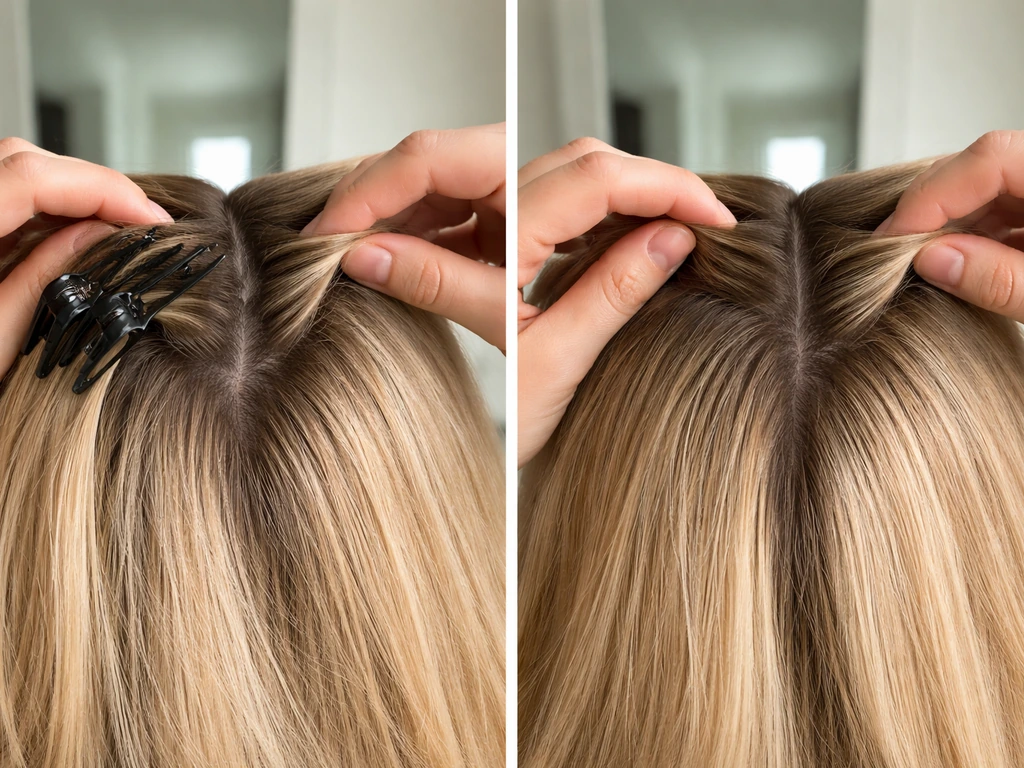
- Section your hair: Clip the top and sides up and start from the bottom. Each section should be no wider than the width of your brush barrel. This is key: too-thick sections don't dry evenly and won't hold their shape.
- Place and tension the brush: Slide the round brush underneath the section and apply firm but gentle upward tension. You're not yanking, you're holding the hair taut enough that the brush guides it. For a smooth finish, place the brush on top of the section and direct airflow down the shaft to flatten the cuticle.
- Follow with the dryer: Keep the concentrator nozzle pointing downward along the hair shaft (not blasting at the root from the side) and follow the brush as you slowly pull it through the section from root to ends. Keep the dryer moving to avoid concentrating heat in one spot.
- Cool shot to lock it in: While the hair is still on the brush, switch to cool air and hold it on the section for a few seconds. This is what sets the shape. Without the cool shot, the style starts falling as soon as the heat dissipates.
- Release and let it rest: Unwind the brush carefully so you don't disturb the shape you just created. If you're going for maximum longevity, roll the section onto a velcro roller while it's still warm and let it cool for 5–15 minutes before releasing.
- Work upward through sections: Move from the nape up through the back, then do the sides, and finish with the top. The crown and top sections get the most visible shaping, so save them for last when your technique is warmed up.
- Finish with a final cool blast: Once all sections are done, do a quick pass of cool air over the whole head to seal everything in. Then hands off for at least a few minutes while it fully sets.
One thing worth repeating: the hair needs to be 100% dry when you're done. If any sections feel even slightly cool or damp to the touch, that moisture will break the shape within an hour. Go back over those sections before you consider yourself finished.
How to adapt the blowout for different growth stages
Pixie or very short hair
At pixie length you can't use a round brush effectively, there's just not enough hair to wrap around it. Instead, use a flat or paddle brush with soft bristles, or even just a vent brush, and focus on directing airflow to add lift at the root and push sections in a flattering direction. The goal here isn't a traditional blowout shape, it's more about controlled volume and smoothness. A small boar bristle brush can help add shine. If you have an undercut that's growing back in, concentrate on blending the longer top sections over the shorter sides by directing airflow across rather than up.
Chin-to-shoulder bob and lob stages
This is where the classic blowout technique really starts to work. A 1–1.5 inch round brush gives you that flipped-under or bouncy-out shape depending on how you angle the brush. For growing out a bob, the ends are often at different lengths from layers or a previous cut, and a blowout can visually unify them by creating consistent bend and movement throughout. Focus extra time on the ends to make sure they're fully dry and set, since this is where uneven lengths show most obviously.
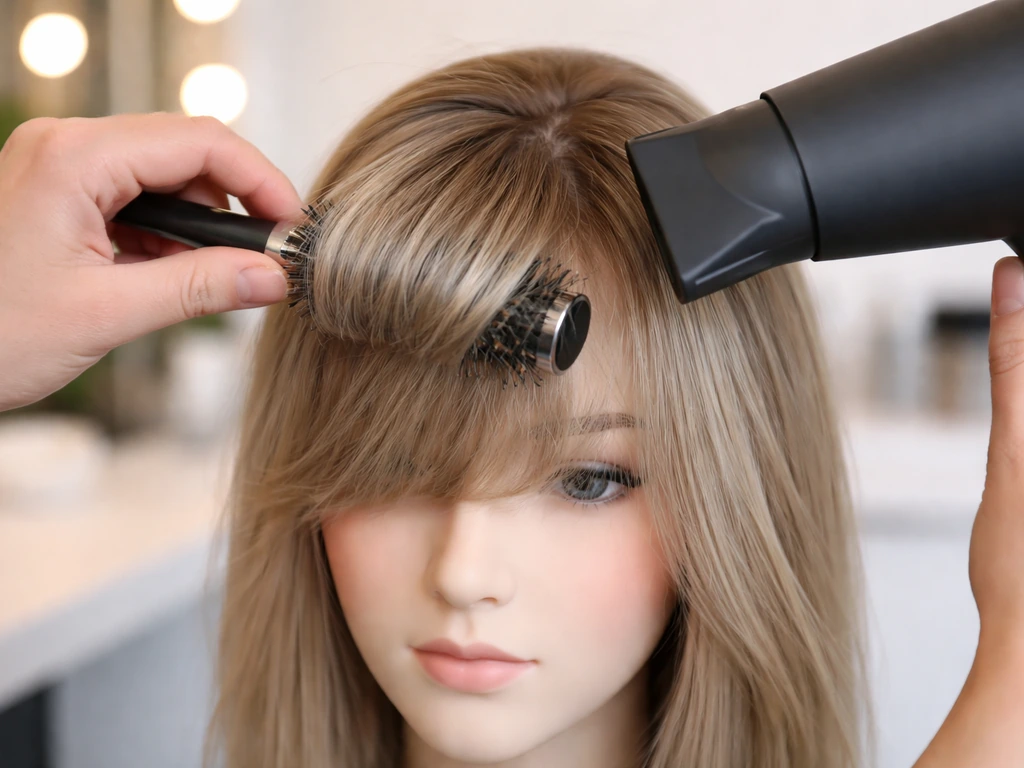
Bangs and fringe at any stage
Growing out bangs is one of the most frustrating phases, and a blowout is genuinely useful here. Use a small round brush (about 1 inch) and a low-to-medium heat setting on the fringe, since the skin on your forehead is close and bangs are often finer and more heat-sensitive.
For straight-across bangs you want to grow out, try directing them to the side with your brush as you dry rather than straight down, this starts training them in the new direction while keeping them flat and controlled. For curtain bangs or a middle-part fringe you're trying to grow longer, use the brush to push each side outward and let them cool swept to the side. For a side part transition, you can also train the fringe and top layers to sweep to your preferred side as they grow middle-part fringe.
If you're trying to learn how to grow a middle part flow, the key is using the blowout to train the part and keep each side swept and set as your fringe lengthens middle part fringe. The grow-out process for bangs is closely related to growing a middle part or side part, since your styling choices now will shape how the part settles as length comes in.
Growing out a side part is all about training the direction of your hair while your length comes in, and a blowout can help you keep it looking intentional. If you're working toward a middle part, the same blowout timing and directional brushing can help your new part settle evenly as your fringe lengthens grow a middle part. If you're specifically working out how to grow a middle part, focus on training the direction consistently as your fringe lengthens.
Undercuts and disconnected layers
An undercut growing in creates a visible line between the shorter underneath sections and the longer top hair. A blowout can help camouflage this by adding volume and movement to the top sections so they lay more naturally over the shorter sides. Use a larger round brush on the top and pull sections slightly outward and downward to encourage the longer hair to drape over the undercut line. Avoid lifting the roots of the top sections too aggressively or you'll actually expose the underneath rather than covering it.
Layers and textured cuts in transition
Layers can look choppy or disconnected when they're at different stages of growing out. The blowout technique helps here by smoothing the cuticle and creating a consistent texture across all the layers. Dry each section with the brush pulling slightly downward toward the ends so longer and shorter layers blend together visually. If you're working with wavy or curly hair that you sometimes straighten and sometimes wear natural, a blowout is a good middle-ground option since it smooths without fully straightening and keeps more of your natural texture intact.
Making your blowout last and refreshing between washes
How long a blowout lasts depends on your hair type, your environment, and how you treat it overnight. Straight, fine hair might hold for two to three days in low humidity. Wavy or curly hair in a humid climate might start reverting within 24 hours. Either way, there are things you can do to stretch it.
Humidity is the main enemy. Products that claim humidity resistance (like John Frieda's Infinite Smooth spray, which can lock the style in for up to three washes) can genuinely help in climates where moisture in the air starts pulling your shape apart. Apply these after your blowout is fully set and cooled, not before.
Sleep is where most blowouts die. The fix is simple but awkward: sleep with your hair loosely piled on top of your head rather than under it, and use a silk or satin pillowcase. Cotton pillowcases create friction that roughes up the cuticle overnight and causes frizz by morning. A loose, high bun or pineapple hold (just a very loose ponytail at the crown, not tight) keeps most of the shape intact.
For root grease on day two, the counterintuitive move is to use dry shampoo before your hair looks greasy, not after. Spray it into the roots at your part and hairline at the first sign of flatness, let it sit, then rub it in and brush through. Dry shampoo also adds grip and texture that helps the style hold. Drybar's Detox Dry Shampoo, for example, should be sprayed from about 4–5 inches away, allowed to dry, then worked in.
To refresh the shape without a full re-wash, a lightweight mist like Kérastase Refresh Absolu can be spritzed through dry hair to reactivate some bounce and hydration. If you used a heat-activated product like Kérastase L'Incroyable Blowdry (which has a reactivation technology that responds at around 150°C), you can briefly re-apply a warm dryer or flat iron to reset the shape without starting from scratch.
Protecting your hair from heat damage while it's growing
This is worth taking seriously. If you're growing your hair out, you're trying to get length, and heat damage is one of the main things that makes hair break off before it gets there. Regular blowouts are fine for most hair types as long as you're consistent about protection and not cranking the heat up unnecessarily.
Every single blowout needs a heat protectant on damp hair before the dryer touches it. There's no workaround for this. A good protectant like Aveda's home blowout spray protects up to 450°F (232°C) and provides frizz control for up to 72 hours. Apply it to towel-dried hair before rough-drying, making sure to coat the mid-lengths and ends, which are the oldest and most vulnerable parts of growing hair.
For frequency: daily blowouts on fine or color-treated hair are going to cause cumulative damage over time. Every other day or every few days with dry shampoo in between is more sustainable. If your hair is bleached or has had significant chemical work, consider whether a blowout twice a week is the right call versus once a week and air-drying in between. Cooler settings with slower passes do the same job as high heat with less long-term damage.
Wavy and curly hair types sometimes get better results from diffusing rather than a traditional round-brush blowout. A diffuser attachment reduces frizz by dispersing airflow and enhancing the natural texture, which means you're using less forceful heat and maintaining the pattern your hair wants to have. If you're growing the flow hairstyle or working with naturally wavy texture, diffusing might give you a better end result than fighting against your wave with a round brush.
When to see a professional: if your hair is very short (still in the pixie zone), heavily color-treated, or has significant breakage, one session with a stylist who can show you the exact technique for your specific length and texture is worth more than any guide. They can also help with things like an uneven undercut that's creating a visible line no amount of home styling can fully disguise.
Fixing the most common blowout problems
Frizz instead of smoothness
Frizz usually comes from one of three things: the dryer is too close to the hair (uneven airflow that roughes up the cuticle instead of smoothing it), the sections are too thick to dry evenly, or the hair wasn't fully dry before you stopped. Keep the dryer a few inches away from the brush at all times, take thinner sections, and make sure each section is completely dry before releasing it. Always direct airflow downward along the shaft, not into the roots from the side.
Dents and kinks in the hair
Dents usually come from clips or elastics used during sectioning that pressed into the hair while it was still warm and set it in the wrong shape. Use clips that grip without digging in (butterfly clips work well), and release them as each section below finishes cooling before moving on. If you already have a dent, warm that section briefly with your dryer, re-brush it with the round brush under tension, and cool-shot it again.
Uneven lengths looking choppy
Uneven lengths from growing out a previous cut are one of the hardest visual problems a blowout alone can't fully fix, but it can reduce how obvious they look. The trick is to keep the brush pulling slightly downward and inward toward the ends, which encourages all the layers to fold in the same direction and appear more cohesive. Adding volume at the root can also distract from unevenness at the ends. If the difference in length is significant (say, more than an inch between the shortest and longest sections), a small trim to blend layers might be more effective than styling alone.
Flyaways and short regrowth sticking up
Flyaways and short pieces around the hairline or crown are the hallmark of a growing-out phase and every single person goes through it. A light-hold hairspray or a tiny amount of pomade smoothed over the top of your fingers and then lightly pressed over flyaways can tame them without making the style look stiff. Some people also use a clean mascara wand or a soft boar-bristle brush dusted with a touch of dry shampoo to press those short pieces down.
If the flyaways are from new regrowth at the crown (the cowlick zone), directing your dryer airflow forward and then to the side during drying, rather than straight back, can help train those pieces to lie flatter. If you want to specifically grow out the crown area, focus your blowout on smooth, consistent root lift and a controlled finish so regrowth blends naturally.
The style drops within an hour
If your blowout falls flat quickly, the most likely culprit is that the hair wasn't fully dry when you finished, or you skipped the cool-shot step, or both. The cool shot is genuinely not optional: it's what causes the hair's structure to set in the shape the brush created. Without it, the style reverts as soon as the residual heat dissipates. Go back through each section more slowly, make sure you hit the cool button for a solid few seconds while the brush is still holding the section, and let the hair rest completely before touching or brushing it.
Your plan from here
If you're starting today: wash and towel-dry your hair, apply a heat protectant, rough-dry to 80–90% dry, then work through sections from bottom to top with a round brush sized to your current length. Cool-shot every section before releasing. Let everything cool fully before touching. Use dry shampoo preemptively on day two, sleep on a silk pillowcase with hair up, and refresh mid-week with a lightweight mist or a quick warm pass if you used a reactivating product.
Match your heat setting to your hair type, keep your dryer a few inches from the brush, and take thinner sections than you think you need. That's it. The technique is learnable in two or three attempts, and the more your hair grows, the more options you'll have with it.
FAQ
Should I do my blowout on freshly washed hair, or can I do it day two to help it hold?
Do a blowout on the dirtiest “not greasy” hair you can tolerate, but time it so the roots are slightly drier than the lengths. If your scalp is too clean or very slippery, the style collapses faster, so start with damp-to-dry hair and use dry shampoo preemptively at the roots the next morning if you want extra lift.
What’s the best way to grow a blowout if my hair is fine and gets weighed down easily?
For fine hair, use a smaller round brush and a lighter product load, then focus tension on the sections at mid-lengths and ends rather than overworking the roots. If you need volume, apply mousse only at the root zone and keep blow-drying passes slower with cool-shot finishing, instead of cranking up heat.
How can I make the bend last longer without using higher heat?
You should not brush or flip the ends until the section has cooled after the cool-shot. If you want a stronger curl or bend, increase tension slightly and spend an extra few seconds brushing under tension while warm, then cool-shot the same section fully before releasing.
What’s the quickest way to tell if my blowout is fully set?
Stop the blowout once every section feels room-temperature, not just “not wet.” If you want to check, run your fingertips through the hair near the ends and at the part line, dampness there will revert fastest.
My blowout has dents where I clipped sections, how do I prevent and fix that?
If you’re getting dents near the scalp, switch to clips that grip without crimping, and remove them in stages so you are not moving to the next section while the prior one is still hot. If you already have dents, warm that exact area briefly, re-brush under tension, then cool-shot again.
How do I use a blowout when my ends are different lengths from layers or uneven regrowth?
If your ends are uneven lengths, pull the brush slightly downward toward the shorter end so both lengths fold toward the same direction. You can also add a small amount of volume at the root (not at the ends) to distract the eye from length differences.
How do I grow a blowout if I have a cowlick at the crown that always pops back?
If you have a cowlick or stubborn crown regrowth, dry at low-to-medium heat by directing airflow forward first, then to the side where you want it to settle. Hold the brush or fingers in that direction through cooling, not just while it is hot.
Can I refresh a grow-out blowout with a reactivating spray and heat, and how often should I do it?
Yes, but do it as part of the blowout system: apply heat protectant first, then use the reactivating product as directed, and refresh only the sections that need resetting. Avoid re-heating the same strand repeatedly in one session, focus on the shape you want to restore.
What’s the best way to sleep to keep a blowout looking good during hair growth?
Sleeping on the back of your head flattens the shape and encourages tangling, especially as you grow past bob length. Use a loose high pineapple or pile on top, and cover it with satin or silk to reduce friction that breaks down the cuticle set.
Why does my blowout undo quickly in humid weather, and what should I change?
Humidity response depends on your setting and product order. Let the blowout cool fully, then apply any humidity-control spray after it is set and cooled, not during drying, and keep your hands off the hair until the next day.
My blowout goes flat by the next day, what are the usual mistakes?
If your blowout falls flat quickly, the most common causes are missing cool-shot time, finishing while the ends are still warm, or using too much heavy product before drying. The fix is to slow down on the last pass, take thinner sections, and cool-shot while the brush is still holding the shape.
How damp should “towel-dried” really be before I start the blowout?
Towel-dried means damp, not dripping. If your hair is too wet, it will steam through the style, and it can look set while still holding moisture that reverts later. If it feels wet after rough-drying, keep drying to reach roughly 80 to 90 percent before you start the brush-work.
What should I do if I’m still in the pixie stage or growing an undercut line?
If your hair is very short, you can still grow the look of a blowout by using airflow and lift with a paddle or vent brush, and by focusing on root direction rather than trying to create a wrap-around curl. For undercuts, guide the top hair to drape over the shorter sides instead of lifting aggressively.