Here is the short answer: to grow a clean middle part, you need enough length for your hair to reach the center of your scalp and lie flat on either side of it. For most people, that means at least 2 to 3 inches of length on top, though finer or straighter hair can often pull it off a little sooner. If you are not there yet, the work right now is growing out the length while training your roots to move toward the center. Both things happen at the same time, and this guide walks you through every step.
How to Grow a Middle Part: Step-by-Step Guide

Marcus Vickers
15 Apr 2026
Can your current length actually support a middle part?
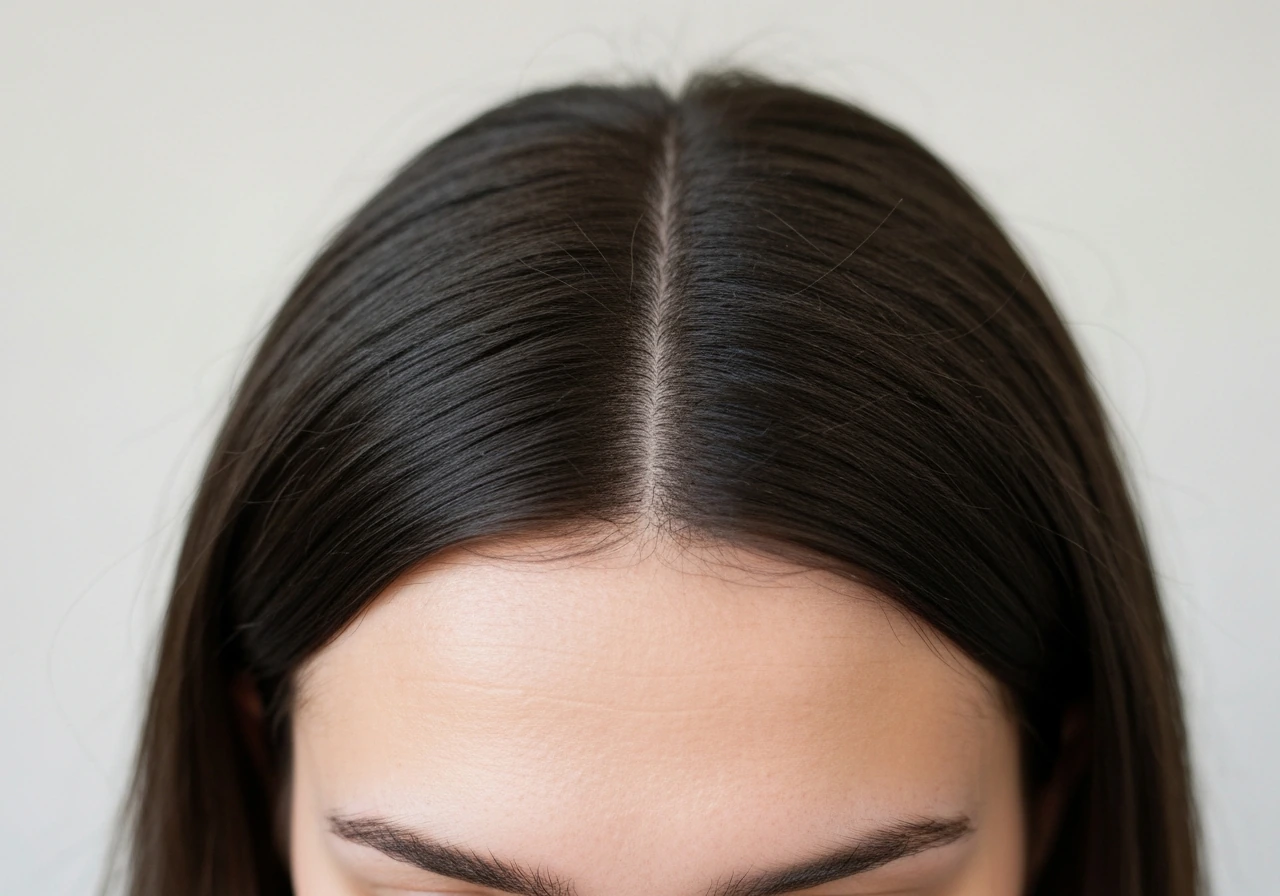
Before you start combing everything to the center, do a quick reality check. Pull a section of your front hair straight down and look at where it lands. If it reaches at least to your eyebrows (or a bit past), you have enough length to work with right now. If it falls short of your eyebrows or springs back up when you comb it forward, the hair does not yet have the weight to stay flat on either side of a center part, and forcing it will just look uneven or severe.
A useful workaround for shorter lengths: instead of trying to hit the exact center right away, create a slightly off-center part first. This gives the hair a gentler direction to travel and looks intentional while you wait for more length. Then you nudge the part a little closer to center every few weeks as the hair grows and gains weight. It is a slower approach, but it looks far better than a harsh center line on hair that is not ready for it.
If you are starting from a buzz cut, a pixie, or any cut where the top is under 2 inches, you are in the early growth phase and your job right now is purely to grow. Do not stress about the part yet. Focus on keeping the hair healthy and getting to that minimum length threshold first. If you are growing out something with layers or crown area unevenness, know that the crown sections often need a bit more time than the front to catch up.
How long it actually takes: a realistic stage-by-stage timeline
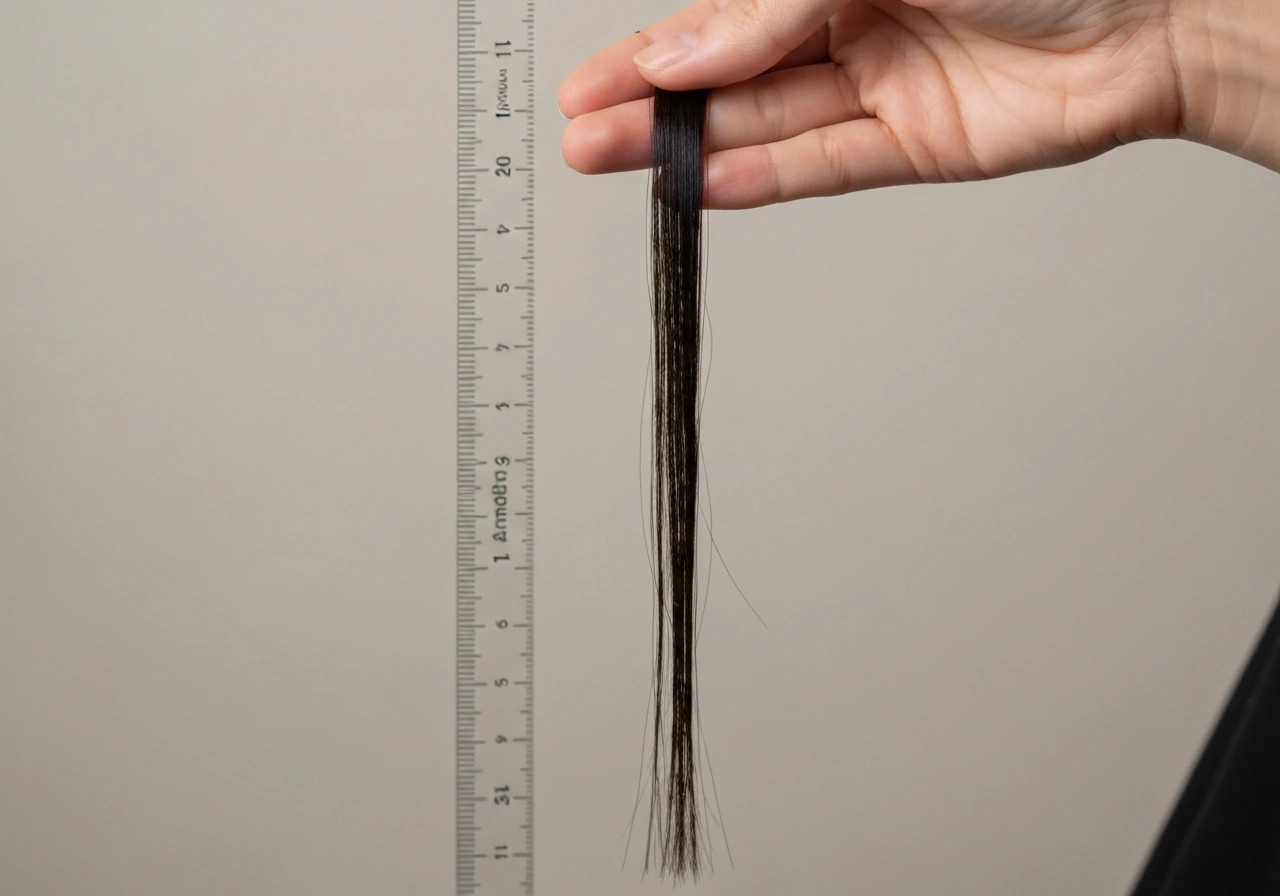
Hair grows roughly half an inch per month on average, so your starting length is everything here. Here is what you can expect at each stage, with honest notes on what is actually happening with the part.
| Starting point | Approx. time to workable middle part | What is happening |
|---|---|---|
| Buzz cut (under 1 inch) | 6 to 9 months | Hair is too short to part at all for the first 2 to 3 months; a soft off-center part becomes possible around month 4 to 5 |
| Short crop / pixie (1 to 2 inches) | 3 to 6 months | Enough length to attempt an off-center part early; true center part achievable around month 4 to 5 with training |
| Short bob / textured cut (2 to 3 inches) | 1 to 3 months | Center part is possible almost immediately with product and heat; refinement takes 1 to 2 months |
| Medium length (3 to 5 inches) | Already there or within 4 to 8 weeks | Hair has enough weight; training the part is the main task now |
Month one and two from a short cut are the hardest. The hair is growing but it has no direction yet, and it tends to do whatever it wants. This is normal. Month three is usually when you start to feel like you have something to work with. Month four and beyond is when the daily training routine really starts to pay off and the part begins to hold on its own.
If you are aiming for a fuller curtain-style look (sometimes called a middle part flow), expect the timeline to stretch a bit longer since you need not just a part but genuine length on the sides and back to balance the look. That is a 6 to 12 month project from most short cuts, and it rewards patience more than almost any other style.
Training your hair to part in the middle: techniques and daily routine

Hair has memory. The longer it has been parting on the side (or growing in any particular direction), the more it wants to keep doing that. Training it to the center is totally doable, but it takes consistent repetition over weeks. There is no shortcut, but there is a daily routine that genuinely works.
The daily training routine
- Start on damp or wet hair. This is when hair is most moldable and responsive to direction. Trying to retrain dry hair is much harder and less effective.
- Use a fine-tooth comb to find the center of your forehead and draw a clean line straight back. Do not guess — take a second to look in the mirror and find the actual center.
- Apply a small amount of product to your roots along the part line (see product section below), then use the comb to press the hair flat on both sides of the line.
- Blow-dry with a round brush or paddle brush, directing heat and tension outward and slightly downward from the center part. The direction of the airflow matters as much as the brush.
- Once dry, run the comb through the part again and hold it in place for a few seconds. Finish with a light mist of flexible hold spray.
- Repeat every single day. Consistency is the whole game here.
If you do not use heat at all, you can still train the part using the wet-comb method. Part the hair in the center while wet, apply a light hold product, and then either air-dry naturally or use a microfiber towel to gently press the hair flat. The results are less precise than blow-drying, but over time the hair will still shift toward the center. Curl patterns and waves require a gentler touch here since you do not want to disrupt the curl structure, just encourage the root direction.
For anyone dealing with a stubborn side part that has been locked in for years, try sleeping with the hair parted in the center. After washing, set the part with a comb and a lightweight gel or cream, then let it dry and go to sleep that way. Overnight hold, repeated nightly, is genuinely one of the fastest ways to break old part memory.
Products and tools that actually help
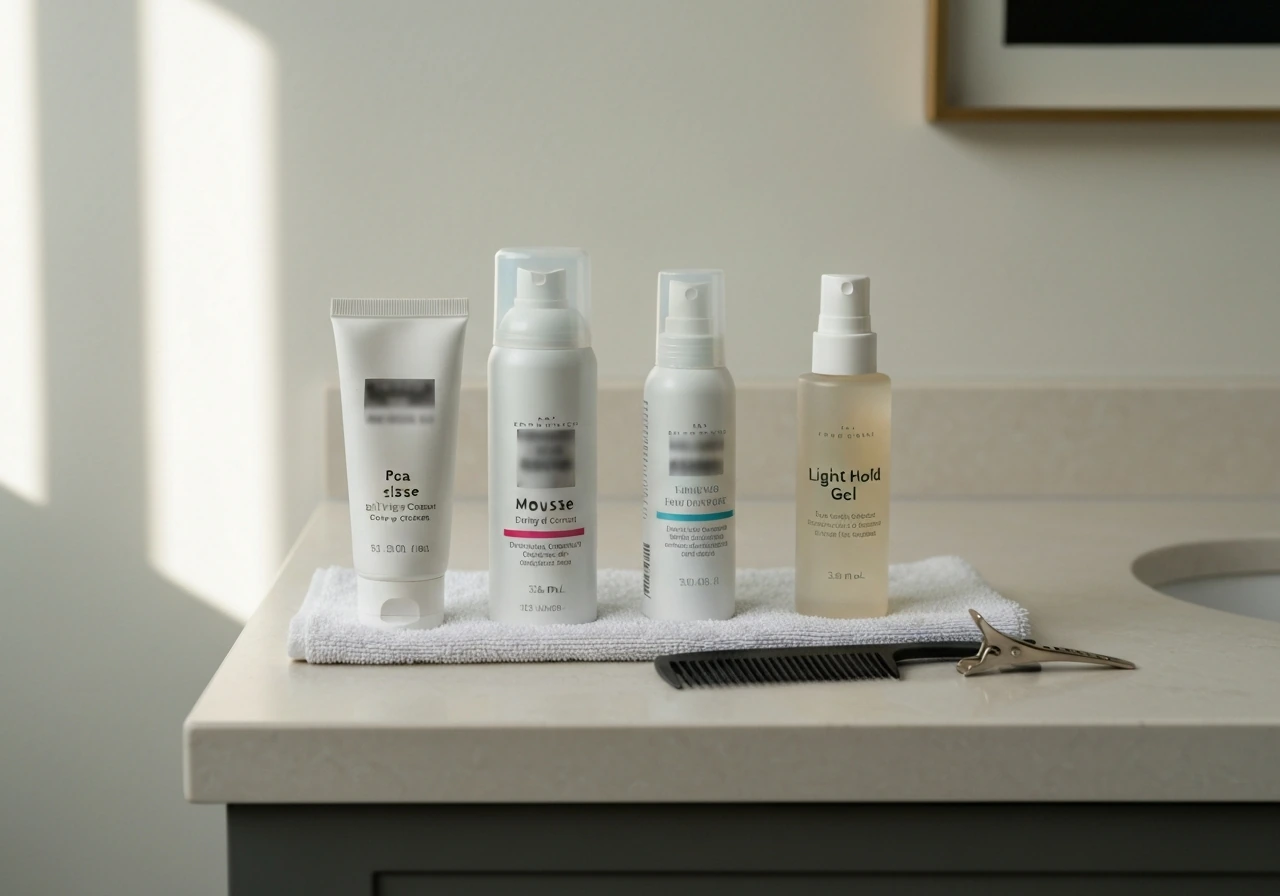
You do not need a lot here, but choosing the right product for your hair type makes a real difference. The goal is something that gives you enough hold to keep the part in place while the hair is still learning, without weighing it down or making it look greasy.
For hold and training the part
- Lightweight pomade or styling cream: works well for thicker or coarser hair that needs a firm hold without crunch. Apply a pea-sized amount to the root zone along the part.
- Mousse: a good all-rounder for medium or fine hair, especially when blow-drying. Apply to damp hair before you start the blow-dry routine.
- Flexible hold gel: strong enough to lock the part in place on stubborn hair, but rinses clean. Best for the early training phase when the hair really wants to revert.
- Light-hold spray (not hairspray): a finishing mist to set the part after blow-drying. Look for anything labeled flexible or brushable so it does not stiffen the hair.
Tools worth having
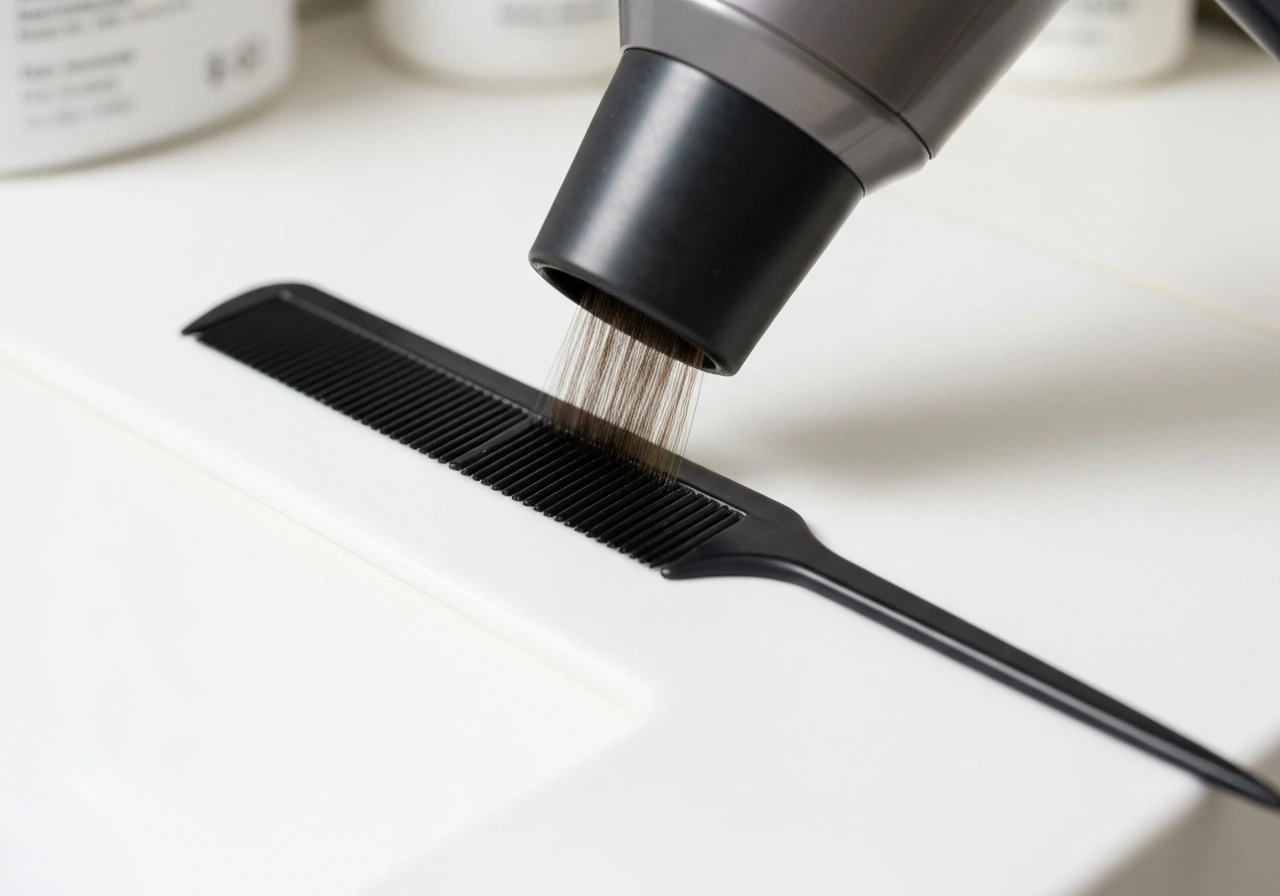
- Fine-tooth or rat-tail comb: the rat-tail end makes it easy to draw a precise center line. This is the single most useful tool for this process.
- Blow-dryer with a concentrator nozzle: the nozzle focuses airflow and lets you direct heat with precision. Worth using even if you usually just rough-dry.
- Round brush (medium size): for directing hair outward and downward during blow-drying. A ceramic or boar-bristle version adds shine and smoothness.
- Hair clips: use them to hold each side in place while you work on the other side during blow-drying.
If your hair is naturally straight or fine, a blowout technique is genuinely worth learning because it lifts the roots away from the scalp and then sets them in a new direction, which is exactly what you need to break a stubborn part. The key move is drying the root zone first, directing the brush away from the center, then letting each section cool before moving to the next.
Getting through the awkward phases without losing your mind
Let's be honest: growing a middle part has at least two genuinely annoying phases, and most people who give up do so during one of them. Knowing what to expect makes it easier to push through.
Uneven sides
This is extremely common, especially if you had layers, an undercut, or a cut that was longer on one side than the other. The two sides of your part will look different in length or volume for weeks or even months. The fix is not to panic-cut everything to match, that just resets your timeline. Instead, use product to add weight or texture to the shorter or thinner side so they look more balanced visually. A bit of pomade or texturizing paste on the shorter side can do a lot to close the gap while you wait.
Flyaways along the part line
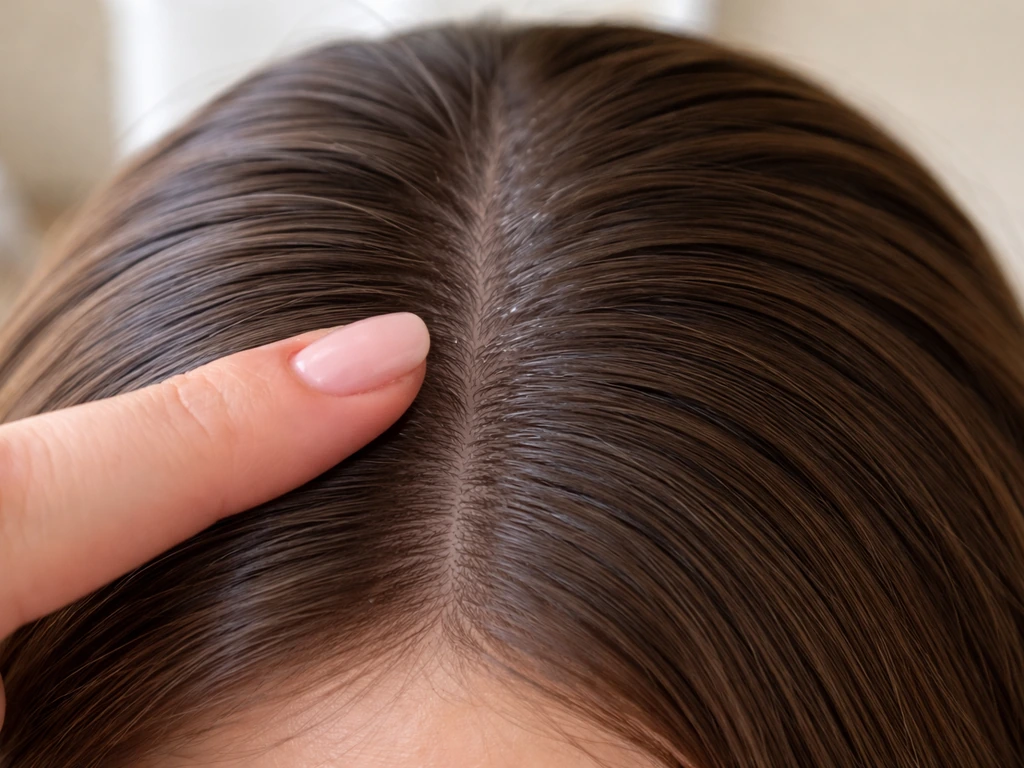
Short hairs along the part are new growth, which is actually a good sign. The problem is they stick straight up and ruin an otherwise clean part. A light hold gel applied with a fine-tooth comb directly to the part line will lay them down. Allure also recommends using a tail comb to help you find and place your center part cleanly a fine-tooth comb directly to the part line. An edge brush or a clean mascara wand also works well for precision. A tiny amount of serum or light oil along the part can add shine and weight to keep those short hairs from lifting.
Flat roots and no volume
Center parts can have a flattening effect, especially on fine hair. If your hair looks plastered to your head, try blow-drying the roots with the hair lifted up (not already directed to the side) for the first 30 seconds, then directing it outward. This builds volume at the root before you set the direction of the part. A volumizing spray or mousse at the root zone before blow-drying also helps significantly.
Bangs or fringe that will not cooperate
If you are growing out bangs at the same time, the front section is going to be the last to fall into place. Bangs that used to sit across your forehead have a strong downward part memory and will resist going to either side of a center part. Growing out the front section takes patience and consistent heat direction. In the meantime, pinning the bangs back or using a small clip on one side keeps them out of the way and out of your face while the length catches up.
The transition from a side part
If you have had a side part for years, your hair genuinely wants to fall that way. The scalp may even have a slight indentation along the old part line. <a data-article-id="41D55ED0-C931-4DEC-94CD-2555C207492">Growing out a side part is its own process, and it is worth treating it that way. Give yourself four to six weeks of daily training before you decide the center part is not working. Most people see a real difference around the five to six week mark when the hair has had enough repetition to start holding the new direction.
Keeping it clean as the hair grows: trims, scalp care, and staying the course
Trimming while growing sounds counterintuitive, but small trims every eight to ten weeks make a significant difference in how the part looks during the grow-out. You are not cutting for length, you are cutting for shape. Ask your stylist for a dusting (just the ends) to remove split ends that make the hair look scraggly, and to clean up any uneven sections that are throwing off the symmetry of the part. Do not skip trims entirely just because you want to preserve length.
Scalp health matters more than most people realize when growing a middle part. The part line exposes the scalp directly to sun, dryness, and product buildup. Exfoliate your scalp once a week using either a scalp scrub or a brush, and make sure you are rinsing product out fully at every wash. Buildup along the part line can make the skin look flaky or irritated, which makes the part look less clean. If you are experiencing dryness specifically along the part, a lightweight scalp oil applied directly to the line two or three times a week will help.
As your hair gains more length and the part starts holding on its own, you can start reducing the amount of product you use each day. The goal is to eventually reach a point where the hair parts naturally in the center with just a comb and water. Most people get there somewhere between month three and month six from a short cut, depending on their hair type. If you are aiming for a specific longer-length style, like the flow hairstyle, the middle part becomes the foundation for the whole look, and the time you put into training it now pays off in a very visible way later.
One last thing: if you have naturally wavy or curly hair, the middle part will look different on you than it does on straight-haired people in photos, and that is a good thing. Waves and curls that fall from a center part look full and intentional when they have enough length to work with. The training process is essentially the same, though you will want to rely more on the wet-comb method and curl-friendly hold products than on heat. Check out advice on achieving the flow look with straight hair for technique details that also translate well to other hair types with small adjustments.
The middle part is one of those styles that looks effortless once it is established but requires real consistency to get there. The work is simple, just not instant. Do the daily routine, be patient through the awkward weeks, and do not cut it all off in frustration at month two. That is where most people quit, and it is also right before things start to click into place. Stick with it, and the part will come.
If you are also thinking about the bigger picture of this grow-out and what the money or highlight pieces might look like once you have more length, it is worth reading up on growing out money piece hair so you can plan color and dimension in a way that complements the center part rather than fighting against it.
FAQ
What should I do if my middle part looks good on wash day but won’t hold between washes?
If your hair splits in the middle one day but slides back to the side the next, treat it as a training issue, not a length problem. After washing, reset the part while hair is damp, use a light-hold product right at the root and part line, and keep the part protected from friction (avoid rubbing with a towel, use a microfiber towel, and sleep on a satin pillowcase). This helps the direction “stick” long enough for the daily pattern to form.
How can I find the real center on my head if I’m not sure where it should be?
For a true center part, rely on symmetry cues instead of eyeballing. Stand in front of a mirror, brush the hair back, and then find the midpoint between your brow center and crown peak (many people’s crown sits slightly off, so use what looks aligned on you). The goal is that each side has similar hair weight, not that your part matches a photo line.
My part line looks kinked, how do I fix it when training the roots gets awkward?
If you accidentally overdirect the roots and they start forming a crimp or kink at the part line, stop daily “forcing” for a few days. Use the wet-comb method with a gentle hold, let the hair dry without re-combing during the process, and focus on flattening and smoothing rather than pushing the hair harder toward the center. You can restart training once the hair relaxes into the new direction.
How do I know when my hair is still too short for a middle part, even if I can make it look centered with product?
If your hair is too short, the part will look either too severe or “stringy” because the strands cannot lie flat. The best sign to wait is when hair rebounds upward when you comb forward, or when the center gap stays visible even after product. In that case, switch to a slightly off-center part and keep growing until the top reaches your eyebrow test area.
How do I reduce product once my middle part is starting to hold?
When you increase length, reduce hold rather than removing it completely. Start with a tiny amount of light cream or gel at the part line, then taper the amount each week as the hair holds naturally. If you use heavy pomade too early, it can weigh hair down and hide the part movement, making training slower and sometimes causing greasy-looking buildup.
Can I grow a middle part with heat, and is it okay to do it every day?
Yes, but use restraint. Too much heat can create new “memory” in the wrong direction or dry the hair so it won’t lie flat. If you blow-dry, focus on the root zone, dry first, direct the brush away from the center, and let the section cool before moving on. Consider limiting heat to a few days per week once the part starts holding.
Why does my middle part look flaky or irritated, and what’s the best fix?
Cover the scalp, not just the hair. If your part line is showing flaky skin, you often need to adjust washing and exfoliation, then add a lightweight scalp oil only on the affected area (not heavy all-over). Also make sure product is fully rinsed out along the part line, because residue can keep the area irritated and the part looking less clean.
My two sides look different during grow-out. Should I cut to make them match faster?
If your sides look uneven, the “short side” is usually not catching up in length yet, or the hair on that side is lighter and needs more weight. Use a styling strategy that matches the cause: add a touch of paste or pomade to the lighter/thinner side, or increase smoothing and training on the stubborn side rather than trimming aggressively to match. Wait through at least one full growth cycle before judging.
How is training a middle part different for curly or wavy hair?
For curly or wavy hair, a center part can look fuller and sometimes feels “off” because the strands puff out. Use the damp wet-comb method, apply a curl-friendly hold on the root area, then avoid touching the part while drying. If the curl pattern keeps separating the part, you may need slightly longer length before it sits as cleanly as it does on straight hair.
What’s the best way to handle bangs while trying to grow a middle part?
If you’re growing out bangs while going for a middle part, treat the front as its own timeline. Pin them back or use clips to avoid constant re-direction, then re-set the front part direction after washing with a comb. You will usually see the front “fall in” after the rest of the top is long enough to balance it, so adjust expectations for the first few months.