Growing out an Edgar haircut takes roughly 6 to 12 months to reach a genuinely different style, but the awkward phase only feels unbearable if you don't have a plan for each stage. If you are working with a 2 block cut instead of an Edgar, the same grow-out mindset applies, and you can follow a step-by-step 2 block plan to keep the shape as your layers lengthen how to grow a 2 block haircut.
How to Grow an Edgar Haircut: Step-by-Step Timeline

Marcus Vickers
12 Jun 2026

The biggest challenges are the blunt fringe going from sharp to shapeless, the short sides losing their clean taper, and the overall silhouette looking like a neglected bowl cut somewhere in the middle. None of that is unavoidable. With the right styling habits, a few targeted barber visits, and an honest timeline in your head, you can stay looking intentional the whole way through.
What the Edgar haircut actually is (and why it's tricky to grow out)
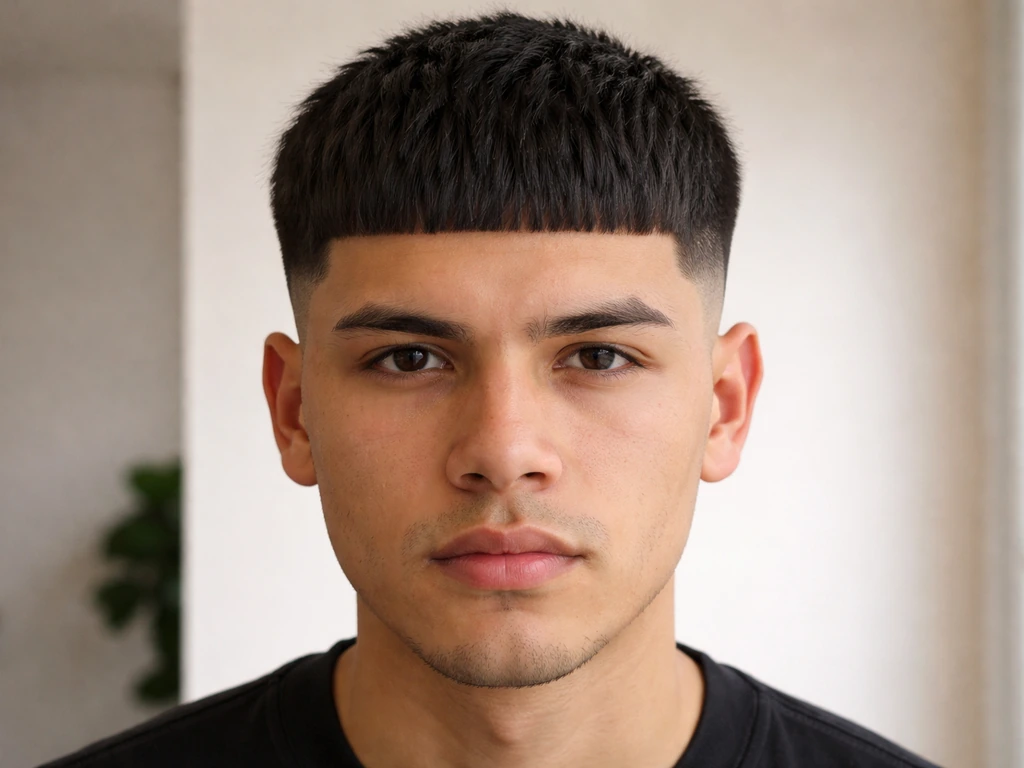
The Edgar is defined by two things: a blunt, straight-across fringe cut flat at the forehead, and short tapered or faded sides that create strong contrast with the top. The overall shape is blank" rel="noopener noreferrer">often compared to a bowl cut, but the fringe is horizontal and abrupt rather than rounded. It tends to look cleanest on thick, straight hair because the density helps the fringe hold its flat, forward-falling line. The style got its name in Latino barbershop culture and has stayed popular because the geometry is bold and deliberate.
The grow-out difficulty comes directly from those two defining features. The blunt fringe has a very specific length that makes it work: too short and it's a forehead strip, too long and it loses the flat line and starts doing unpredictable things depending on your cowlicks, wave, or natural part. The contrast between the short sides and the longer top also starts to erode unevenly, because hair on the sides and crown doesn't always grow at exactly the same rate.
Cowlicks and whorls can make growth at the temples look more dramatic or stick out at odd angles because hair in those areas often grows at a tilt rather than straight out. All of this means you're managing multiple moving parts at once, not just waiting for hair to get longer.
Your grow-out timeline: what to expect and when
Hair grows roughly half an inch (about 1.25 cm) per month on average, though individual rates range from about 0.5 cm to as much as 1.7 cm per month. That means the Edgar's fringe, which typically sits right at or just above the brows, needs somewhere between 2 and 6 months of growth before it reaches chin-length and starts behaving like longer bangs or a curtain fringe. The sides take even longer to blend because they started shorter. Here's a honest stage breakdown: If you're wondering how long the grow-out takes and what to expect at each stage, the blunt fringe length and side blending timelines matter most.
| Stage | Approx. Timeline | What's Happening | Main Challenge |
|---|---|---|---|
| Fresh Edgar | Week 1–3 | Everything is sharp and clean; fringe sits flat at the forehead | Nothing yet, enjoy it |
| Early grow-out | Month 1–2 | Fringe gains half an inch or more; sides start softening | Fringe loses its flat line, starts to lift or separate |
| Mid phase | Month 3–5 | Fringe is in the eyes or near brows; sides have noticeable length | The whole shape looks undefined and bowl-like |
| Late phase | Month 6–9 | Fringe is past brow level; sides have real length to blend | Deciding the new style and managing texture |
| New destination | Month 10–12+ | Enough length to commit to a curtain fringe, textured crop, or mid-length style | Patience and consistent upkeep |
These are estimates based on average growth rates. If your hair grows faster or you started with a deeper fade on the sides, adjust the numbers accordingly. The point is that you have a real journey ahead, and knowing where you are in it makes each awkward week feel less random.
Early stage: the first 6 to 8 weeks

This is when the fringe starts to misbehave first. It's gained enough length that it no longer sits flush against your forehead, but it hasn't got enough weight to fall flat. If you have a cowlick near the center of your hairline, this is when it starts showing up as a split or a lift in the fringe. Your sides are probably still fairly tight and the contrast between top and sides is still high, which actually works in your favor right now because the taper still looks intentional.
How to style the fringe in the early stage
Blow-drying is your biggest tool here. Wet the fringe first, then blow-dry it forward and slightly down using a low or medium heat setting. Aim the nozzle from above so you're directing the airflow forward rather than sideways. This trains the fringe to fall toward the forehead instead of flipping up or separating.
Do this every morning while the hair is wet, not after it's already dried in the wrong direction. A light-hold hair clay or matte paste applied to slightly damp hair, then dried into place, gives texture without grease and helps the fringe stay where you've put it. Clay absorbs excess oil, adds a dry matte finish, and gives short fringe enough hold to stay flat without weighing it down or making it look styled-for-a-wedding.
If the fringe is lifting at a cowlick, don't fight it with too much product. Instead, blow-dry that section first before touching the rest of the fringe, directing the air from the root forward. Trying to overload a cowlick with pomade or wax usually just makes it look greasy and doesn't solve the angle problem. The blow-dry technique is what actually resets the direction temporarily.
Managing the sides early on
The sides don't need much intervention at this stage. You can keep the neckline and the outline clean with a barber visit every 3 to 4 weeks, just for a line-up, without shortening the top or sides. Keeping the outline sharp makes the grow-out look deliberate rather than neglected. Think of it as maintaining the structure while the volume builds.
Mid stage: months 3 through 5
This is the hardest part. The fringe is at or past brow level and is long enough to get in your eyes but not long enough to sweep to the side or tuck behind your ear. The sides have grown out enough that the fade or taper line is fuzzy, but there isn't yet enough top length to create a new blended shape. The whole silhouette can start to look like a growing-out bowl cut, which is essentially what it is. This is where most people panic and cut everything short again. Don't.
Reducing the contrast on the sides
The goal at this stage is to soften the line between your longer top and your growing sides, not to shorten anything. Ask your barber to blend the sides upward more gradually, creating a taper rather than a hard contrast line. If you had a high fade, letting it drop to a mid or low fade, and then to a taper, is the right direction over these months. Each visit, the transition zone between short and long moves a little higher, reducing the bowl-cut silhouette without chopping off the length you've earned.
Training the fringe direction in the mid stage
By month 3 to 4, the fringe has enough length and weight that you have real options. You can continue blow-drying it forward to maintain a softer version of the Edgar's flat fringe look, which transitions well into a textured crop or heavy curtain fringe. Or you can start training it to split in the middle or sweep to one side, which opens the path toward a curtain bang style.
The direction you choose now starts building the habit the hair needs. A salt spray applied before blow-drying adds grit and body without making the hair stiff, which helps the fringe hold the direction you're setting it in. Use it on damp hair, rough it in with your fingers, then blow-dry forward or to the side depending on your target style.
For days when the fringe just isn't cooperating, a thin headband or a couple of bobby pins can hold it off your face without looking out of place. Texture and movement are your allies here: a fringe that looks slightly tousled reads as intentionally styled, while one that's been slicked flat and is still lifting at the edges reads as outgrown.
Dealing with texture, wave, and cowlicks mid-grow
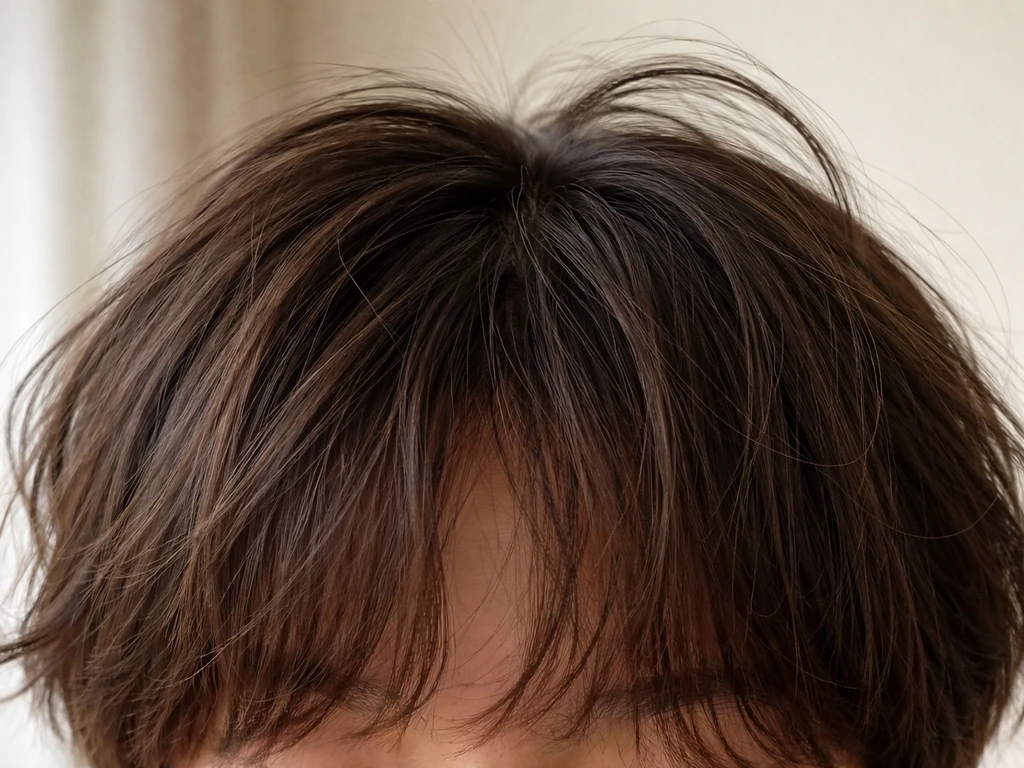
If your hair has natural wave or texture that the short Edgar fringe was suppressing, it starts showing up now. Wavy hair often curls at the ends once the fringe passes a certain length, which can feel like a surprise if you're used to the flat Edgar look. This isn't a problem, it's information about what your natural texture is doing and what styles will work with it further down the road. For cowlick-prone fringe, ask your stylist to cut the pieces in the cowlick zone slightly shorter than the rest of the fringe. This graduated approach reduces the choppy or separating look as the fringe grows through that length.
Late stage: months 6 through 9 and beyond
By month 6, the fringe has real length and the sides have enough growth to blend into something new. This is where the grow-out stops feeling like survival and starts feeling like designing a haircut. The decisions you make now determine what you end up with.
Three common destination styles and how to get there
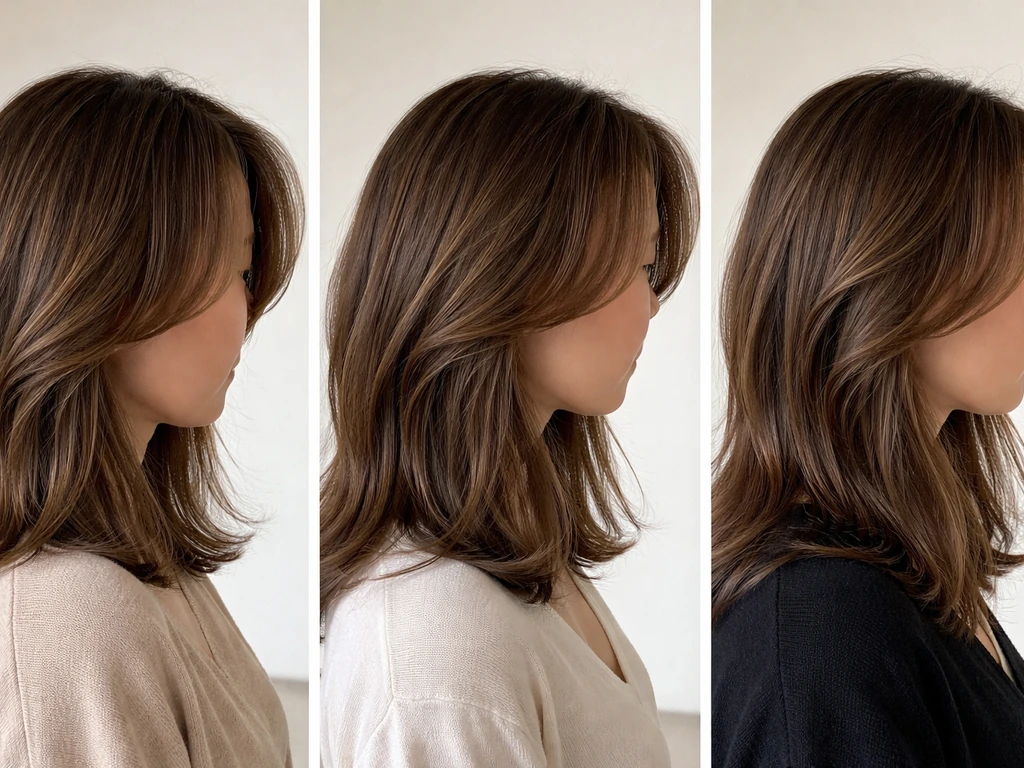
- Curtain bangs or a curtain fringe: Part the fringe down the middle or slightly off-center and blow-dry each side outward and slightly back. The Edgar's blunt fringe has grown enough by month 6 to 8 to fall into a soft curtain shape with the right technique. This is one of the most natural transitions from an Edgar because the length is already built in.
- Textured crop or French crop: Keep the fringe forward but ask your barber to add some point-cutting or texturizing into the fringe ends to break up the blunt line. The sides get blended into a mid-length taper. This destination feels like a grown-up version of the Edgar without abandoning the forward-fringe aesthetic.
- Mid-length blended style: If your goal is longer hair all over, this phase is about patience and keeping everything even. You want the sides growing at the same rate as the top, so ask for gradual blends rather than resets at each barber visit. By month 9 to 12, you'll have enough length on top and sides to comb back, style with a center part, or wear it textured and loose.
The late stage is also when a good leave-in conditioner earns its place in your routine. Longer fringe and growing sides are more exposed to dryness and breakage, especially if you're heat-styling daily. Look for a leave-in with glycerin and panthenol: glycerin draws moisture to the hair shaft, and panthenol strengthens the hair and reduces the kind of micro-breakage that makes growing fringe look thin at the ends. Apply a small amount to towel-dried hair before blow-drying, focusing on the fringe ends.
What to tell your barber and how to use visits wisely
The single most important thing to communicate to your barber is your goal. If you say nothing and just sit in the chair, many barbers will default to restoring the original shape. Be specific: tell them you're growing out the Edgar toward a particular style and that you want to maintain length while managing the shape.
If you want the end result to look clean while you learn how to grow out a bowl cut shape, keeping the fringe direction consistent is key grow out the Edgar. If you’re wondering how to grow a two block haircut from a similar starting point, the key is also to communicate your end goal and plan gradual blending.
If you want a true mod cut length, plan your grow-out stages around the fringe first, then gradually blend the sides so the cut evolves cleanly grow out the Edgar. If you want to end up with a mod cut, keep the fringe as your anchor and adjust the side blending as the length comes in. Here's what to actually ask for at each stage:
- Early stage (months 1 to 2): Line up the neckline and edges only. Don't touch the top or the sides. Keep the outline clean so the grow-out looks intentional.
- Mid stage (months 3 to 5): Soften the fade or taper line by dropping the fade lower or transitioning to a taper, blending upward more gradually. Ask for any split ends on the fringe to be dusted without changing the overall length. If cowlicks are causing problems, ask for a subtle graduation in the fringe at the problem area.
- Late stage (months 6 and beyond): Ask for the style you're actually building toward. Whether that's a curtain fringe trim, a textured crop shape, or a full blended mid-length style, bring a reference photo and describe what you want the final destination to look like. Your barber can now work with you instead of just maintaining.
Visit frequency during the grow-out can be every 4 to 6 weeks for outline and blend maintenance, rather than every 2 to 3 weeks as you might with a fresh Edgar. Spacing visits slightly further apart lets the length build while still keeping you looking tidy. If your neckline grows fast and starts looking unkempt, you can ask for just a neck cleanup between appointments without touching anything else.
Products, habits, and fixes for the whole grow-out
The grow-out period asks more of your hair and your routine than the maintained Edgar did. Here's what actually helps:
Products worth using
- Matte hair clay: Strong hold with a dry, non-greasy finish. Best for the early and mid stages when the fringe is short enough to need control without weight. Apply to slightly damp hair and blow-dry into place for best results.
- Matte hair paste: Similar to clay but more flexible and reworkable throughout the day. Useful in the mid and late stages when the fringe is longer and you might need to reshape it after it's dried.
- Salt spray: Adds grit, texture, and light volume without stiffness. Use on damp hair before blow-drying to help the fringe hold a direction and look intentionally tousled rather than outgrown. Works especially well for wavy or fine hair that loses body as it gets longer.
- Leave-in conditioner with glycerin and panthenol: Apply to towel-dried hair before heat-styling to reduce breakage, add moisture, and keep the fringe ends from splitting as they grow. A small amount goes a long way on short-to-medium length fringe.
Daily habits that make a real difference
- Blow-dry while the hair is still wet, not after it's started air-drying in the wrong direction. Heat-styling a fringe that's already set in an awkward shape is much harder than directing it from wet.
- Use your fingers to direct the fringe during blow-drying rather than relying only on a comb. Your fingers allow more responsive pressure to train a cowlick or a lift.
- Sleep on a silk or satin pillowcase if the fringe is at a length where friction causes it to wake up in a completely different direction every morning. It won't solve everything but it reduces the reset time in the morning.
- If you're getting fringe in your eyes during the mid stage, resist the urge to push it back constantly with your hand. That trains the fringe to grow backward, which fights the forward direction you've been building. Use a headband or clips to keep it off your face instead.
- Stay consistent with the blow-dry direction you're training toward. It takes several weeks of repeated direction before the fringe starts naturally falling the way you want it to.
Fixing patchiness and uneven growth
If one side of the fringe seems to grow faster, or the hair near your temples looks thicker or thinner than the rest, you're not imagining it. Growth rates vary across the scalp, and areas with different follicle density or angle (like around cowlicks and whorls) can look uneven even when the actual growth is similar. The fix is textured styling rather than obsessive trimming. Using a matte clay or paste and working the fringe with your fingers creates a surface that absorbs minor length differences into the overall texture instead of highlighting them. A clean, polished look actually makes uneven lengths more obvious, while a slightly textured, matte finish disguises them naturally.
Growing out an Edgar has a lot in common with growing out other structured short cuts, like a bowl cut or a two-block, where the contrast between sections and a defined perimeter are what made the cut work in the first place. The approach is the same across all of them: protect the length you're building, reduce contrast gradually rather than in one dramatic reset, and use styling to look intentional at every stage. You don't have to look like you're between haircuts. With the right habits, you can look like someone who knows exactly what they're doing the whole way through.
FAQ
Can I get trims while growing it out, or will that ruin the timeline?
Aim for “shape maintenance, not length cutting.” Ask your barber for a line-up or neckline cleanup that keeps the top and sides connected, but avoids shortening the fringe or the transition zone between top and sides. If you need only one thing between full appointments, prioritize the neckline, because it tends to grow in first and makes the whole haircut look untidy even when the rest is on track.
What should I do if my fringe keeps lifting at the same cowlick spot?
If the fringe is still at the brow area and is lifting at cowlicks, use blow-drying first, then only a small amount of product. Too much clay or paste can add weight unevenly and make the fringe separate. Apply to slightly damp hair, then dry immediately while directing airflow from the root forward, and let it cool briefly before touching it.
How do I grow it out if my hair is fine or struggles to hold a fringe position?
If your hair is fine, flat, or oily, the “matte clay on slightly damp hair” approach may need less product and more airflow. Start with a pea-size amount, rough in with your fingers, then blow-dry forward on low or medium heat. For extra hold without heaviness, use a lightweight styling cream or a very small amount of paste, then finish with a quick cool shot.
Will headbands or bobby pins help, or do they make it look worse while growing out?
Yes, but only if you use them as a temporary direction tool, not a permanent crutch. Keep bobby pins or a headband on after styling for a short window (like during commutes) so the fringe has time to settle, then remove them once it is dry and set. If you rely on them all day, the fringe can end up looking intentionally “pinned” rather than naturally grown.
What’s the biggest mistake people make when the grow-out starts looking like a bowl cut?
During the late awkward phase, avoid the common mistake of cutting the fringe to “fix” the bowl-cut look. The better adjustment is to soften the side-top transition by having your barber blend upward gradually. If you really need a reset, do it only after you have enough fringe length to keep direction consistent, otherwise you restart the same awkward period.
How do I grow it out into curtain bangs instead of keeping the flat fringe look?
If you choose a curtain-bang route, start training earlier by month 3 to 4, but do it progressively. First teach a slight center split, then increase the split width over a few weeks. When you blow-dry, comb or finger-drag the fringe outward gently and dry until fully set, otherwise the middle can collapse and turn into an uneven, straight-across fringe.
My hair grows fast. How do I adjust the months if the fringe behavior doesn’t match the timeline?
A faster-than-average growth rate can shrink the “2 to 6 months for the fringe to behave” window, but the real trigger is hair behavior, not the calendar. If the fringe starts reaching your eyes and gets weight, you are ready for the next training step. If it still bounces and won’t fall forward, wait even if you hit the month mark.
What cut or styling tweak works best if I have wave or curl in the fringe?
Wavy and textured hair often benefits from a cut change in the cowlick zone. Ask your barber to slightly graduate or notch the fringe pieces around the cowlick area, then commit to a consistent blow-dry direction. Diffusing alone can leave it frizz-prone, so if you diffuse, finish with a quick targeted blow-dry on the fringe for direction control.
How can I prevent breakage and dryness while heat-styling the fringe during the grow-out?
If you use heat daily, prioritize hair protection so the fringe doesn’t look thin at the ends. Keep heat to low or medium, apply leave-in on towel-dried hair, and reduce pass count by drying in the correct direction the first time. If your ends feel dry or rough, pause heat for a couple of days and let the leave-in do the work.
How often should I see my barber if my neckline grows out faster than the rest?
Whenever you schedule, base it on what is losing control first. If your neckline goes messy quickly, do a short neck cleanup between bigger visits. If your main issue is side blending, keep the standard 4 to 6 week spacing, and ask for transition-zone blending rather than taking off bulk from the top or shortening the fringe.