The best grow-out haircut for a Black man is one that keeps structure while your hair is doing its thing between lengths. That usually means a tapered or faded sides with a textured top, a shape-up that stays tight while the top grows freely, or a low-maintenance twist-out-friendly cut that looks intentional at every stage. The goal is simple: choose a cut that grows with you instead of fighting you, so you never feel forced to start over. A men’s haircut when trying to grow it out should keep the sides tidy while letting the top length develop without constant resets men's haircut when trying to grow it out.
Best Haircut to Grow Out Hair for Black Men

Marcus Vickers
20 Apr 2026

How to choose the right grow-out cut based on where you're starting
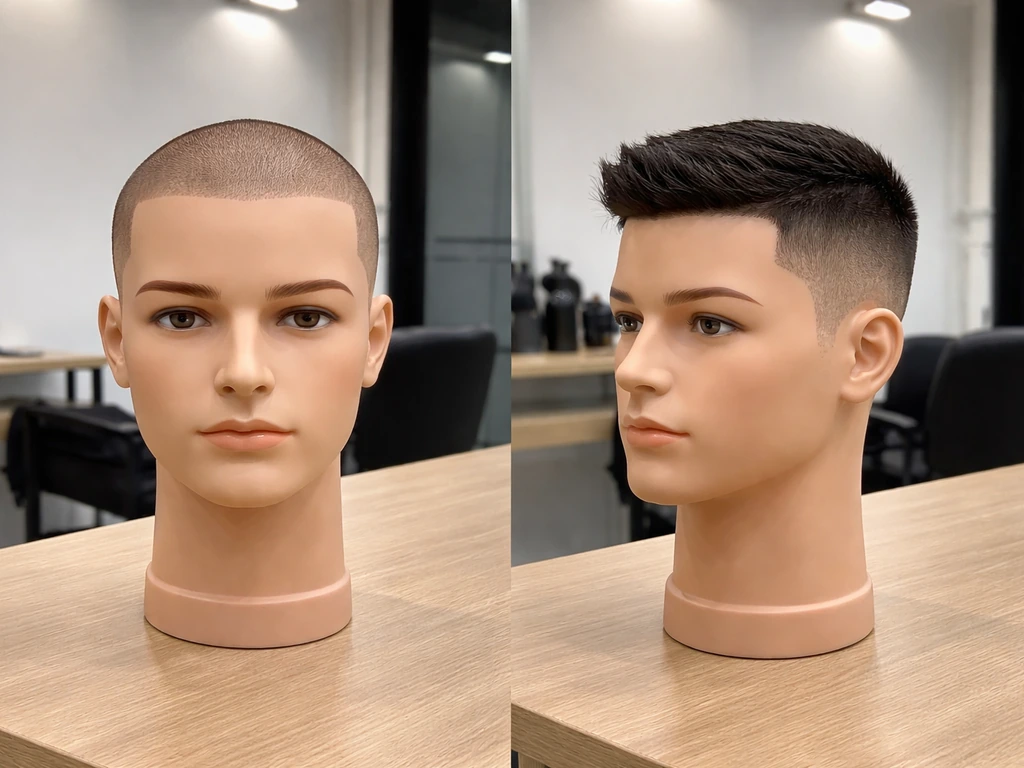
Your starting length matters more than anything else when picking a grow-out haircut. Someone coming from a buzz cut has a completely different path than someone growing out a low fade with a couple of inches on top. Before you do anything, be honest about two things: how much hair you have right now, and what your hair texture is actually like when it grows in.
If you're starting from a buzz cut or very low fade (basically zero length on top), you have the most freedom because you're building from scratch. You don't need to make a dramatic cut decision yet. The move here is to let the top grow and keep your taper or fade fresh every 3 to 4 weeks so the sides stay clean while the top catches up. If you're starting from a crew cut or short fade with some length already on top, you're likely already in or approaching the awkward stage. This is where a deliberate cut choice becomes critical.
Face shape plays a real role too. If you have a round face, you want your grow-out cut to add height and keep width controlled. Tighter tapers on the sides with vertical growth on top (think twists, picked-out afro, or a defined coil shape) work well. If you have an oval or oblong face, you have more flexibility. Wider shapes like a rounded afro or a temple fade with volume on top balance your proportions. Square and heart-shaped faces generally do well with medium-density cuts that don't add too much height at the crown but keep the perimeter clean and defined.
Low-maintenance styles that actually look good through every awkward stage
The awkward stage is real. There's a point, usually around 1 to 3 inches of growth, where your hair is too short to define into a style but long enough to look uneven and uncooperative. The secret to surviving it is picking a cut style from the start that transitions naturally as the hair grows. Here are the styles that genuinely hold up through every phase:
- Tapered natural: tight taper on the sides, natural textured top that you can twist, pick, or define. Looks clean from week 2 all the way to several inches of growth.
- Temple fade with shape-up: the sides stay sharp, your edges stay defined, and the top has room to grow into twists, curls, or a small afro without looking messy.
- Skin fade into a coil top: works especially well for type 3c to 4c hair. The fade does the visual heavy lifting while the top fills in.
- Low cut with a defined part: a hard part cut into the side gives your whole head shape and intentionality even when the hair itself is in an in-between length.
- Protective-style-friendly cuts: a light taper that leaves enough length in the back and sides to loc, cornrow, or braid adds options as your hair grows instead of limiting them.
What makes all of these work is that the shape comes from the sides and edges, not from the top. When the sides are clean and the line-up is sharp, even patchy or uneven top growth looks like it belongs. That's the mindset to carry through the whole grow-out process.
Growing from short to medium to long: how the transition actually works
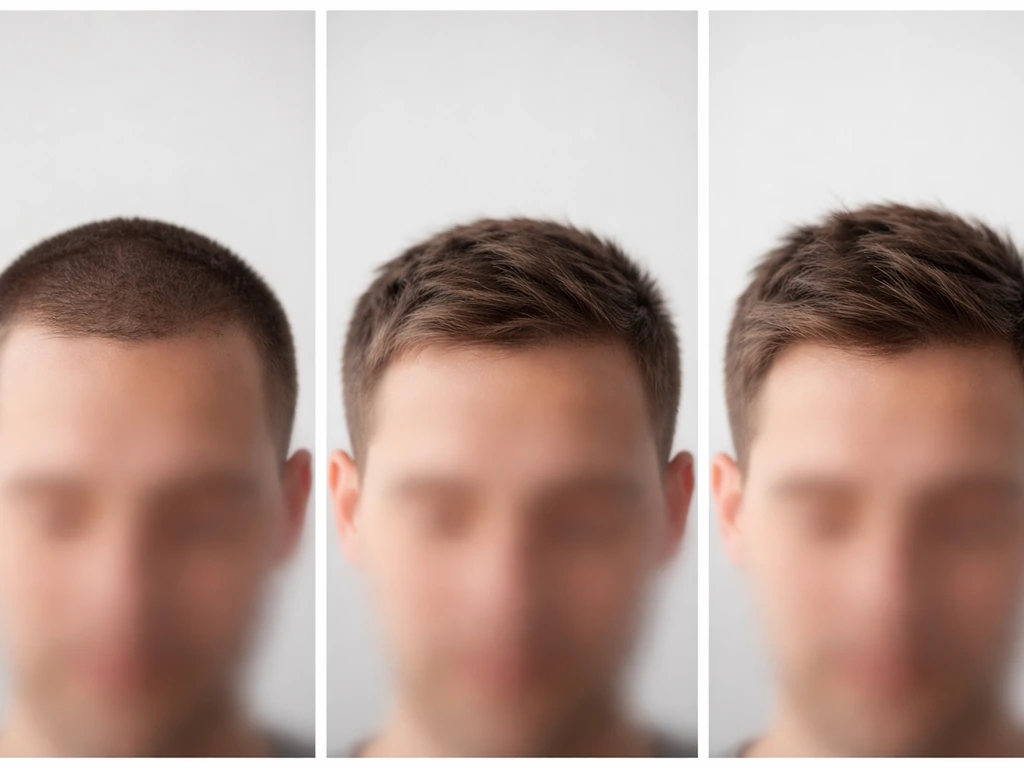
The path from a fade or buzz cut to longer hair isn't a straight line. It happens in stages, and knowing those stages makes it a lot less frustrating. Here's how to think about the full transition.
Stage 1: Short (0 to 1 inch on top)
At this stage, your job is mostly to keep the perimeter clean and let the top do what it does. Visit the barber every 3 to 4 weeks for a taper refresh and line-up only. Don't cut the top. If your hair is type 4, you might not see much visible length yet because of shrinkage, but the length is there. Moisturize regularly to keep the hair healthy and avoid manipulation that could cause breakage.
Stage 2: Medium-short (1 to 2 inches on top, the real awkward zone)
This is the stage most people give up during. The top starts puffing out, the shape looks undefined, and it's tempting to just cut it back down. Don't. Instead, start introducing texture techniques: two-strand twists at night to control shrinkage and define your curl pattern in the morning, or a light pick-out to shape what you have into a cohesive silhouette. Your barber's job here is to taper the sides and clean the line-up without touching the top length.
Stage 3: Medium (2 to 4 inches, starting to style)
At this length, you have real styling options. Twists, a small afro, a comb-out, or even starter locs become viable. If you've been keeping up with moisture and edge care, your hair will reward you here. You can start asking your barber to blend the taper more gradually into the top so the overall shape looks more unified and intentional.
Stage 4: Medium-long (4 to 6+ inches, the payoff stage)
Now you have options that didn't exist a few months ago: full twist-outs, wash-and-go definition, puffs, cornrows, flat twists, or free-form locs if you went that route. The taper may need to be grown out at this stage too if you want a fuller look, or kept tight if you want the contrast. Either way, this stage feels like the work paid off.
Layers, undercuts, and keeping bulk under control
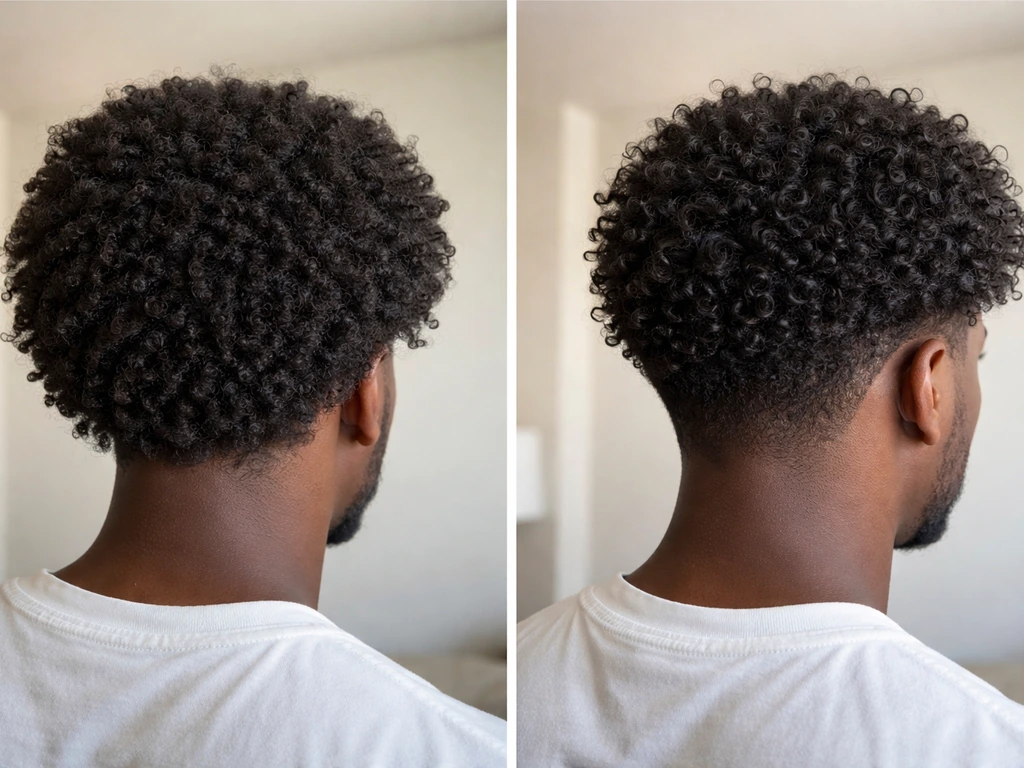
One of the most common complaints during a grow-out is the "helmet" effect, where the hair grows out as one dense, shapeless block with no movement. This happens when there's too much bulk at the top and no internal shaping. The fix is layering and thinning, done carefully.
For Black men with tighter curl patterns, aggressive thinning is usually not the answer because it can disrupt the curl pattern and cause uneven shrinkage. Instead, ask your barber to do light dusting on the top to remove weight without removing length. If your hair is type 3 or has a looser curl pattern, soft layers can add movement and prevent that dense, rounded shelf look.
Undercuts, which involve trimming the underneath layers shorter than the top, can also help reduce bulk while keeping top length intact. This is especially useful if you have a lot of density and the hair feels heavy or starts to expand sideways instead of growing up and out in a defined shape. Communicate this clearly to your barber: you want bulk reduced, not length removed.
The biggest layering mistake during a grow-out is letting a barber thin the crown too aggressively. That can create dips or uneven spots that take months to grow back and make the whole shape look worse, not better. If in doubt, do less.
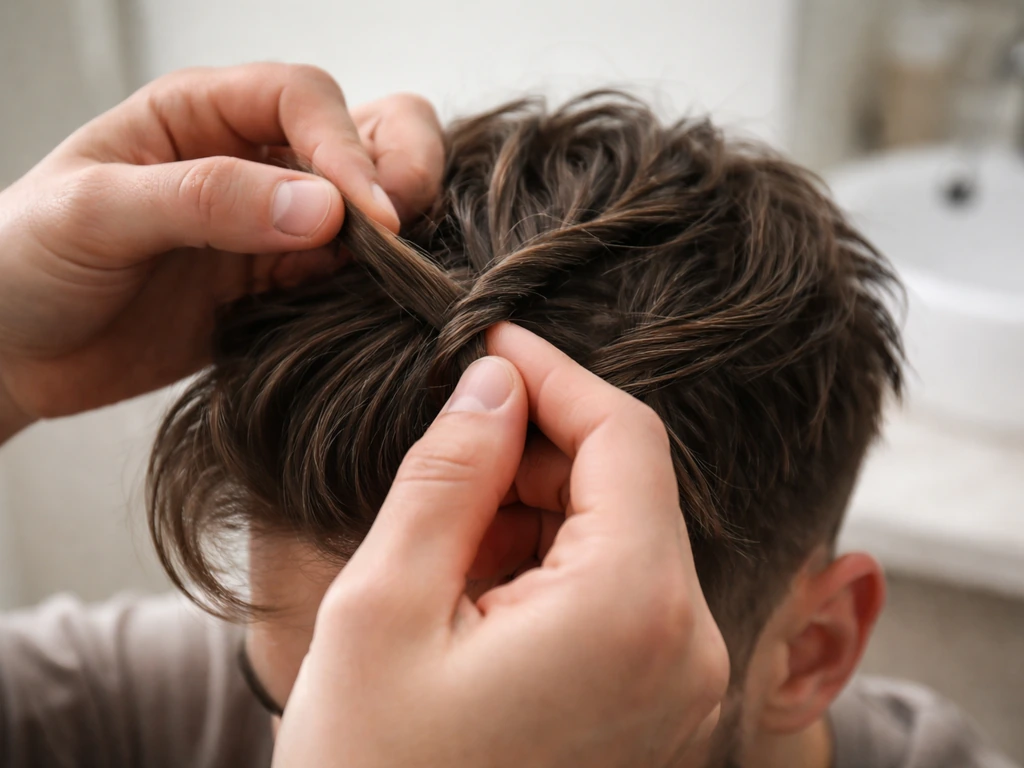
Styling your hair while it's growing: products and techniques that work
Black hair during a grow-out needs moisture, definition, and stretch. Those three things drive almost every styling decision you should be making right now.
The moisture foundation
Start with a good leave-in conditioner on wash day. Black hair, especially type 4, needs consistent moisture to reduce dryness-related breakage that can sabotage your length retention. Apply leave-in to damp hair, seal with a light oil (jojoba, grapeseed, or castor oil depending on your density), and don't skip this step even when hair is short. Dry, brittle hair breaks off faster than it grows.
Controlling shrinkage to see (and show) your progress
Shrinkage is completely normal for tighter textures, especially type 4. Your hair might shrink 50 to 75 percent of its actual length, which means what looks like half an inch can actually be 2 inches of grown hair. Understanding this keeps your head straight during the process. To reduce shrinkage and show more length, try banding (loosely securing sections with hair ties at intervals down each section) while the hair dries, or use two-strand twists to stretch and define simultaneously. These techniques don't damage your hair and make the grow-out look significantly further along than a fully shrunk wash-and-go would.
Defining your pattern
For wash-and-go days, a lightweight curl-defining cream or gel applied to soaking wet hair (the "praying hands" method works well for evenly distributing product without disrupting the curl clump) will give you definition without crunch. For a bigger, more shaped look, pick out the roots gently after your twist-out or wash-and-go has dried. Always pick from the roots upward, not downward, to add volume without frizz.
Keeping edges sharp
Clean edges do more work than almost any other part of your grooming routine during a grow-out. Even if the top looks patchy or uneven, sharp edges and a clean line-up signal that the look is intentional. Use an edge brush and a light-hold edge control product to lay your hairline between barber visits. Don't overuse thick pomades on the edges, as heavy buildup can clog follicles over time.
Your trim and maintenance schedule during the grow-out
One of the most common fears during a grow-out is that trimming will cost you progress. That's a false tradeoff. Strategic trimming actually protects your length by removing split ends that travel up the shaft and cause breakage. If you have blank" rel="noopener noreferrer">tightly curled or textured hair, including African American hair, the American Academy of Dermatology advises brushing your hair when it is wet to help decrease the chances of hair breakage. If you want to know how to trim hair to grow it out, focus on removing split ends while leaving enough length for your next styling stage. The key is knowing what to cut and what to leave alone.
| What to maintain | How often | What to tell the barber |
|---|---|---|
| Taper or fade on the sides | Every 3 to 4 weeks | Clean up the sides and taper, don't touch the top length |
| Line-up and edges | Every 2 to 3 weeks (can be done at home) | Sharpen the hairline and temple area only |
| Top length trim (dusting) | Every 10 to 16 weeks | Take off just the damaged ends, no more than a quarter inch |
| Bulk/shape correction | As needed, typically every 2 to 3 months | Reduce weight without removing length, light layering only |
The research backs this up: trimming textured hair every 10 to 16 weeks for end health is a solid baseline, though some people with drier or more fragile ends benefit from going in every 8 to 12 weeks. The interval that matters most is the one your own ends tell you. If you're seeing visible splits or your ends feel rough when you run your fingers down a twist, it's time. If your ends look clean and your hair is holding moisture well, you can stretch it a bit longer.
The non-negotiable part of this schedule is the sides and edges. Let the top grow, but keep the perimeter fresh. That contrast is what makes the whole grow-out look deliberate rather than neglected.
Week-by-week timeline: what to actually expect
Hair grows roughly half an inch per month on average, though individual rates vary and shrinkage makes this harder to track for tighter textures. DermNet NZ explains that tightly coiled hair can appear shorter due to natural shrinkage, which is why it can be harder to track grow-out progress shrinkage makes this harder to track for tighter textures.. Here's a realistic picture of what you'll see and feel at different stages from a starting point of a close cut or fade.
- Weeks 1 to 2: Almost no visible change on top. Sides may already be ready for a clean-up. Keep edges sharp. Moisturize daily.
- Weeks 3 to 4: Top starts to show visible growth, maybe a quarter to half inch of actual length. Hair might feel stubbly or rough. This is normal. Don't cut the top.
- Weeks 5 to 8: You're entering the early awkward stage. Top growth is uneven, crown may puff differently than the sides. Start using twists at night to control and define. Taper refresh recommended around week 4 to 5.
- Weeks 9 to 12: About an inch to an inch and a half of top growth (more actual length if you factor in shrinkage). You can start doing basic style attempts: twist-outs, small puff with a band, or a picked-out shape. This is also a good window for a light end dusting if needed.
- Months 4 to 6: Two to three inches of growth, often more. Real style options open up. The grow-out is working. Taper still needs refreshing every 3 to 4 weeks. Start thinking about whether you want to grow out the sides too or keep the taper contrast.
- Months 6 to 12: If you've stayed consistent with moisture, edge care, and trimming only what needs to go, you're likely at 3 to 5 inches or more depending on shrinkage. Full twist-outs, cornrows, flat twists, and afro shapes are all on the table.
The most important thing this timeline should tell you is that the process doesn't feel dramatic week to week. Progress shows up in months, not weeks. If you keep comparing your hair to where you want it to be every few days, you'll drive yourself crazy. Check in monthly instead.
Mistakes that set you back (and how to avoid them)
Most grow-out failures come from the same small set of mistakes. Knowing them upfront can save you months of backtracking.
- Cutting shape out of the top too early: the most common mistake. When hair looks uneven at 1 to 2 inches, it's tempting to ask the barber to clean it up on top. This almost always means losing the length you've built. Resist it. Use product and technique to manage shape instead of scissors.
- Inconsistent trimming: going too long without a taper refresh makes the sides look grown-out in a bad way, which makes the whole head look neglected rather than intentional. Stick to the 3 to 4 week side schedule even when you're tired of the process.
- Neglecting the edges: this is the fastest way to make a grow-out look like you've given up. Clean edges hold the whole look together. If you can't get to the barber, a home trimmer and edge brush will keep you looking sharp between appointments.
- Skipping moisture: dryness leads to breakage, and breakage is the enemy of length retention. A grow-out can stall completely if your ends are constantly breaking off at the same rate your hair is growing. Moisturize and seal consistently.
- Letting uneven growth go uncorrected for too long: if one section of your head is growing significantly faster or in a different direction, a small corrective trim to even the shape (not the length overall) can actually save you months of visual awkwardness. This is different from cutting for length, it's cutting for shape.
- Ignoring shrinkage and misjudging progress: if you measure your grow-out by what you see in a fully shrunk state, you'll think you're making no progress and give up. Stretch your hair before measuring. The length is there.
- Changing the plan too often: every month you switch from growing a tapered natural to wanting locs to wanting a different fade is a month of confusion and potentially unnecessary cutting. Decide on your destination before you start and stick to it.
Your actual next steps, starting today
If you're ready to commit to the grow-out, here's what to do right now. If you want to make that starting choice stick, follow a simple guide for how to cut hair to grow it out so your sides and top transition cleanly. First, decide your destination style: a fuller natural, locs, longer twists, a big afro, whatever it is.
If you are still deciding, use the best haircuts to grow out hair as your starting point so your plan matches how your hair develops destination style. Having a clear target makes every decision between now and there easier. Second, book a barber appointment this week, not to cut more off, but to get a clean taper and line-up that you can grow from.
Tell your barber you're growing the top out and you want to preserve length up there. Third, build your moisture routine: leave-in conditioner, light oil, and a nightly twist or banding routine to manage shrinkage and protect ends while you sleep.
The grow-out process for Black men is genuinely manageable when you have the right cut as your starting point and a realistic plan for every stage between now and your goal. You don't need to cut it short again. You just need to stop fighting your hair and start working with the texture and growth pattern you actually have.
FAQ
What’s the best haircut to grow out hair if I’m starting from a mid fade with more length on top than I can control?
Ask for a low taper with a controlled edge, keep the sides clean, and request “top length preserved” while your barber blends the taper gradually (not a sharp disconnect). This prevents the awkward puff-up phase where the sides lag behind the top.
How often should I get the sides trimmed during a grow-out without losing progress on my top?
Plan for a taper or fade refresh every 3 to 4 weeks, but only authorize perimeter and line-up work. Make it explicit that the top is not to be trimmed, even if it looks bulky, because bulk can be handled later with light dusting or soft layering.
If my hair starts looking uneven at the 1 to 3 inch stage, should I restart the process with a shorter cut?
No. Use styling to make the uneven growth look intentional, such as two-strand twists or a gentle pick-out to form one silhouette. If you’re tempted to cut, try banding while drying first, because shrinkage can make “patchiness” look worse than it is.
My shrinkage is extreme, the top looks like it hasn’t grown at all. How can I tell if length is actually building?
Track your hair in the stretched state (after twists, banding, or light stretching with two-strand twists). If stretched length increases while the shrinkage percentage stays similar, your growth is progressing, even if the visible look doesn’t change week to week.
What should I do if my hair gets a “helmet” look even though my sides are clean?
The fix is internal shaping, not more trimming of the sides. Ask for light dusting on the top or soft layers, and avoid aggressive thinning at the crown because it can disrupt curl formation and create dips that take months to fill.
Can I thin my hair during a grow-out if I have a lot of density?
You can, but keep it conservative. For type 4 and tighter patterns, request “light reduction” or thinning that removes weight only, not density from the crown. If the barber suggests heavy thinning, get a second opinion or say no and go with soft layers instead.
Should I choose twists, a small afro, or starter locs while I’m still in the awkward stage?
Twists are usually the safest first option because they manage shrinkage and define curls as length develops. Starter locs can work if you commit to consistent maintenance, but if you’re not ready for that schedule, start with twists or a puff and switch later once the top is long enough to hold shape.
How do I prevent breakage during a grow-out if my hair is dry or tangles easily?
Moisture first, manipulation second. Use leave-in on damp hair, seal lightly with an oil, then detangle minimally and only when hair is moisturized. If ends feel rough when you run your fingers down twists, increase sealing and reduce friction at night (satin bonnet or pillowcase).
Is trimming really necessary while I’m trying to grow out, or will it slow my progress?
Strategic trims protect progress by removing split ends that travel upward and cause further breakage. Use your ends as the decision guide, if you see splits or the ends feel coarse, trim. If ends are smooth and moisturized, you can stretch the interval slightly.
When trimming, what’s the biggest mistake to avoid?
Don’t let the barber remove length at the crown or thin too aggressively. Request split-end removal and keep enough uniform length so your styling stage stays consistent; crown dips are hard to correct and can make the grow-out look patchy for a long time.
How should I communicate my goal to the barber so they don’t cut the top?
Tell them you’re growing the top out and you want “perimeter and line-up only.” If you need shaping, ask for a taper refresh on the sides, and request any blending be done by keeping top length intact, then address bulk later with light dusting or soft layers when the top is longer.
What edge control should I use if I’m worried about buildup?
Use a light-hold product and apply sparingly, focus on laying the hairline between barber visits. Avoid thick pomades on the edges daily, buildup can accumulate over time and can make edges look dull or feel stiff rather than neat.
If I want the biggest afro look, what grow-out haircut detail matters most?
You need perimeter control so the shape looks rounded, not messy. Ask for a taper that keeps the sides from over-expanding, then let the top grow with enough bulk to form the shape, later you can fine-tune with pick-out technique and occasional light top dusting if needed.
How long does the grow-out usually take before it stops feeling awkward?
Most people see the major “awkward stage” around 1 to 3 inches, and it tends to improve in a few months once the top can form a repeatable silhouette. Base your expectations on months, not week-to-week changes, especially with tighter textures where shrinkage hides progress.