
Growing your hair into a mullet takes roughly 6 to 18 months depending on where you're starting from, and the single most important thing you can do is resist the urge to let all your hair grow at the same pace. A mullet is built on contrast: shorter in the front and sides, longer in the back.
How to Grow Your Hair Into a Mullet: Timeline and Cuts

Marcus Vickers
28 May 2026

That means you'll be strategically trimming some sections while protecting others, managing an awkward middle phase, and learning to style hair that doesn't quite look like anything yet. This guide walks you through every step, from deciding on your exact mullet shape to the moment you sit in the chair and ask for the final cut.
Yes, you can grow a mullet, but it takes patience and consistency with trimming the front and sides while protecting the back can anyone grow a mullet.
Plan your mullet before a single hair grows
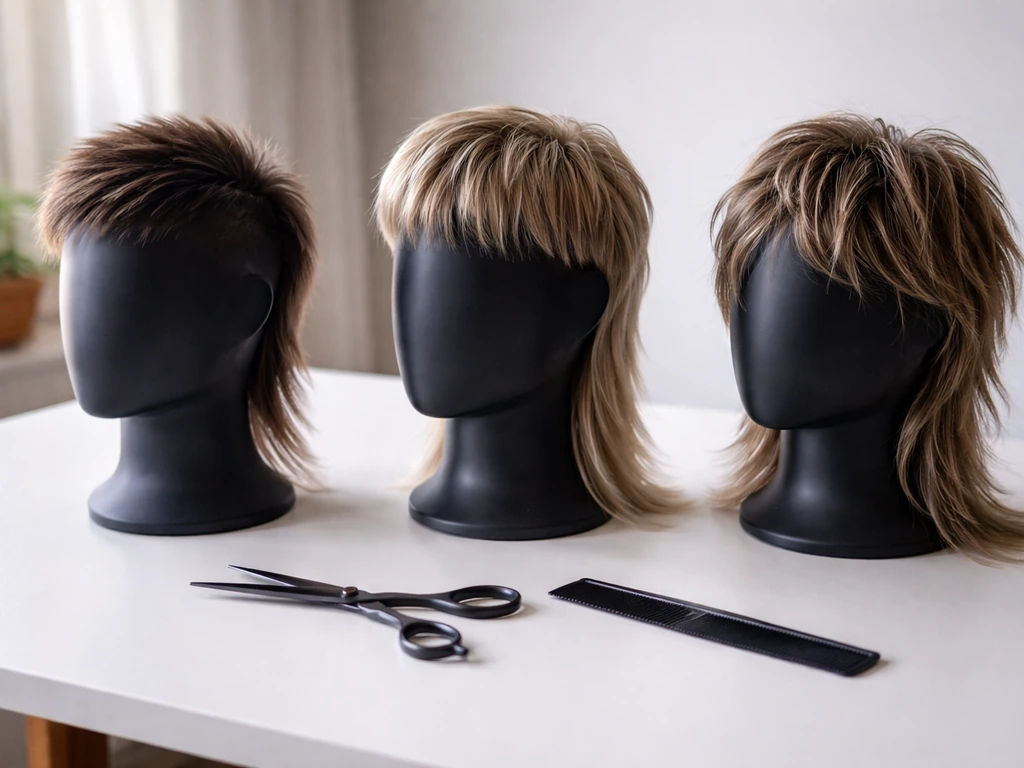
Before you do anything else, decide what kind of mullet you're actually aiming for. This matters more than most people realize, because the target shape determines which parts of your head need length protection and which parts need regular trimming throughout the grow-out. The classic definition is simple: shorter on top, shorter on the sides, longer at the back. Wikipedia defines a “mullet” as blank" rel="noopener noreferrer">shorter hair in the front/top/sides and longer hair at the back. But that's a spectrum, not a single look.
Here are the main mullet shapes worth knowing about so you can pick a target:
- Modern mullet: short-to-medium top and sides (often with a fade or taper), textured layers on top, deliberate length at the back. This is the most requested version right now.
- Shaggy mullet: softer transitions, longer layers throughout, and a back section that's typically 2 to 4 inches longer than the front and sides. Great for fine or wavy hair.
- Taper mullet: same front-to-back contrast as a classic mullet but with a gradual taper around the ears and nape instead of a harsh fade. More subtle and low-maintenance.
- Curly mullet: works with your natural curl pattern. The shorter front and sides frame the face while the back is left to grow out with volume and texture.
Once you have a general shape in mind, set your length targets. A useful starting framework: decide how long you want the back to be at its longest point (many people aim for collar-grazing or mid-neck, roughly 3 to 5 inches), then work backwards to set your front and side lengths. In a shaggy or modern mullet, the back is usually 2 to 4 inches longer than the top. In a more dramatic classic mullet, that gap can be even bigger. Write those numbers down. They become your roadmap.
How to cut your hair to support mullet growth (not fight it)
This is where a lot of people go wrong. They think growing a mullet means not cutting anything. What it actually means is cutting the right things while protecting others. Here's the basic rule: trim the front and sides on a regular schedule, protect the back completely (or trim it only minimally to remove split ends).
If you're starting from a short cut like a buzz, a crop, or even a pixie, give the back a full 8 to 12 weeks of zero cutting before you assess. Once you can see that the back is clearly outpacing the front (which it will, because you're trimming the front), you're on track.
Here's how to approach cuts during the grow-out:
- Every 4 to 6 weeks: visit your barber or stylist to trim the front fringe and the sides only. Keep the sides at your target length or just above it.
- Every 8 to 12 weeks: allow only a light dusting of the back (half an inch maximum) to remove splits and keep it healthy. Never let anyone take significant length off the back.
- At any point: if the sides are getting heavy and unruly, ask for a taper or a light fade to keep them clean without touching the back.
- Avoid: any cut that 'balances' the front and back to the same length. That undoes weeks of progress.
If you're starting from a longer style, say a bob or a shag, you may already have usable back length. In that case, your job is to start trimming the front and sides more aggressively at each appointment while leaving the back completely alone. You can sometimes skip ahead 2 to 3 months of grow-out time this way.
The growth timeline, phase by phase
Hair grows roughly half an inch per month on average, though this varies with genetics, health, and hair texture. Here's what to expect at each stage if you're starting from a short cut like a buzz or a close crop:
| Phase | Approximate time | What's happening | What it looks like |
|---|---|---|---|
| Starting point | Month 0 | All sections are short and roughly even | Clean short cut |
| Early growth | Months 1–2 | Back starts getting shaggy, sides get fluffy, front may be sticking up | Messy all-over growth; nothing intentional yet |
| Awkward phase | Months 3–5 | Back shows real length, sides are unruly, front is in-between | This is the hardest phase; it looks unfinished |
| Proto-mullet | Months 6–8 | Back is clearly longer, front and sides are trimmed and controlled | People will start to see the shape forming |
| Defined mullet | Months 9–12 | Enough contrast exists to actually cut and define the mullet properly | You're ready for the final shaping cut |
| Full mullet | Months 12–18 | Back is at or near your target length with front/sides maintained | The finished look you planned for |
If you're starting from a longer cut, you can often reach the 'defined mullet' phase in 3 to 5 months rather than 9 to 12, because you're working with existing back length. The awkward phase is unavoidable for most people, but it's much shorter when there's already some length to work with.
How to style each phase so it looks intentional
The awkward phase is real, but it doesn't have to look accidental. The goal at each stage is to make the length contrast look deliberate, not like you forgot to get a haircut.
Months 1–2: Keep everything under control

At this stage, use a light pomade or matte paste on the top to push hair forward or to the side. This makes the front look styled rather than overgrown. The back is still very short, so there's nothing to do there yet. Keep the sides clean with a taper if they're getting frizzy or puffy.
Months 3–5: Manage the awkward sides
The sides are usually the most annoying part of this phase. They're long enough to look unkempt but not long enough to lie flat. A few options: ask for a light taper to neaten them up without removing length that would disrupt the mullet silhouette later, use a small amount of gel or clay to push them back behind the ears, or wear a headband if your style permits. For the front, lean into texture. A sea salt spray or texturizing cream can make messy front growth look deliberately tousled rather than overgrown.
Months 6–8: Style the back deliberately
By now the back should be noticeably longer than the front. This is when you can start using lightweight curl creams (for curly or wavy hair) or a blow dryer with a diffuser to encourage the back to fall the way you want it. For straight hair, a round brush blown downward on the back section gives it a cleaner hang. This phase is also when you'll notice whether the back is growing in layers or as a single blunt wall of hair. If it's blunt and heavy, ask for minimal feathering or soft layers at your next trim to let it move naturally.
Months 9 and beyond: Product and styling for the actual mullet
At this stage you have enough to work with. For a shaggy or modern mullet, a texturizing spray or mousse on the back adds movement and keeps it from looking flat. For a cleaner, more structured mullet, a medium-hold pomade on the top and a light oil or serum on the back keeps the two sections looking intentional and distinct. Curly mullets thrive with a leave-in conditioner on the back and a tiny bit of hold gel to define the front, letting the back do its natural thing.
Keeping a clean mullet: blending, undercuts, and layers
A mullet that isn't maintained will start to look like any other overgrown haircut. The key maintenance tasks are blending the transition zone, managing the sides, and refreshing the layers in the back.
The transition zone is the area just above and around the ears where the shorter sides meet the longer back. This is the most technically important part of a mullet. A hard line looks dated and harsh. A soft taper or a blended fade looks intentional and modern. Talk to your stylist specifically about where you want this line to sit. Some people want it high (for a more dramatic contrast), others want it low (for a subtler look). Neither is wrong, it just depends on your target style.
For undercut options: an undercut on the sides (where the hair under the top layer is clipped very short) creates a dramatic visual separation and works well for a modern or dramatic mullet. A taper undercut is a softer version that blends gradually instead of cutting sharply. If you're going for the taper mullet look specifically, tell your barber you want a gradual taper around the ears and nape, not a disconnected fade.
Layers in the back are essential for anything except a blunt-cut mullet. Without layers, the back can become a heavy, shapeless curtain. Ask for point-cutting (where the scissor cuts into the hair at an angle) rather than straight-across cuts. This adds texture and movement without dramatically reducing length. For a shaggy mullet, soft long layers that start around ear level and cascade down to the longest point are the classic approach.
Common setbacks and how to handle them
Growing a mullet is a long game and things will go sideways at some point. Here are the most common problems and what to actually do about them.
Uneven growth
One side of your head growing faster than the other is surprisingly common and almost always temporary. The fix is patience, not scissors. If the unevenness bothers you, a taper on the faster-growing side can visually balance things without losing length. Don't let anyone even up both sides by trimming them to match, because you'll just be cutting progress off the slower side.
Cowlicks
Cowlicks are most disruptive in the crown area and along the nape. At the crown, they can cause the top section to stick up or separate awkwardly during the grow-out. A medium-hold paste applied to damp hair and blow-dried in the direction you want can train cowlick-prone hair over time. At the nape, cowlicks can cause the back to curl outward or up rather than hanging down cleanly. A nape cowlick that's really severe may mean you need to grow the back longer than average before it has enough weight to hang straight.
Breakage
If the back section is breaking before it reaches your target length, the culprit is almost always dryness or mechanical damage (friction from collars, rubbing against headrests, sleeping on rough pillowcases). Switch to a satin or silk pillowcase, apply a leave-in conditioner to the back section daily, and deep condition weekly. Trim only the damaged ends and no more. Breakage is not a reason to cut the back short again.
Texture changes during grow-out
Some people find their hair gets wavier or curlier as it gets longer, especially in the back. This is normal and actually works in your favor for a shaggy or curly mullet. If the texture change is making the back frizzy or puffy rather than wavy, a light smoothing serum or curl cream on damp hair before air drying usually tames it without fighting the natural pattern.
The 'is this a mullet yet?' crisis
At some point around months 4 to 6, most people have a moment of 'this just looks bad and I want to cut it all off.' This is the awkward phase doing its thing. That grow-out timing is the main reason an MTF should plan how to grow out hair and stick with the awkward phase. It's normal and it passes. Take a photo from multiple angles, compare it to your month 1 photo, and you'll usually see real progress even when it doesn't feel that way. Hold the line on back length. The front-to-back contrast is close, even if it doesn't feel visible yet.
When to commit: getting your first real mullet cut
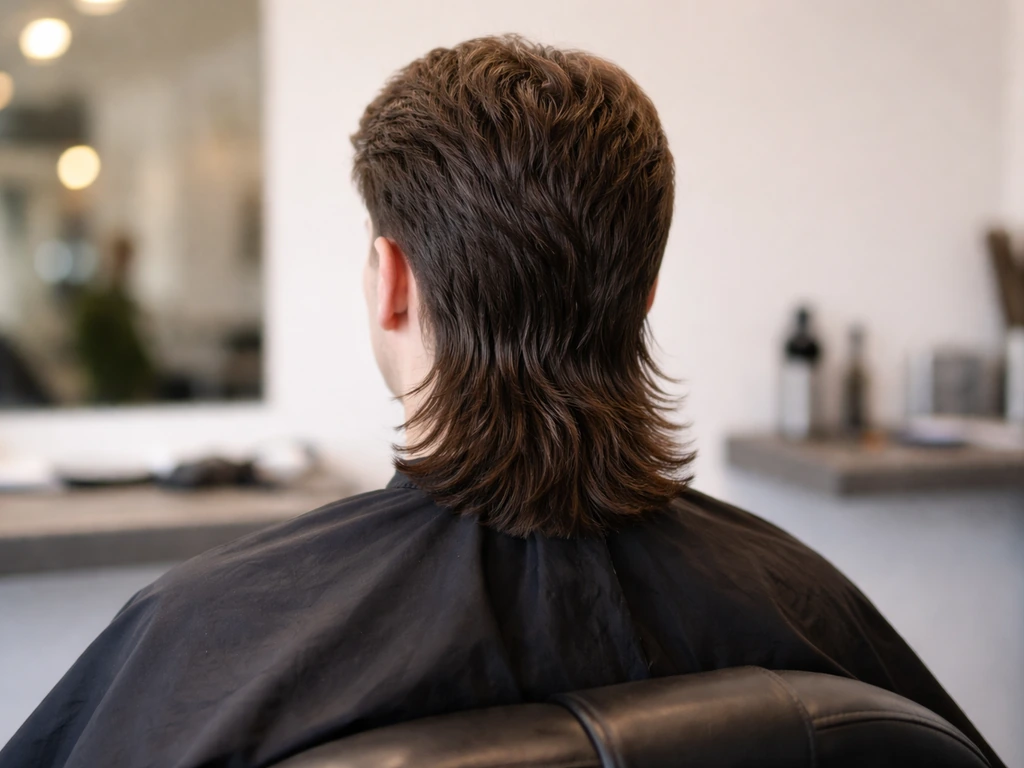
You're ready for the final mullet-shaping cut when the back is at least 2 inches longer than your front section, the sides have been maintained at or near your target length, and you have enough back length to actually cut shape into it without losing all your progress. For most people this happens between months 8 and 12 from a short starting point, or as early as months 3 to 5 from a longer starting cut.
When you sit down with your stylist, here's exactly what to tell them:
- Tell them the specific length you want to keep at the back's longest point (use inches, not vague words like 'a little longer').
- Tell them the exact shape of the transition zone you want: hard disconnect, soft taper, or blended fade. Bring a reference photo.
- Tell them you want layers in the back for movement, not a blunt cut, unless you specifically want the blunt mullet look.
- Tell them how short you want the front and sides, and whether you want a fade, taper, or scissor finish on the sides.
- Tell them what you don't want: do not take length off the back, do not balance the front and back to match, do not thin the back with a razor (which can cause frizz and breakage).
- Ask them to show you the back with a hand mirror before they finish so you can approve the length before you leave the chair.
Once you have the shape, you're maintaining rather than growing. From this point, keep the back trim-free for as long as you want to add length, and schedule the front and sides every 4 to 6 weeks. The mullet is a style that rewards patience during grow-out and consistency in maintenance. The awkward months are genuinely worth it when the contrast clicks into place.
It's worth noting that not everyone ends up wanting to keep a mullet once they reach this stage. Some people use the grow-out process as a bridge to longer overall hair and work on avoiding a mullet silhouette entirely rather than leaning into it. If you’re wondering how to grow out hair without mullet, this is the same phase where you can protect the front while letting the back soften into a more blended look avoiding a mullet silhouette.
Others find the mullet shape suits them so well they stick with it long-term. Either path is a valid use of the time you've put into the grow-out. The goal is always hair you actually like, at a length that feels like yours.
FAQ
What should I do if I miss a trim during the mullet grow-out?
If you miss a trimming appointment, your front and sides will catch up to the back and the contrast will soften. Don’t try to “catch up” by chopping the back. Instead, go back on schedule, and ask your stylist to do a shaping pass that restores the blend in the transition zone while keeping the back protected. If it’s been more than 8 weeks, it may help to shorten the front and sides slightly more than usual for one cycle to regain the silhouette, then return to your normal 4 to 6 week rhythm.
Can I color or chemically treat my hair while growing a mullet?
Color and chemical services (bleach, highlights, relaxing, frequent heat) can increase dryness and breakage, which is especially risky for the back where you’re trying to keep length. If you plan color during the grow-out, choose a technique that minimizes repeated processing on the back section, use a leave-in plus heat protection, and schedule deep conditioning weekly. If you notice snap or split ends, trim only the damaged ends and pause further chemical work until the hair feels resilient.
Will a mullet work for my hair type (fine, thick, curly, straight), and what changes should I ask for?
A mullet can work with thick, thin, curly, or straight hair, but your cutting strategy should change. For fine hair, ask for subtle layers in the back so it doesn’t look flat or heavy, and rely on volumizing mousse rather than heavy oils. For very coarse or thick hair, request more texture (point-cutting or controlled thinning) so the sides and back don’t bulk up, then style with lighter hold to avoid crunchy separation.
My back looks flat or stringy, how do I fix it without starting over?
If the back keeps looking “stringy” or flat instead of longer and textured, the issue is usually insufficient layers or not enough weight distribution during styling. Ask for soft long layers that start around ear level, then blow-dry or diffuse the back downward to create a clean hang before it sets. For wavy or curly hair, use a leave-in and let the back air dry undisturbed, then scrunch once once it’s mostly dry to revive shape.
How often should I maintain my mullet after the final cut, and can I stretch appointments?
After your final shaping cut, you can extend time between haircuts if you focus on maintenance between visits. Keep the sides neat with light styling (paste or gel) and manage flyaways with a tiny amount of product, then touch up the transition zone with a quick damp refresh and re-blow-dry. Only trim the front and sides every 4 to 6 weeks, but you can usually keep the back trim-free longer if it stays healthy and split ends are controlled.
How do I know if I’m on track for the defined mullet stage?
The awkward phase timing is influenced by how short your starting point is and how fast your hair actually grows. Instead of relying only on months, use the “contrast readiness” checklist: the back should be at least 2 inches longer than the front when you want the defined result, and the sides should be close to your target length so the transition zone can be shaped. If you’re behind, don’t cut the back shorter to make the look appear sooner. Keep protecting length and refine contrast on the front and sides only.
One side grows faster. How can I make it look balanced without losing progress?
If you’re tempted to even out asymmetry by trimming both sides equally, don’t. That usually removes progress from the slower side and makes the difference recur. A better approach is to protect the back and keep the scheduled front and side trims, then ask for a targeted visual balance on the faster side (for example, a slight taper adjustment around the ears) while you wait for the slower side to catch up.
What are the best options if my nape cowlick makes the back curl outward?
For strong nape cowlicks that stick out, weight is your friend. Grow the back longer than your original target before attempting hard shaping, then style with a heavier leave-in or light cream on the back and ensure the nape is directed downward while it dries. If it still won’t cooperate, ask your stylist about nape-specific soft layers or feathering that lets the hair move without requiring you to cut the entire back short again.
How do I avoid a harsh line between the sides and the back?
A hard, straight line where the sides meet the back usually means you need a softer transition. Tell your stylist you want the transition line to be blended (soft taper or gradual fade style) and specify where it should sit (high for dramatic contrast, low for subtle). Bring a reference photo of the exact silhouette you want, and ask for point-cutting or texture in the transition area so it doesn’t create a blunt wall.
If I change my mind, what’s the easiest way to stop growing a mullet and transition to another style?
Yes, you can stop at any time, but the safest “exit” depends on where you are in the grow-out. If you’re early and the back is just starting to outpace, ask for a more blended long shag or a layered cut that removes the mullet contrast while keeping length. If you’re mid-grow-out and the back is significantly longer, transition into a blended layered cut by softening the transition zone first, then refine the shape at the next visit. The key is changing the haircut goal, not hacking off the back you already protected.