Growing out layers on curly hair takes roughly 6 to 18 months depending on your starting point, and the awkward middle stretch is real. But you can get through it without looking like you lost a fight with a pair of scissors. The key is stopping any cuts that add more unevenness, building a protective wash routine, and using a handful of styling tricks to blend visible layer lines until shorter pieces catch up to the length below them.
How to Grow Out Layers in Curly Hair: Step by Step

Marcus Vickers
14 May 2026

What 'growing out layers' actually looks like on curly hair
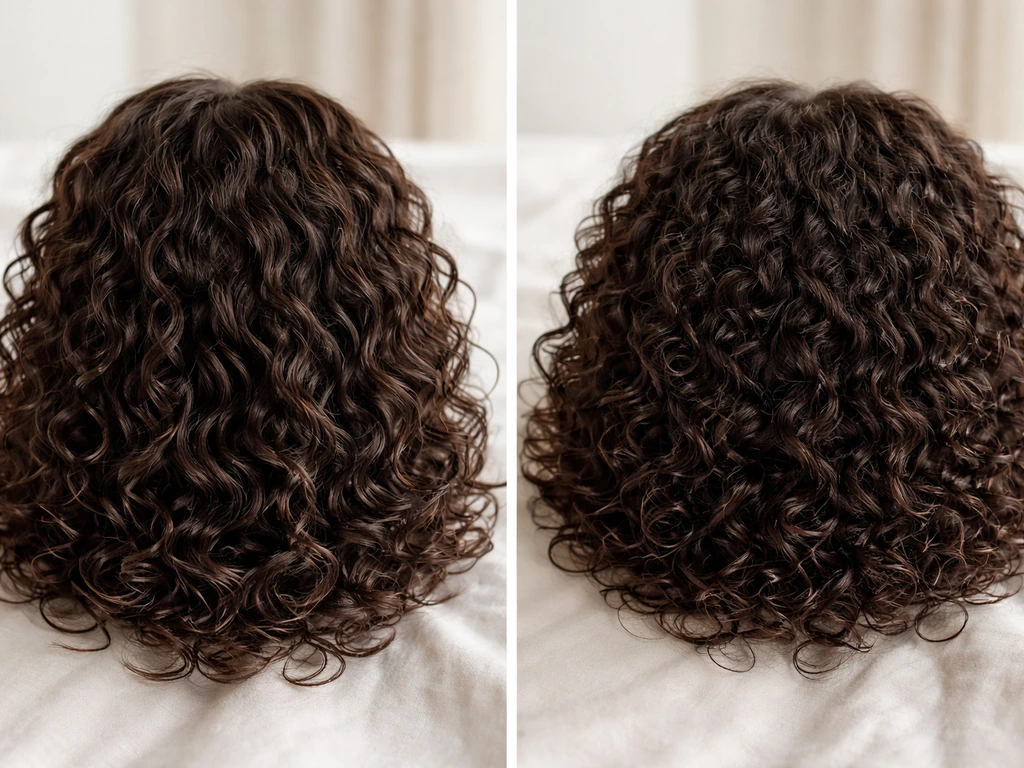
On straight hair, layers are obvious in a mirror. On curly hair, shrinkage makes the whole thing messier and harder to read. Shrinkage is the difference between a strand's stretched length and how long it actually sits when it forms a curl. Tighter curl patterns shrink more, so the same actual length of hair can look an inch shorter in one section than another. This means your 'layer lines' often look more dramatic than they really are, and it also means some sections of your hair appear stubbornly short even when they've grown quite a bit.
The crown is a classic problem area. Curl-pattern variations across the scalp mean crown hair often shrinks more, making it appear shorter even when it's actually keeping pace with the rest. On top of that, the crown tends to have tighter, drier curls that clump differently from the hair at your nape or sides. The result is that as layers start growing out, the top looks poofy and full while the bottom looks longer and flatter, or vice versa. It's not uniform, and that unevenness is what makes the grow-out phase feel so awkward.
If you had choppy, face-framing, or crown layers cut in, those shorter pieces are currently sitting on top of or around your longer hair and not blending well. If you grew out an undercut, you're dealing with sections at the nape or sides that are genuinely much shorter than the rest of your hair and need more time. Both scenarios call for the same general approach: protect what you have, stop adding new unevenness, and style to bridge the gap.
Your plan for today: reduce unevenness, frizz, and breakage
Before anything else, stop doing things that create new unevenness. That means no more layers cut in 'just to clean it up,' no aggressive brushing on dry hair, and no heat styling without a protective barrier. Breakage is one of the biggest reasons curly grow-outs stall, because snapping off even a few millimeters from the shorter pieces just resets the clock.
Start with a moisture audit. Frizz and poof during a grow-out are almost always amplified by dryness. When the hair shaft is dry, the cuticle lifts, individual strands stop clumping together into a defined curl, and every layer line becomes more visible. A lightweight leave-in conditioner applied to soaking wet hair after every wash is the single fastest fix. If you also deal with flyaways, the same moisture, gentle detangling, and lightweight leave-in steps help them settle so the grow-out looks smoother how to grow out flyaways. Look for something formulated for curls that detangles at the same time, because working a leave-in through tangled hair creates extra friction and breakage.
Switch to sleeping on a satin or silk surface tonight if you haven't already. A satin bonnet or silk pillowcase reduces friction, keeps the cuticle flat, and prevents the overnight frizz that makes layer lines look worse in the morning. The difference shows up fast, usually within a few days.
- Stop trimming or layering until you have a deliberate maintenance plan (see the section below)
- Apply a leave-in conditioner to soaking wet hair after every wash
- Detangle only when hair is saturated with conditioner or leave-in, never dry
- Sleep with a satin bonnet or on a silk pillowcase to cut friction and frizz
- Avoid heat styling where possible; if you use heat, always use a heat protectant
- Skip sulfate shampoos that strip moisture and increase frizz between washes
Cut and maintenance strategy: dusting, trims, and when to stop changing it
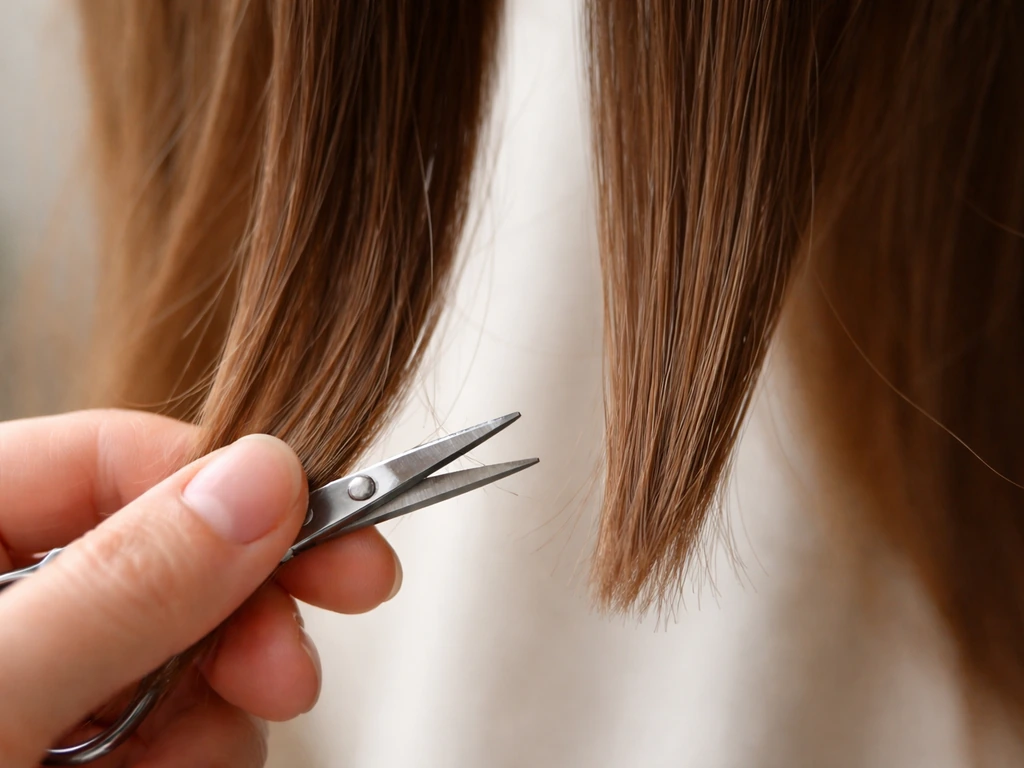
The most counterintuitive grow-out advice is also the most important: you probably need to stop cutting, not start. If you want to grow out layers into one length without cutting, focus on dusting only split ends and using protective, blending styles during the awkward phase. Many people keep getting 'small trims' that remove the very length they're trying to build. If your goal is to get shorter layers to catch up to longer ones, cutting the longer pieces back down to meet them is just choosing a shorter starting point. That's fine if you genuinely want to, but be honest with yourself that you're resetting rather than growing out.
What you should do instead is dust. Dusting means removing only the very tips of split or frayed ends, typically a quarter inch or less, without taking any real length. This keeps the ends healthy so they don't break further up the shaft, which would actually shorten your hair over time. A trim every 8 to 12 weeks to stabilize the bottom edge makes sense once your layers are mostly blended and you just want to keep the shape tidy. During early grow-out, stretch that to every 10 to 12 weeks and ask your stylist explicitly for a dusting only.
The one exception is bangs. Face-framing pieces and curtain bangs that have grown past your eyes but not yet reached your chin are genuinely hard to style through, and a very small trim to an intentional length can make the whole thing look more deliberate while you wait for them to blend. If you're growing out a full fringe, you can usually pin or clip it to the side rather than cut it, which buys you weeks of grow-out time.
If you're working with a stylist, find one who specializes in curly or textured hair before every appointment. Stylists who don't understand curl patterns often cut more than expected when the hair is stretched or wet, and you end up shorter than planned every single visit. A curly-specialist cuts dry and understands how shrinkage changes the final result.
Wash day and detangling routine to keep curls growing evenly
Your wash routine during a grow-out has one job: keep every section of hair moisturized and intact. Uneven moisture leads to uneven shrinkage, which makes layer lines look more dramatic. Breakage in any section effectively re-layers your hair from the inside out, which is exactly what you're trying to avoid.
Use a sulfate-free cleanser. Sulfates strip the natural oils that help curls clump and stay defined, and they're especially harsh on textured hair that's already dealing with uneven dryness across sections. Sulfate-free formulas clean the scalp without leaving hair parched and frizzy before you've even started styling.
Detangle in the shower with conditioner in your hair, not after. Work a wide-tooth comb through each section while it's saturated and slippery. Start at the ends, work up toward the roots in sections, and never rip through a knot from root to tip. Tangles can make hair appear shorter than it is because they bunch and compress strands, so thorough detangling also gives you a more accurate picture of how much growth you actually have.
After rinsing, apply your leave-in while hair is still dripping wet. The water acts as a carrier, helping the product distribute evenly from roots to ends. Then apply your gel or cream on top with a raking motion, working section by section from underneath so every curl gets coated. Ouidad's rake-and-shake technique, where you rake product through with spread fingers and then shake the section gently from underneath, is genuinely useful here because it encourages individual curls to form defined clumps rather than frizzy blobs at the layer transition zones.
Let hair dry without touching it as much as possible. Once it's fully dry, you can 'break the gel cast' by gently scrunching the hair upward with your palms to soften any crunch, which gives you flexible, defined curls rather than stiff ones. This step matters during grow-out because it helps shorter layers blend visually into the length instead of sticking up separately.
- Wet hair thoroughly before applying any product
- Shampoo scalp only with a sulfate-free cleanser, let the rinse clean the lengths
- Apply conditioner from mid-shaft to ends, then work a wide-tooth comb through while saturated
- Rinse conditioner, then immediately apply leave-in to soaking wet hair
- Apply gel or cream with a rake-and-shake method, section by section
- Scrunch upward with a microfiber towel or old t-shirt, never rub
- Diffuse or air dry without touching, then scrunch to break the cast when fully dry
Styling tricks to hide and bridge layer lines during the awkward phase

The goal during a grow-out is to make everything look intentional. That means using styles that blur the line between lengths rather than exposing it. The good news for curly hair specifically is that volume and texture actually help you here. You're not trying to fake sleekness, you're trying to direct the eye away from the transition zone.
Day-to-day styling
A diffused wash-and-go with a strong hold gel is one of the most effective grow-out styles because defined curl clumps naturally blend different lengths together. When each section is clumped and defined, the eye reads 'curly hair' rather than 'uneven layers.' Undefined, frizzy sections are where the layer lines become obvious, so moisture and hold are your friends.
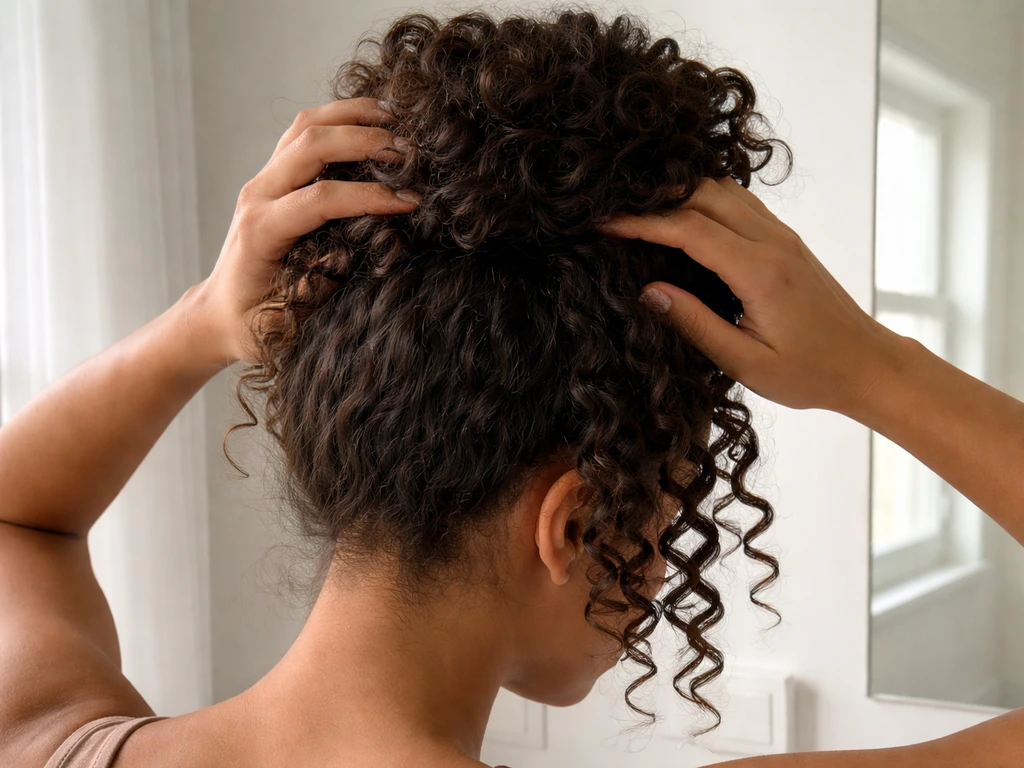
Clip the roots at the crown while diffusing or while hair dries. Placing a clip at the base of a section near the crown lifts the root, adds volume at the top, and prevents the shorter crown pieces from flopping forward and exposing the length difference between them and the rest of your hair. Remove clips once hair is fully dry.
Protective and transitional styles
Twist-outs and braid-outs are excellent for the grow-out phase because they create a uniform wave or curl pattern across all lengths, which visually merges sections that are at different stages. Doing a twist-out on freshly washed, product-applied hair gives you 2 to 3 days of blended, intentional texture that hides layer lines completely.
Updos are your best tool when you're frustrated. A pineapple (a loose, high bun or ponytail at the very top of your head) keeps layers tucked in while looking casual and works especially well for medium-length and longer grow-outs. Half-up styles pull the crown area up and out of view, which is especially useful if your crown layers are the shortest and most visible. Headbands and wide clips placed at the crown blend shorter pieces into the rest of the hair or simply keep them out of the picture entirely.
Braids, whether two-strand, three-strand, or box braids if your hair is long enough, are a great multi-week option because they protect the ends, reduce manipulation, and let every section grow without the daily mechanical stress of styling. If you're in an undercut grow-out and the nape or side sections are still very short, a braid or low ponytail on the longer hair keeps attention away from the shorter sections while they catch up.
Timelines by starting length and what to expect
Hair grows roughly half an inch per month on average, which works out to about 4 to 6 inches per year. That's the number to work from when you're planning. Actual rate varies by person, health, genetics, and scalp condition, but it's a realistic baseline. Use the table below to estimate your rough timeline from common starting points.
| Starting point | Goal length | Estimated time | What the awkward phase looks like |
|---|---|---|---|
| Pixie cut with layers | Chin/collarbone length | 12–18 months | Crown sticks up, sides fall flat; ear-length phase is the hardest stretch |
| Bob with layers | Collarbone/shoulder length | 6–12 months | Top layers poof, bottom looks stringy; layer lines most visible at cheek level |
| Bangs/fringe growing out | Blend with layers | 4–8 months | Pieces fall in eyes, then cheek, then need to be pinned or clipped until they hit the jaw |
| Face-framing layers | One length | 6–12 months | Short pieces frame the face but don't reach the length below; looks choppy on wash day |
| Undercut grow-out (nape/sides) | Blend with top length | 6–14 months | Short sections at nape/sides are visible when hair is down; most obvious when hair is damp |
| Crown-only layers | Even throughout | 4–8 months | Crown looks poofy or shorter; takes about half the grow-out time of a full-layer cut |
The hardest phase for most people is the 3-to-6-month stretch regardless of starting point. That's when shorter pieces have grown enough to be annoying but not enough to blend. This is usually when people cut it all off and start over. If you can push past that stage with protective styles and a solid routine, the 6-to-9-month range usually feels dramatically better because lengths start to converge and styling gets easier.
Special cases: colored or chemically treated hair
If you're growing out layers and you also have color, bleach, relaxer, or a keratin treatment in your hair, you're dealing with two separate sources of damage and unevenness at the same time. That requires more attention, not less, because fragile, chemically treated strands break more easily, which defeats your grow-out progress.
Bleach breaks the disulfide bonds inside the hair shaft, the internal protein links responsible for strength and elasticity. Once those are broken, the hair is structurally weaker and dries out faster. This is why bleached curly hair often loses its definition during a grow-out: the treated sections don't hold moisture or curl pattern the same way the new growth does. The visual result is a texture line on top of the layer line, making the transition look even messier.
Bond-building treatments (like OLAPLEX No.2 or similar products) are designed to relink broken bonds inside the hair shaft and improve resilience over time. These aren't just deep conditioners. They work internally rather than just coating the outside of the strand. Using a bond-building treatment as part of your monthly routine during a grow-out with chemical overlap genuinely helps the treated sections hold up better, retain more moisture, and behave more predictably during styling.
Leave-in balms and rich leave-in treatments applied after every wash are especially important if you have any bleached or treated sections. Bleached hair is particularly vulnerable to heat damage, so diffusing on a low heat setting (or air drying when you can) protects the weakest sections. Avoid any new chemical services while you're in an active grow-out phase unless you have a very specific reason, because each service is another opportunity for breakage at the treatment-to-new-growth line.
- Use a bond-building treatment monthly to repair and strengthen chemically treated sections
- Apply a rich leave-in or balm to bleached or treated lengths after every wash
- Diffuse on low heat only; bleached hair is much more vulnerable to heat damage
- Hold off on new color or chemical services until your grow-out is further along
- Trim split ends at the treated sections more frequently (every 8 weeks) to prevent breakage traveling up the shaft
- Keep a close eye on the texture line between new growth and treated hair; that's your highest-risk breakage zone
Troubleshooting and when to see a curly specialist
Even with a solid routine, things come up. Here's how to read the common problems and what to actually do about them.
| Problem | Likely cause | Fix |
|---|---|---|
| Frizz at the crown that won't settle | Crown layers are too short to clump; dryness lifting cuticle | Apply gel directly to crown on wet hair; use a root clip while drying; increase leave-in frequency |
| Flat roots, no volume | Over-moisturizing at the root; skipping diffusing | Apply products mid-shaft to ends only; lift roots with clips while diffusing |
| Uneven clumps across sections | Inconsistent product distribution; shrinkage differences between sections | Section hair into 4 to 6 parts before applying product; rake through each fully before moving on |
| Visible layer line at cheek/jaw | Face-framing layers at a mid-grow-out length | Use a headband, clip, or half-up style to pull those pieces back; or do a twist-out to visually blend |
| Breakage at one section only | Mechanical stress, sleeping friction, or chemical overlap | Identify the cause; add a bonnet at night; check that you're not detangling that section dry |
| Hair not growing evenly across sections | Fragile edges or temples with slower/thinner growth | Reduce manipulation at those sections; avoid tight styles that pull; treat edges very gently |
You should see a curly-specialist stylist in a few specific situations: if you've been growing for 6 or more months and still can't get any definition or blending, if you're experiencing significant breakage that isn't improving with your routine, or if you genuinely can't figure out what your curl pattern is doing because of how much the layers are interfering. A good curly specialist can do a dry assessment of where your layers actually are, which lengths are causing the most visual disruption, and whether a single targeted cut, like removing one especially short section that's outlived its usefulness as a layer, would speed things up rather than slow them down.
The broader topic of how layers grow out and whether they grow out evenly is worth understanding in general, because curly hair complicates both questions. The broader topic of how layers grow out and whether they grow out evenly is worth understanding in general, because curly hair complicates both questions how to grow out layers fast. If you’re wondering whether your new growth will blend evenly from the start, shrinkage and crown variation are usually the reasons it looks uneven for a while do layers grow out evenly. This helps answer whether your layers grow out evenly or if one area will always lag behind due to shrinkage how layers grow out. If you're wondering how to grow out layers on curly hair, understanding how shrinkage and uneven blending affect the process can help you stick with the right plan how layers grow out. Shrinkage and curl-pattern variation mean that even when the actual lengths are converging, the hair might not look uniform for a while longer. That's not failure, it's just how textured hair works. Stay consistent with your routine, protect the ends, and give the timeline room to breathe.
FAQ
Can I get a trim while I am growing out my curly layers, or will it undo the progress?
Yes, but only if the cut is truly maintenance, not redesign. If you need a stylist, ask specifically for “dusting” (removing only split or frayed tips, about a quarter inch or less) and request the assessment with hair in a dry state so shrinkage is accounted for. Avoid “refreshing layers” or adding new graduation, those typically recreate the same unevenness you are trying to eliminate.
My shortest layers still look short, how do I know if it is real growth lag or just styling/shrinkage?
You can, but treat it as a styling choice, not a cure. If a section looks shorter, first re-check moisture and detangling, because dryness and knots can mimic “not growing.” If the hair is consistently shorter even after you use leave-in on soaking wet hair and gentle detangling, that is when a curly specialist dry assessment becomes useful to decide whether targeted dusting is warranted.
How often should I clarify or use a stronger cleanser during layer grow-out?
Consider scaling back frequency and intensity of clarifying if your hair gets dry, buildup, or feels stiff. For most people in a grow-out, a sulfate-free routine keeps things clean enough between washes, and heavy product buildup can actually make layers look more uneven. If you clarify, do it sparingly (for example, occasionally rather than weekly), then follow immediately with a rich conditioner and your regular curl leave-in so the hair regains consistent clumping.
What is the best way to detangle so my layer lines do not get worse?
Dry detangling can make the problem look worse because it increases friction, stretches fragile curls unevenly, and can cause micro breakage that effectively shortens the hair. Detangle only while saturated with conditioner in the shower, work in small sections, start at the ends, and stop if the comb stalls, then add more slip rather than forcing through tangles.
My crown looks poofier than the rest during grow-out, what should I change first?
If your crown is puffing or lying funny, try root placement tools rather than changing hair length. Clip-lifting at the crown during drying helps prevent shorter crown pieces from flopping forward and exposing transitions. Also ensure you apply leave-in and styling product while the hair is dripping wet, since uneven moisture across the crown can create a different shrinkage pattern than the sides.
Can I use heat to blend the layers while they grow out?
If you are using heat tools, keep the goal strictly to protect and smooth, not to “straighten away” layer lines. Use a heat protectant and lower heat settings, and avoid repeated high-heat passes on the shortest, driest pieces since they break first. When possible, default to air-dry or diffusing on low heat because the blend improves when curls keep their clumps intact.
Which protective styles help most, and which ones can accidentally make the grow-out look worse?
Yes, but choose styles that reduce manipulation at the layer transition. Braids, twist-outs, and pineapples generally keep lengths more uniform, while constant combing, restyling throughout the day, or constantly pulling sections apart can separate clumps and make layer lines easier to spot. If you use updos, loosen them enough to avoid tension at the shorter crown or nape areas.
I have highlights or bleach, why do my layers look worse than other people’s grow-outs?
It is not just an aesthetic issue, it can be a timing issue. If color or bleach is involved, treat the treated sections as higher-risk and expect the texture to hold differently during grow-out. Add a bond-building step during your routine and prioritize leave-in moisture, then diffuse on low or air dry. If blending still fails after improving moisture and resilience, a stylist dry check can help decide whether targeted correction is needed later rather than repeatedly cutting now.
How do I decide when it is time to cut versus when to keep waiting?
It is usually too soon to “fix” with scissors if you are still inside the difficult middle stretch. If you have been growing for around 3 to 6 months, the shortest pieces are often long enough to be annoying but not long enough to blend, which can tempt frequent cutting. A better decision aid is to wait until either (1) the texture is consistently hydrated and clumped, or (2) you have reached the point where a simple dusting on a single outlived section would not reset the rest of the timeline.
I follow my routine but still have obvious layer lines, what technique detail should I adjust?
If you are seeing visible lines even when you are moisturizing, check your product application order and technique. Apply leave-in on soaking wet hair, then apply gel or cream using a raking motion so every curl at the transition zone gets coated. Let it dry without touching, then scrunch the gel cast once fully dry to keep clumps flexible, that blend step can reduce “sticking up” on shorter layers.