Growing out permanent hair dye takes patience, but it's very manageable if you know what to expect at each stage. Hair grows about half an inch per month, so a full transition from dyed to fully natural color can take anywhere from 6 months (short hair) to 2 or more years (long hair). The good news: you don't have to chop everything off or endure a harsh line of demarcation the whole time. With the right blending techniques, a smart care routine, and a few strategic trims, you can move through the grow-out looking intentional rather than just waiting. If you are aiming to grow out transitioning hair fast, focus on minimizing contrast early with strategic trims, blending tools, and a timeline you can stick to how to grow out transitioning hair fast. If you’re specifically working with scene hair, focus on blending the root line and using face-framing layers as the colored sections grow out how to grow out scene hair.
How to Grow Out Permanent Hair Dye: Step-by-Step

What the grow-out actually looks like (and how long each stage takes)
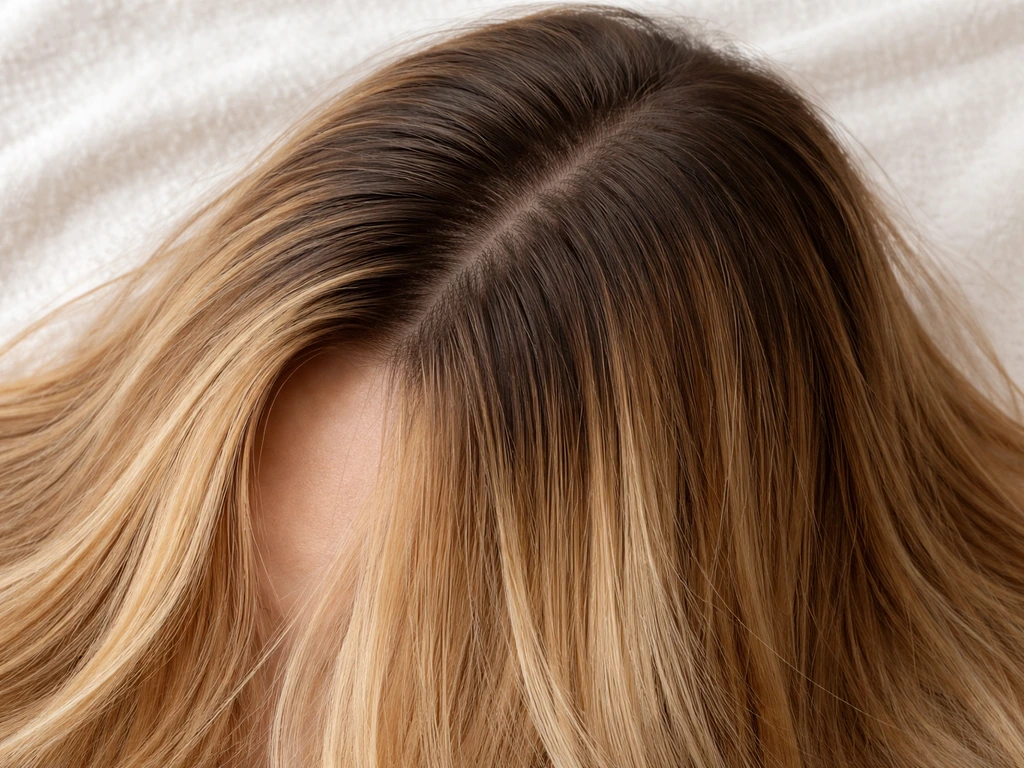
The first thing to understand is that permanent dye doesn't fade out the way semi-permanent does. Because oxidative dyes work by chemically altering the color molecules inside your hair shaft (using hydrogen peroxide and alkalizing agents like ammonia to open the cuticle and deposit color deep in the cortex), that color is locked in. Your natural color isn't coming back to those strands. Only the new hair growing from your scalp will show your real color. That's what makes this a true grow-out rather than a fade-out.
Here's roughly what you'll see at each stage, based on that half-inch-per-month growth rate:
| Time from last dye | What you'll see | How awkward is it? |
|---|---|---|
| 0–4 weeks | A thin strip of natural color at the roots, usually 0.25–0.5 inches | Low — easy to hide or ignore |
| 1–3 months | 0.5–1.5 inches of regrowth, visible line of demarcation forming | Moderate — the classic 'grown-out roots' look |
| 3–6 months | 1.5–3 inches of regrowth, a clear two-tone band across the hair | High — this is the hardest phase |
| 6–12 months | 3–6 inches of regrowth, transition zone becomes wider and more blendable | Getting easier with the right techniques |
| 12+ months | Majority of hair may be natural, depending on starting length | Low if managed well — finish line in sight |
The most uncomfortable window is usually months 3 through 6, when the line between your natural root and the dyed length is hard to miss. This is where most people give up and re-dye. Don't. That's exactly the phase where the blending strategies below make the biggest difference.
Assess your situation before you do anything
Before you decide on a strategy, you need to honestly look at three things: your current color level, how warm or cool the dye is compared to your natural hair, and how much damage has already happened.
Color level and contrast
Hair color is measured on a level scale from 1 (black) to 10 (lightest blonde). The bigger the gap between your dyed color and your natural color, the more visible the line of demarcation will be and the more work it will take to blend. If you dyed dark brown hair black (one or two levels apart), this grow-out will be relatively easy. If you lifted naturally dark hair to a light blonde (four or more levels), expect a stark contrast that needs professional attention to blend safely.
Warmth and tone
Warm dyes (reds, coppers, golden blondes) tend to fade and shift toward brassy or orange tones over time, especially with heat and UV exposure. If you want the specific plan for red, warm-toned dye as you grow it out, see how to grow out red dyed hair for stage-by-stage advice. Cool dyes (ash blondes, dark cool browns) can fade toward green or dull gray. If your dye has faded significantly already, the visible contrast at the root might be less dramatic than you expect. Take a photo in natural daylight before deciding how much intervention you need.
Damage assessment
Permanent dye, by its chemistry, does cause some structural change to the hair shaft. Permanent dye can also cause temporary ultrastructural changes in hair; one single-case study using electron microscopy reported sequential alterations after permanent hair dye, with the cuticle described as near complete restoration by about 8 weeks ultrastructural changes after permanent hair dye. Hydrogen peroxide increases surface damage and can reduce the stiffness and strength of your strands. Run your fingers down a dry section of hair: if it feels rough, tangles easily, or snaps instead of stretching, your hair is damaged and that affects every decision going forward. Damaged hair needs a gentler approach to blending and coloring, because adding more chemicals (bleach especially) could push it to breakage.
Day-to-day care while your hair grows out
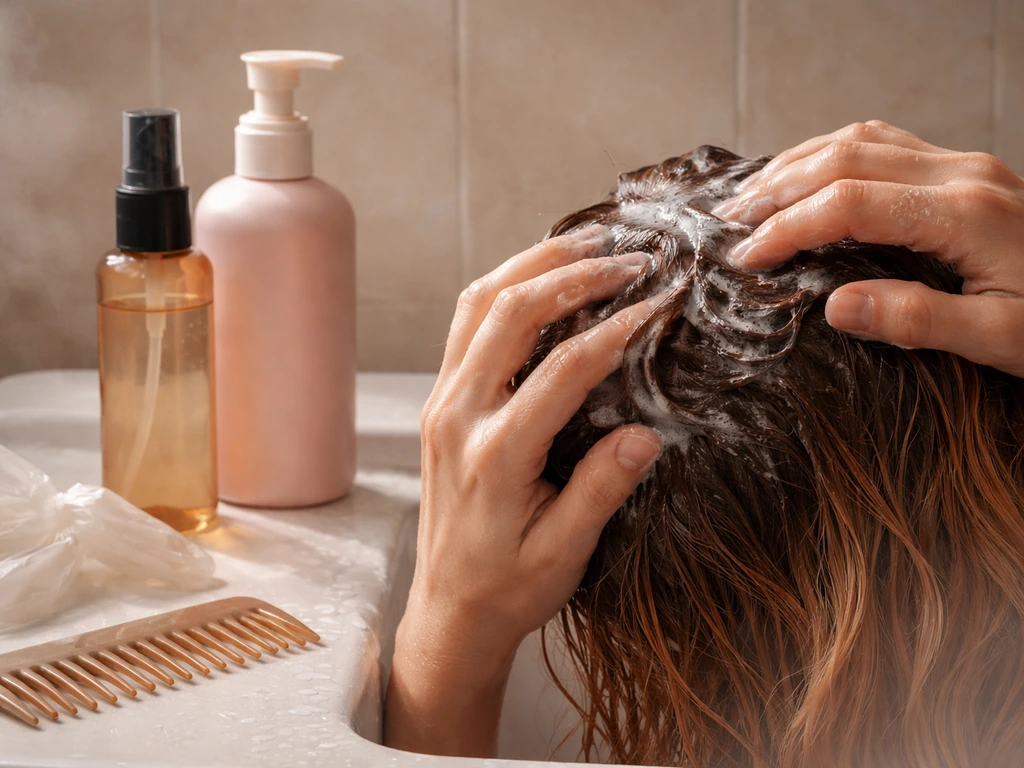
The longer your hair has to grow, the more important it is to keep what you already have in good condition. Wella’s Color Fresh Mask is positioned as an at-home, color-depositing maintenance mask for keeping or transforming color, and it’s formulated without animal-derived ingredients at-home color-depositing maintenance for keeping or transforming color between salon visits. Damaged, dry, or broken hair doesn't just look worse during a grow-out, it actually slows your perceived progress because you keep losing length to breakage. Here's what actually matters:
- Wash with sulfate-free, color-safe shampoo. Sulfates strip color faster and dry out already-processed strands. Washing 2–3 times a week (rather than daily) makes a real difference in both color retention and moisture levels.
- Use a hydrating conditioner every wash, and a deep conditioning mask once a week. Your dyed ends need more moisture than your new growth — the chemistry of permanent dye does open and alter the cuticle, and that means ongoing moisture loss.
- Turn down the heat. Hot tools lift the cuticle layer, which makes color wane faster and increases breakage risk. If you can't skip heat altogether, use a heat protectant every single time and keep styling tools below 380°F.
- Protect from UV. Sun exposure oxidizes color and causes both brassiness and dullness. A UV-protective hair serum or a simple hat on sunny days is worth it, especially for blondes and reds.
- Avoid any additional chemical services on already-damaged lengths unless a professional has assessed the hair. Overlapping dye, bleach, or relaxer on compromised hair is the fastest route to breakage.
- Trim regularly — every 8 to 10 weeks. Small trims (half an inch to an inch) remove the most damaged, split ends without sacrificing meaningful length progress. This keeps hair looking healthy and actually helps the grow-out look more intentional.
Blending the root line as it grows in
A hard line between your natural root and your dyed length is the main visual challenge of growing out permanent color. There are several ways to soften it that don't require re-dyeing the whole head, and they work at different stages of the grow-out.
Strategic cuts and trims
The single most underrated tool in a color grow-out is a good haircut. Layers are especially useful because they break up the solid line where natural meets dyed. Ask your stylist for face-framing layers or internal layers that create movement and blur the two-tone effect visually. If you're growing out a shorter style like a pixie or bob, longer layers at the crown can help the natural regrowth blend into the dyed ends beneath rather than sitting as a stark block.
Parting changes
Switching your part is free, takes three seconds, and can dramatically change where the contrast line falls. A deep side part hides a lot of root growth. A middle part tends to make root growth more obvious, so if your regrowth is very visible, avoid it during the hardest phases. Zigzag parts also scatter the line of demarcation across a wider area, making it look less defined.
Styling choices that buy you time
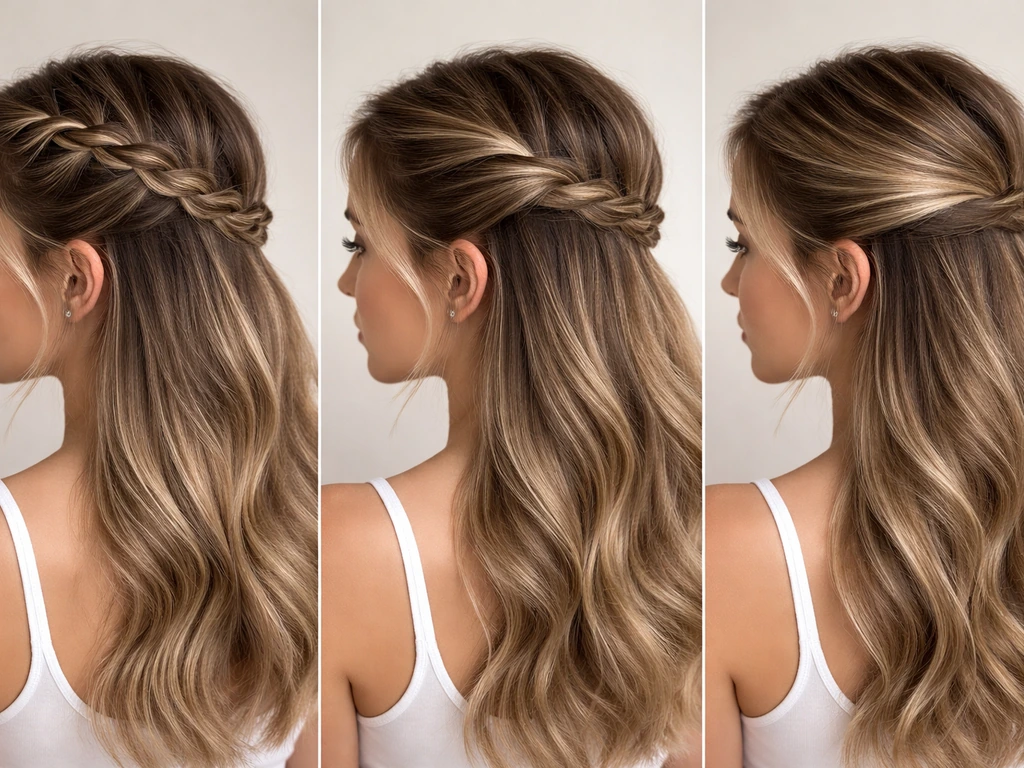
Braids, twists, buns, and half-up styles are genuinely useful during the grow-out, not just a cop-out. They keep the two-tone length hidden while drawing attention to volume and texture at the root instead. Loose waves also scatter the line better than pin-straight styles, which make the transition zone look sharper.
Ways to reduce contrast while you wait (toners, root smudging, highlights)
If you want active help blending the grow-out without fully re-dyeing, these are your best options. They range from totally DIY to strictly professional, and they serve different situations.
Toners
Toners don't change your underlying color dramatically, but they shift tone, cooling down brassiness, adding shine, or evening out subtle color differences between root and length. A purple or blue toning shampoo used once or twice a week is one of the easiest DIY moves for anyone growing out a blonde or lightened color. Deposit-only color glosses (like those used in salon zone-technique approaches) are also low-commitment and fade without leaving a hard line.
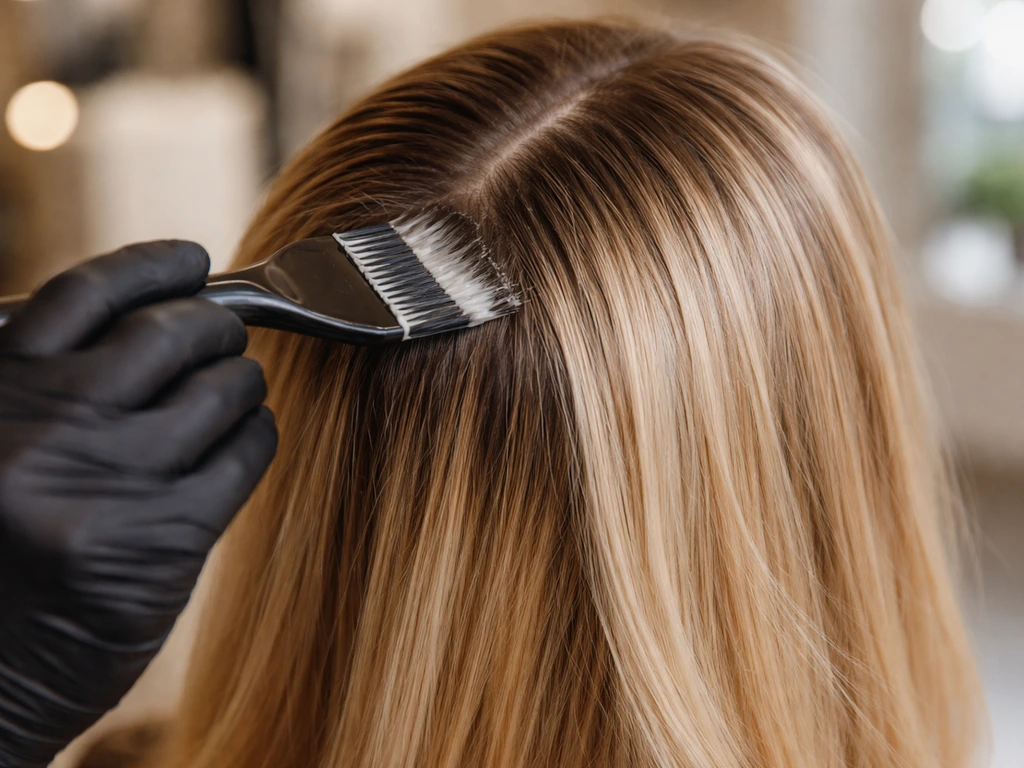
Root smudging
Root smudging is a technique where a colorist applies a shadow color at the root zone and blends it softly into the length, removing the hard line of demarcation. It works especially well when your natural color is darker than your dyed color (the classic 'dark roots growing into blonde' situation). This is best done by a professional, but it's a lower-commitment option than full color correction because it uses low-lift or deposit-only formulas.
Highlights and balayage
Strategic highlights or balayage can be a smart middle path if you're not ready to commit to a full natural grow-out. A colorist can paint highlights that mimic your natural variation, blend the regrowth zone, and gradually shift the overall palette toward your natural color over several appointments. This is a longer game but it keeps you looking intentional the whole time. It's a particularly good option if your natural color is a medium or lighter brown and your dyed color was a significantly different shade.
DIY vs. professional help: when to go to a salon
Let's be direct here: some grow-out situations are fine to manage at home, and some genuinely need a professional. Trying to DIY the wrong situation can result in banding, breakage, or a color result you'll need even more work to fix.
| Situation | DIY-able? | What to do |
|---|---|---|
| One or two levels of contrast between root and dyed length | Yes | Toning shampoo, color gloss, strategic trims |
| Dark color growing into medium-brown natural hair | Mostly yes | Root touch-up with a shade that matches your natural, or just trim and wait |
| Lightened/bleached lengths with darker natural roots | No — go pro | Root smudging or balayage by a colorist |
| Color-correcting very light dye back to dark | Risky DIY | A colorist can use zone techniques to avoid banding |
| Removing permanent dye with color remover (not bleach) | Possible with care | Color removers work on oxidative dye but results are unpredictable — strand test first |
| Bleaching dyed hair to speed up removal | No | Bleach on already-processed hair causes serious damage — always go to a professional |
Color removers (not bleach) work by shrinking the oxidative dye molecules inside the hair shaft so they can be washed out. They don't lighten the hair itself, which makes them much safer than bleach for going from dark dye to lighter. But results vary a lot based on the original dye formula and how many times the hair has been colored. Always do a strand test on a hidden section first, and be prepared for the possibility that the result is orange or uneven, especially on hair that's been dyed multiple times. If that happens, stop and see a professional rather than layering more products on top.
If you've had any scalp irritation, redness, itching, scaling, or blistering from dyeing, stop using color products entirely and see a dermatologist before doing anything else. Hair dye allergies can worsen with repeated exposure, and applying more product to a sensitized scalp can cause a serious reaction.
Common problems and how to avoid them
Banding
Banding looks like visible stripes or rings of different color along the hair shaft. It happens most often when color is applied unevenly, when regrowth has grown too far before a touch-up is applied (so the heat from the scalp processes the roots differently than the mid-lengths), or during color correction. To avoid it: never apply fresh dye over already-colored lengths unless your hair has significant fading, and use a zone-based approach where different parts of the hair get different formulas. A professional colorist knows this technique instinctively.
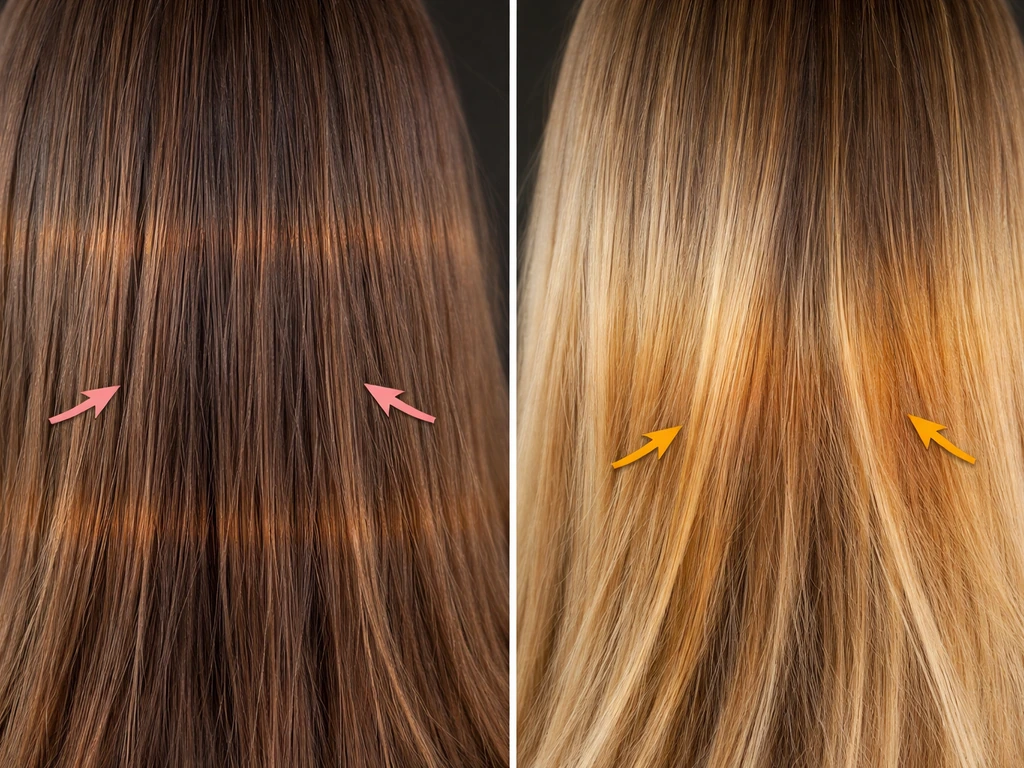
Brassiness
Brassiness is the orange or yellow warmth that appears as dye fades, especially in hair that was lightened. It's caused by the underlying warm pigments in your hair becoming exposed as cooler dye tones fade first. A purple toning shampoo used 1–2 times per week is the most effective at-home control. For stronger brassiness, a blue toning mask or a salon gloss treatment will do more work.
Uneven fading
Some sections of your hair fade faster than others, especially around the face and crown where heat, sun, and friction are highest. This creates a patchy look along the length rather than an even two-tone. Keep these sections better protected (more heat protectant, more UV protection) and consider a glossing treatment to even out the tone across the whole length.
Gray hair interactions
If your natural color includes gray or silver, the grow-out can look more stark because gray hair has a different texture and often resists color differently. Gray strands may also appear as bright white against darker dyed lengths. One option here is to lean into it: a root smudge or balayage that adds some dimension around the gray can make the transition look deliberate. If you're growing out dye to reveal natural gray, the styling strategies here are closely related to broader transitioning hair guidance, and the timeline is the same, about half an inch per month from the scalp.
Scalp irritation
If your scalp has been sensitized by repeated dyeing, the grow-out phase is actually a good time to give it a rest. Avoid putting any color product directly on the scalp during this period if you've had past irritation. Use a gentle, fragrance-free shampoo, and if irritation, flaking, or redness appears, consult a dermatologist, don't try to treat it with more hair products.
What to do with your hair at each stage of growth
Your styling strategy should shift as the grow-out progresses. Here's how to approach each major phase, whatever length you're starting from:
Very short hair (pixie, buzz cut): months 1–4
If you're starting from a short cut, you actually have a head start, the dyed section is shorter, so the total grow-out time is much less. The tricky part is that short hair makes every millimeter of contrast very visible. Keeping the cut neat and shaped (small trims every 6–8 weeks) helps the regrowth look intentional. A root smudge applied very close to the scalp can soften the line early. Avoid trying to re-dye the whole head just to cover the roots at this stage, you'll reset your progress.
Bob or medium length: months 2–8
This is where most of the blending work happens. Textured cuts with layers are your best friend here, they break up the harsh horizontal line. Try a slight shag or layered bob shape that adds movement. Half-up styles, braids tucked at the crown, and loose waves all help diffuse the contrast visually. If you're growing out bangs at the same time, pin them to the side or blend them into a soft curtain bang shape as they reach cheekbone length.
Growing out an undercut
An undercut grow-out has its own challenge: the shorter underneath sections grow in at a different rate and texture than the top. If the undercut section was also dyed a different color, you'll have multiple contrast zones. Keep the undercut section a little shorter during the grow-out so it blends into the overall length more gradually. Slicked-back styles or styles that blend the underneath layers into the over-layer work best here.
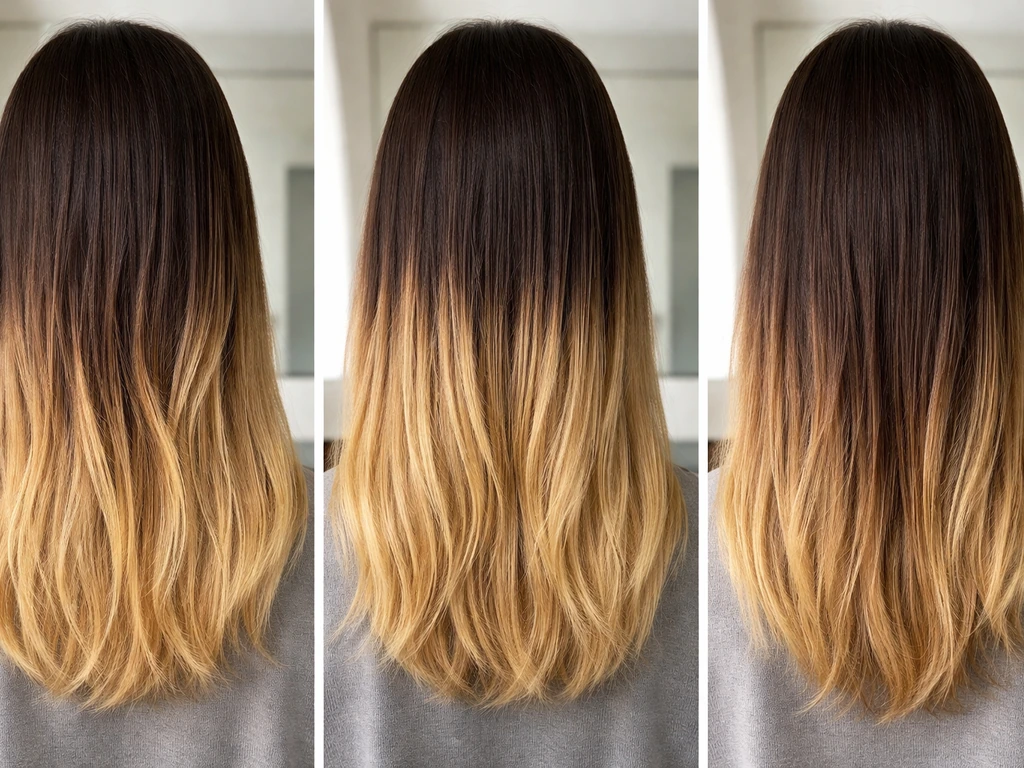
Longer hair: months 6 and beyond
If you're starting with long hair, the grow-out is a longer commitment, but you also have more styling flexibility. Loose waves, braids, and upstyles can hide the contrast zone easily. Progressive dusting trims every couple of months remove the oldest, most faded dye from the ends without sacrificing the length you've built. By month 12 or so, you'll have 6 inches of natural growth, enough to work with creatively and to start seeing what your natural color actually looks like in the current light.
The goal isn't to get through this perfectly. It's to get through it without giving up and starting over. Most people who quit and re-dye do it because they hit month 3 or 4 and felt like there was no plan. Having a routine, a blending strategy, and a realistic timeline changes everything. Your hair is growing, and half an inch a month adds up faster than it feels like it will. If you're also dealing with chemo hair regrowth, focus on gentle care and be extra patient with blending timelines as new strands come in.
FAQ
Can I re-dye just the roots to fix the grow-out line?
Yes, but only if you are blending upward (depositing or toning) without trying to change the level dramatically. For example, use a root smudge or gloss at the regrowth zone rather than re-dyeing mid-lengths, and only do it after you confirm your scalp is not sensitive. If you try to “fix” the line by applying fresh dye across the whole head, you increase the risk of banding and a new contrast layer.
When is the best time to do something to help the grow-out?
A safe rule is to wait until regrowth is at least visible enough to create a new blend area, usually around the point where months 3 to 6 feel worst. Before that, use non-lifting options like toning shampoos, glosses, or a root smudge to reduce contrast. If your hair is already very dry or has been lightened, delaying stronger color work helps prevent breakage during the hardest phase.
Is color remover a good DIY option for permanent dye grow-out?
If you do any DIY color removal, do it in a controlled, strand-tested way on a small hidden section first, and do not expect “permanent” dye to come out evenly. Oxidative dyes can leave uneven warmth, so you may need a toner or gloss afterward to even the tone. If you notice orange or patchy results on the strand test, stop and get a professional instead of layering more products.
What if the dyed ends feel rough or break easily during the grow-out?
Your strands can look more “stuck” at the line because of dryness, not because dye won’t move. Once ends feel rough, tangled, or snap, focus on strengthening and moisture, then use styling to diffuse the transition. Since permanent dye is chemically trapped, the most reliable improvement after damage is appearance management (layers, parts, glosses), not expecting the old color to fade into place.
How do I pick the right toner if my dye has faded unevenly?
Use the same “level” thinking the article mentions, but also watch for undertone mismatch. Two shades can look similar in the bottle, yet produce different outcomes as they fade, especially if you have red or copper dye. Take photos in natural light, then choose toners that counter the specific undertone you see (purple for yellow warmth, blue for stronger orange/yellow) instead of guessing.
Will growing out permanent dye over natural gray look different than growing out over non-gray hair?
Yes, gray can change the look even if your dye seems to be growing out normally, because gray strands often reflect light differently and may resist toning. If the contrast feels harsh, consider a low-commitment root smudge or dimension around the gray rather than trying to match every strand. Keep expectations realistic, blending gray is usually about softening visual contrast, not making it disappear quickly.
What should I do if my scalp was irritated during earlier dyeing?
If you previously had scalp irritation, keep all color products off the scalp during the grow-out. You can still do hair-only care (conditioners, masks, heat protectant), but for any toning, choose formulas designed for hair only and apply carefully to avoid scalp contact. If symptoms like redness or itching return, treat it as a medical issue and stop DIY color entirely until you get guidance.
How often should I use a toning shampoo while growing out permanent dye?
Wash timing matters for both color buildup and tone control. If you are using a purple or blue toning product, follow the recommended frequency and avoid overdoing it, because excess toning can make hair look dull or uneven. Also consider washing with cooler water to reduce how quickly warmth reappears in the fade zone.
What’s the best next step if I notice banding during my grow-out?
Do not try to “wait it out” if you are seeing true banding, like rings or stripes at specific heights. Banding often comes from uneven processing zones or applying new color over older color. The better next step is to book a consultation, bring photos, and ask for a corrective plan that uses zone-based formulas instead of one blanket application.
How can I tell if my grow-out looks patchy because of fading versus because the hair is damaged?
A quick visual test is to compare how your hair looks when fully dry in natural daylight versus after being freshly washed and styled. If certain sections look warmer or darker only after heat or sun, they are likely responding differently due to uneven porosity or fading. Protect those areas more (UV and heat control) and consider a gentle gloss on the overall lengths to even tone rather than repeatedly toning just one spot.
Is growing out permanent dye harder with a pixie or bob than with long hair?
For short hair, the regrowth line feels more dramatic, but it usually improves faster because there is less total dyed length to manage. Keep trims on schedule to maintain shape, and use a root-level softening option early so the line is less “horizontal” as it grows. If you attempt to cover everything at once in a short cut, you often end up restarting the contrast problem.