You can grow your hair into a curtain hairstyle from almost any starting point, but it takes roughly 6 to 12 months depending on where you're beginning, and the key to surviving it is knowing exactly what to do at each stage instead of white-knuckling it through the awkward bits. The curtain look is a center-parted, medium-length style with long face-framing layers that sweep outward like, well, curtains. Hair grows about half an inch per month, so the math is simple once you know your target length and your current starting point.
How to Grow a Curtains Hairstyle: Step-by-Step Timeline

Marcus Vickers
21 Jun 2026

What the curtain hairstyle actually is (and who it works for)

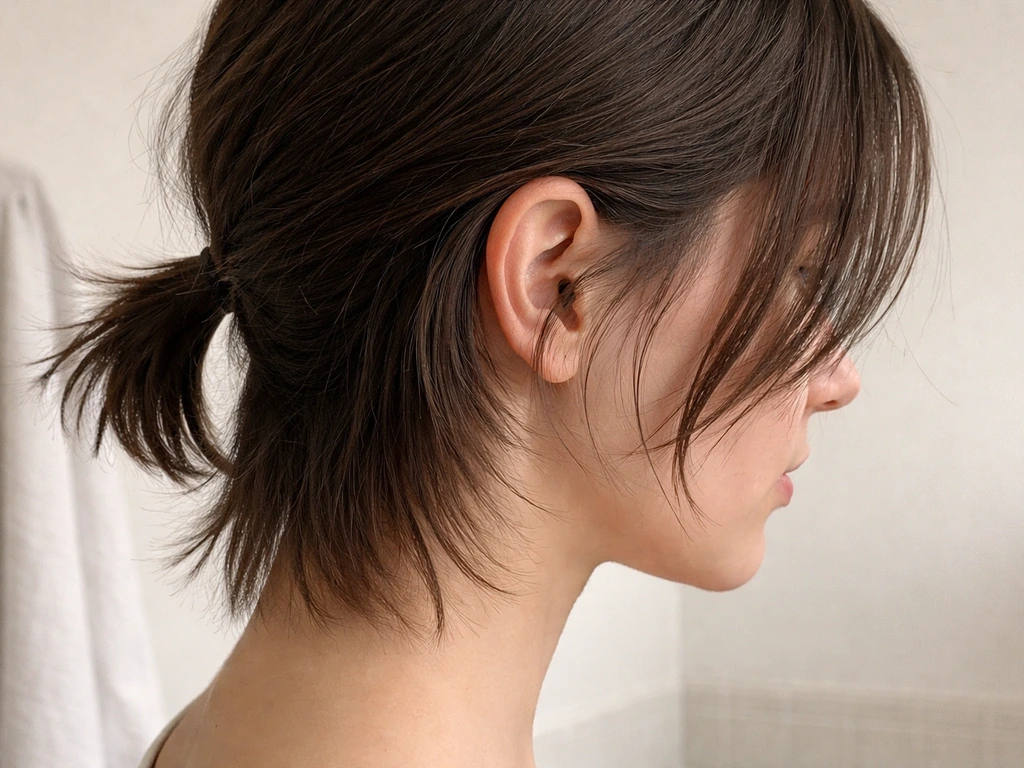
The curtain style sits at that sweet spot between a structured fringe and loose, face-framing layers. The defining features are: a center part, a fringe that splits naturally open in the middle rather than sitting flat across the forehead, and lengths that taper down toward the cheekbones or jaw. It's softer than a blunt-cut fringe and longer than most traditional bangs. The whole effect looks effortless because the layers are meant to blend into the rest of the hair, not sit as a separate panel.
One thing stylists consistently point out: for the curtain effect to actually work, the base of the haircut needs to be long enough to connect with the fringe. If the rest of your hair is shorter than chin-length, the curtain pieces can end up looking like a disconnected fringe rather than a true flowing layer. That's important to know before you decide on your grow-out timeline. Your goal isn't just fringe length, it's overall connection.
Who does it suit? Almost everyone, genuinely. The center part and cheekbone-grazing layers are particularly flattering on oval, heart, and long face shapes, but the length can be adjusted to work wider or rounder faces too by keeping the layers a little longer and more angled. For curly hair, the fringe should always be cut dry in the curl's natural state and left longer than it looks at first, because shrinkage will pull it up noticeably once it's released. If you're curly, factor that into your target length.
Growing it from your current cut: a stage-by-stage timeline
Where you're starting from makes a huge difference, so here's a realistic breakdown by starting point. Hair grows about half an inch per month as a baseline, though genetics, health, and hair type mean you might see slightly more or less.
Starting from a buzz cut
This is the longest road, typically 12 to 18 months to reach a proper curtain length. Months 1 to 3 are about basic regrowth and patience: your hair is establishing length and you're mostly managing texture and shape. By months 4 to 6 you'll have enough length to start experimenting with a rough center part, though it won't fall naturally yet. Months 7 to 10 bring you into the true awkward territory where it's long enough to be annoying but not long enough to behave. This is where styling (covered below) becomes your best tool. By months 11 to 14, you're entering curtain territory and can begin the final shaping.
Starting from a pixie cut
Expect 9 to 14 months from a short pixie. The first 3 months usually produce a shaggy, uneven look around the ears and neck that feels frustrating. By months 4 to 5 you're in what stylists often call the curtain bang phase, where the face-framing pieces are starting to reach cheekbone-adjacent lengths but the rest of the hair is catching up. Months 6 to 8 bring a chin-length window that's genuinely awkward but manageable with the right styling. After month 9 you're usually looking at something that can be shaped into the final curtain style.
Starting from a bob
The bob is actually a great launching point for a curtain style. If your bob is already chin-length or slightly below, you might be 3 to 5 months away from a workable curtain length. The main work here is growing the fringe area if your bob has a blunt fringe, and adding face-framing layers rather than the uniform weight of a classic bob. A blunt-bang bob has a 4 to 6 week awkward phase where the fringe hits the nose bridge and won't cooperate, but it moves through that stage faster than a shorter starting point.
Starting from bangs or a fringe
If you already have a fringe or bangs, you're working primarily on the front section of your hair. Blunt bangs at brow-level take roughly 3 to 6 months to reach cheekbone length, which is the minimum for a proper curtain effect. The awkward stage hits hardest around weeks 4 to 6 when the fringe reaches the nose bridge area and looks neither like a bang nor a curtain. After that, it tends to improve weekly.
Curtain bangs are actually easier to grow out than blunt bangs because their tapered, layered nature blends more gradually into surrounding hair. If you want to hide bangs as they grow out, the key is styling and timing so the fringe blends into the rest of your layers.
Starting from an undercut
Undercuts are the trickiest starting point because the shaved or very short sections at the nape or sides have to fully regrow before the curtain look connects properly. If the undercut is at the nape only, you can usually disguise it while the top grows, but a side undercut adds significant time (often 12 or more months for the shortest sections). The goal is to keep growing the longer top sections while the undercut sections catch up, blending with layering as the length allows.
Styling while you grow: making it look intentional every step of the way
This is where most grow-out guides fall short, because they talk about destination styling but not the in-between styling. Here's what actually works during the growth period.
Blow-drying technique for the fringe area
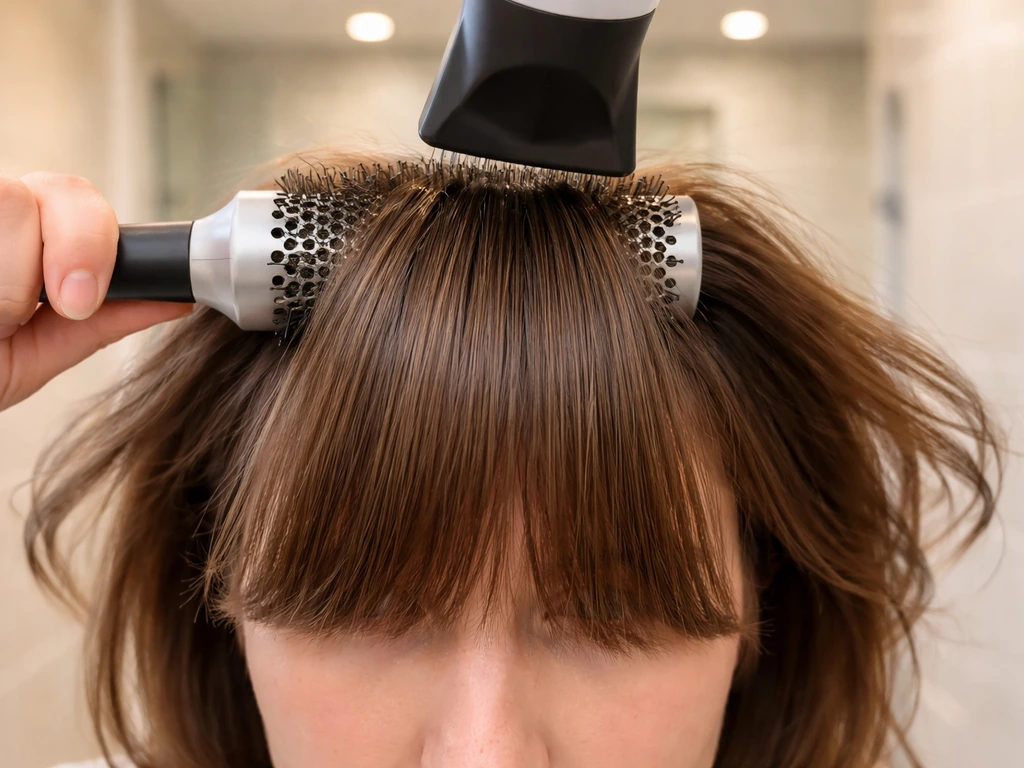
The curtain blow-dry is specific. Place a round brush behind the fringe section and pull it forward toward the nose, not straight down. Then sweep each side outward and slightly back to create the open, swooping shape. The trick is to flick outward at the ends rather than rolling under, which prevents the curtain pieces from collapsing into the face. Keep the heat moving and don't hold in one spot too long.
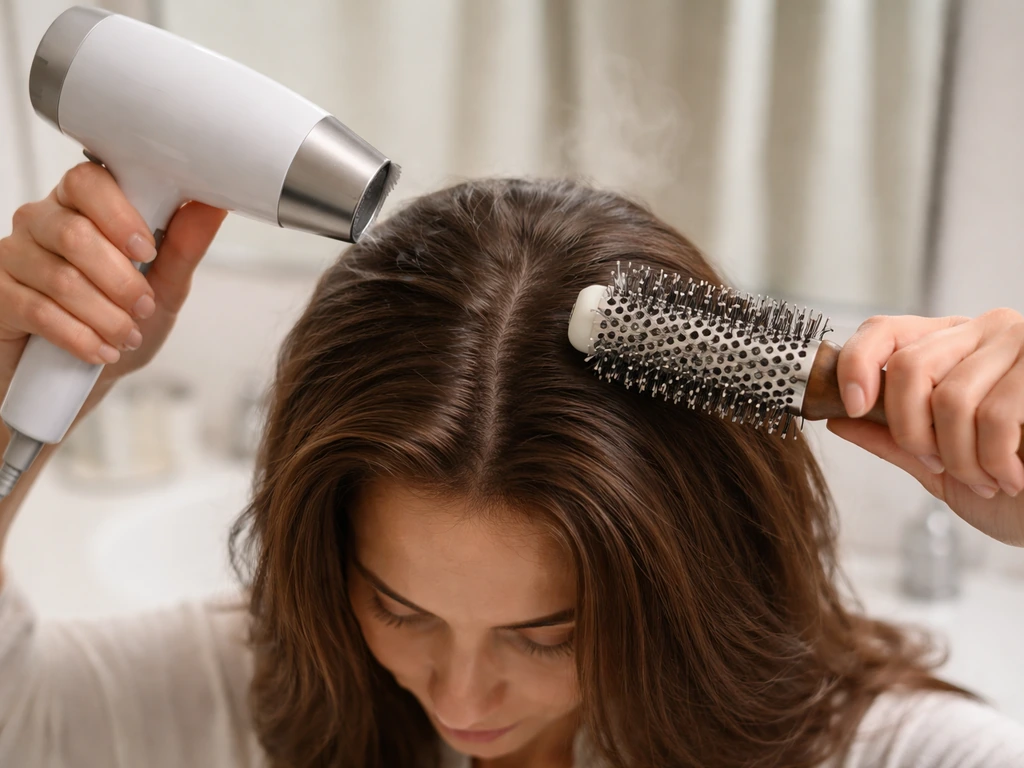
A technique that works really well during growth, especially before the hair is long enough to fall naturally: set the shape before the hair is fully dry. Use clips to hold each curtain side in a soft outward C-shape while the hair dries. Pinch the bangs together at the hairline, set with a clip, then swoop each side outward and gently clip the ends. Let it set for 5 to 10 minutes before releasing. This trains the hair into the curtain position without you having to fight it with a brush every morning.
Part placement
If your hair has a natural side part or a stubborn cowlick at the crown, it will resist a center part at first. The fix is to establish the center part while the hair is wet every single day and dry it in that position. It takes about two weeks of consistent effort for most hair types to start cooperating. Use a small amount of lightweight product at the roots before drying to help hold the new direction.
Face-framing during the growth period
While the curtain fringe is growing, you can fake the face-framing effect by angling the front sections slightly longer toward the cheekbones and using a round brush to kick the ends outward rather than inward. This keeps the fringe feeling intentional even when it's technically still mid-growth. A few drops of lightweight oil on the ends help define the pieces and prevent the wispy, undefined look that makes growing-out fringe look accidental.
Getting through the awkward phases
The awkward phase is real and it usually hits twice: once around weeks 4 to 6 (when the fringe is in the nose-bridge zone) and again around months 6 to 8 (when overall length is at that in-between chin-to-shoulder territory). Here's how to handle the most common problems.
Cowlicks and root resistance
Cowlicks at the hairline or crown are the biggest enemy of a curtain part. The most effective approach is to blast the root area with a hair dryer on high heat while using a brush or your fingers to push the hair against its natural direction, then finish with cool air to lock it. Doing this every wash day eventually reduces the cowlick's power. Lighter, thinner hair tends to respond faster than thick or coarse hair.
Flyaways and frizz
Short, broken hairs around the hairline are common during grow-out, especially if your hair has had chemical processing. A tiny bit of pomade or a fine-tooth comb with hairspray can smooth these down without making the rest of the hair stiff. For wavy or curly types, a light curl cream applied to damp hair can corral flyaways while keeping the texture intact.
Uneven lengths and regrowth texture
Uneven lengths are almost inevitable, especially if you started from an undercut or a layered cut that grew out unevenly. The strategy here is not to panic and reach for scissors, but to use styling to balance the visual weight. Texturizing spray adds volume to shorter sections, and gentle waves (from a medium-barrel wand) can visually even out lengths by disguising where one section ends and another begins. Waves are genuinely your best friend during a multi-length grow-out.
Trimming and maintenance strategy during grow-out
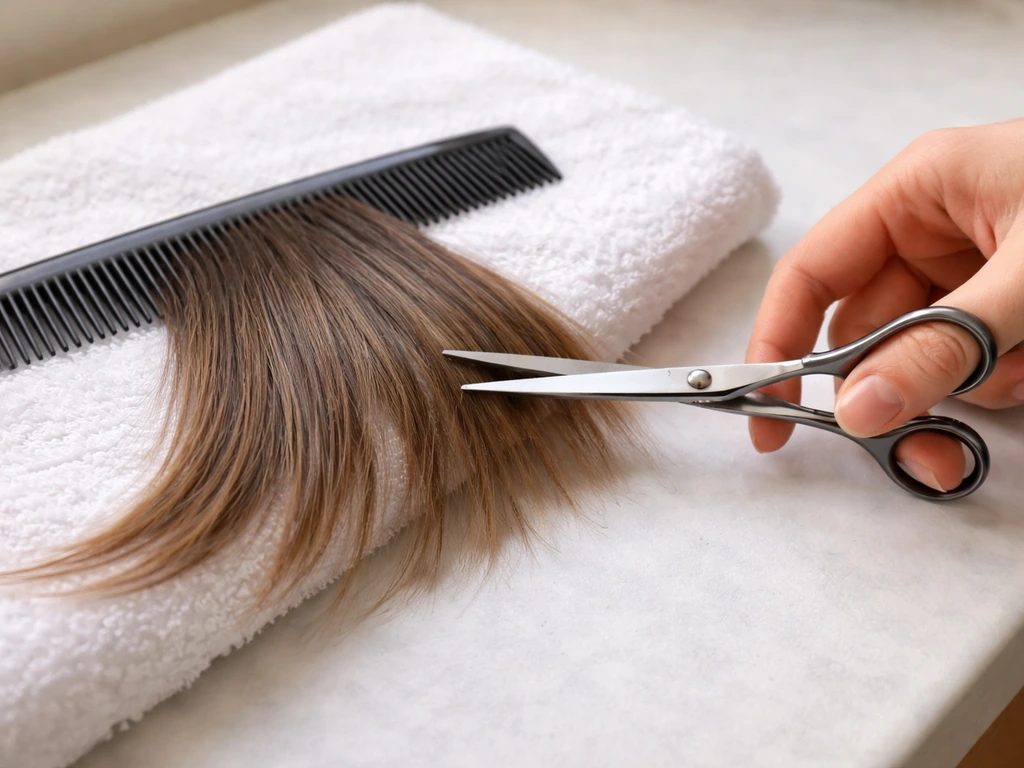
This is the most common question and the most commonly screwed-up part of growing hair out: how much should you trim, and when? If you are specifically trying to figure out how to grow out bangs, the same stage-by-stage patience applies, but the trimming timing matters most for avoiding a crooked awkward phase. The general guideline is a quarter to half an inch every 12 weeks if the goal is maximum length, but for the curtain fringe specifically, small tidying trims every 4 to 6 weeks keep the shape looking intentional without setting you back significantly.
The key rule for the curtain fringe: don't trim it until it at least touches the cheekbone. If you are wondering how curtain bangs grow out weirdly, this cheekbone-touch rule is the same kind of guide that helps you avoid that awkward look as they lengthen. Trimming before that point risks cutting it back into regular bang territory and restarting the clock. Once it clears the cheekbone, small point-cut trims (where the scissors cut into the ends vertically rather than straight across) keep the ends soft and blended without removing meaningful length.
For overall layers during grow-out: ask your stylist for blending cuts specifically, not shape cuts. A blending cut removes bulk and connects the layers without reducing the length of the longest pieces. This is different from a regular trim, so be specific about what you want. If you have an undercut growing out, talk to your stylist about whether the shorter sections need any shaping to blend into the growing length, rather than just being left to grow straight up or outward.
| Growth stage | Trim frequency | What to ask for |
|---|---|---|
| Fringe above nose bridge | Every 4–6 weeks | Small tidying trim, point-cut ends, no length removal |
| Fringe at nose to cheekbone | Every 6–8 weeks | Soften ends only, no shortening |
| Fringe at cheekbone to jaw | Every 8–10 weeks | Blend layers, shape face-framing pieces |
| Full curtain length (jaw and below) | Every 8–12 weeks | Final shaping, full curtain layer definition |
If your hair is colored, highlighted, or bleached
Color history matters a lot during grow-out because the fringe and face-framing sections are often the most processed parts of the hair. As the curtain pieces grow, you'll start to see a visible line between your natural root color and your processed length. How stark that line looks depends on how different your natural color is from your processed color and how your hair's porosity affects fade rate.
High-porosity hair (common after bleaching or repeated coloring) absorbs toner quickly but fades fastest, which means the blonde or lightened sections of your growing curtain fringe can turn brassy or uneven before you expect it. Glossing or toning treatments every 2 to 3 weeks can manage this between salon visits, though a strand test first is smart on highly porous hair to avoid unpredictable results.
The most practical tool for managing color grow-out during this process is a shadow root or root melt technique. A shadow root involves darkening the root area slightly to blend your natural regrowth into the lightened lengths, creating a seamless gradient rather than a hard line. This typically lasts 8 to 14 weeks and dramatically reduces the visible contrast as the curtain pieces grow. If your stylist has mentioned root tapping, root melting, or root blurring, these are all variations of the same concept and all work well during grow-out.
One more thing: uneven toner fade can actually make the curtain fringe look worse by exaggerating contrast between the highlighted and non-highlighted pieces. If you notice the color looking patchy or harsh between appointments, a clear gloss (no lift, just shine and tone) can smooth the overall look without the commitment of a full color service.
How to know when you're ready for the final shaping
There's a specific moment during the grow-out when the hair stops feeling like a project and starts feeling like it's almost there. Here's what that actually looks like in practice: the curtain fringe reaches at least your cheekbone (ideally the jaw), it splits naturally at the center part without you forcing it, and the overall length of your hair is long enough to connect the fringe pieces into proper face-framing layers rather than leaving them floating as a separate section.
When those three things align, you're ready for the final shaping appointment. Tell your stylist you want the curtain layers defined and connected, with face-framing pieces that angle from the cheekbone toward the jaw and blend into the rest of the length. Ask them to point-cut the ends of the fringe to maintain the soft, wispy curtain texture rather than cutting it blunt. If you've had an undercut growing out, this is also the appointment to check whether those sections are fully blended or still need a few more months.
For ongoing upkeep once you've achieved the curtain style, plan on a shaping visit every 8 to 12 weeks. The curtain fringe grows out gracefully compared to a blunt fringe, which is one of the reasons people love it. The longer layers just get longer, and the style stays wearable through most of that growth. If you're someone who's also navigating the grow-out of bangs more broadly, including questions about how to hide or manage them at specific stages, those are separate but closely related challenges worth thinking through alongside this process. If you want more specific tips for that in-between stage, see our guide on how to grow out your bangs without looking awkward grow-out of bangs.
Your next steps right now
Start by figuring out where you are today. Measure your curtain fringe area (the front face-framing pieces) and compare it to your cheekbone. If it's at or below the cheekbone, you're in the final stretch. If it's above the nose bridge, you're in early stages. If it's between the nose bridge and cheekbone, you're in the hardest part, and consistent styling plus scheduled small trims every 4 to 6 weeks is your whole job right now. If you're wondering how to grow out bangs over 50, the same curtain-bang grow-out timeline applies, but you may need slightly more moisture and more strategic trims for easier blending.
- Assess your current fringe length against the cheekbone benchmark.
- Identify your starting cut type (buzz, pixie, bob, bangs, undercut) and set a realistic timeline using the stage breakdowns above.
- Start training your center part today by setting it wet every wash day and drying in position.
- Book a blending trim if you haven't had one in the past 8 to 10 weeks, and be specific: ask for blend and shape, not a regular trim.
- If you're color-treated, talk to your colorist about a shadow root or gloss to manage visible regrowth during the grow-out period.
- Commit to the clip-and-set blow-dry technique daily during the nose-to-cheekbone phase to train the curtain shape.
- Mark your calendar for a final shaping appointment when the fringe clears the jaw and splits naturally at center.
FAQ
How do I know if I should trim my curtain fringe during the grow-out, or wait it out?
If you trim before your curtain fringe reaches your cheekbone, you can accidentally push it back into “regular bangs” territory and lose progress. Use the cheekbone-touch rule as your cutoff, then switch to tiny point-cut tidies (vertical snips into the ends) every 4 to 6 weeks only to soften the shape, not to shorten the length.
What should I prioritize if I want the curtain hairstyle to look good sooner?
If your goal is faster results, the best lever is scheduling, not faster growth. Stick to your growth timeline, but book styling-oriented touch-ups every 4 to 6 weeks (so shape stays intentional) and longer check-ins every 8 to 12 weeks once you are in full curtain territory. Think “maintain the silhouette,” not “chase the final length daily.”
My curtain fringe looks worse as it grows because of color. What can I do?
Color contrast can make the fringe look patchy even when the cut is perfect, especially on bleached or highly porous hair. If the highlights look uneven between appointments, ask for a clear gloss (tone only, no lift) to blend the overall look, or consider a shadow root to reduce the visible line as the curtain grows.
What’s the fastest way to train a center part if I naturally have a side part or cowlicks?
For a struggling center part, set it while the hair is wet and repeat consistently for about two weeks. Use a lightweight product at the roots, dry from the root upward with the hair held in the center-part position, then finish with cool air to reduce the chance of the part flipping after it cools.
My curtain fringe won’t swoop outward and keeps falling back in. How do I fix it?
If your curtain pieces collapse toward your face, adjust your technique: position the brush behind the fringe and pull forward toward the nose, then flick outward at the ends instead of rolling under. Also keep heat moving, holding one spot too long can set the wrong shape.
What if my hair is too short right now and the curtains look disconnected?
If your hair is too short to connect the fringe into face-framing layers, the result can look like separate bangs instead of true curtains. Before expecting the “connected” look, confirm your overall front layers are at least chin-length, then build up with layers that blend into the rest of the hair rather than adding blunt weight at the fringe area.
How should I adjust the curtain-bang grow-out plan for curly or wavy hair?
Yes. Wavy or curly textures often benefit from defining the shape while damp (or after drying) with a light curl cream, then using clips for the outward C-shape during the early grow-out. Curl shrinkage can change how long it looks, so base your target on what it reaches in its natural state, not on how it looks stretched.
Is it realistic to grow curtains from an undercut, and what changes in the plan?
For undercuts, the key edge case is timing by section, not by overall length. If the nape is shaved only, you can usually disguise more quickly while the top grows, but a side undercut often requires an extra blend period. Ask your stylist whether those shorter sections need shaping to merge into the emerging curtain layers once length allows.
How often should I get my hair cut once I actually reach the curtain hairstyle?
Once the fringe naturally splits in the center and reaches at least your cheekbone, you should plan shaping every 8 to 12 weeks. The curtain style keeps looking wearable longer than blunt bangs because it blends as it grows, so you can prioritize small end-softening instead of frequent major trims.
What should I do during the hardest awkward phase when my fringe is between the nose bridge and cheekbone?
If you are between the nose bridge and cheekbone, that is the hardest window, and you should treat styling as part of the “schedule.” Aim for consistent outward-kick styling at the ends, use a round brush to angle the front sections slightly longer toward the cheekbones, and schedule small trims only every 4 to 6 weeks so the shape stays cohesive.
My hairline hairs look uneven and broken during grow-out. What’s the right way to manage them?
If you see broken hairs or a frizzy, uneven hairline, do not add heavy product. Use a fine-tooth comb plus a tiny amount of pomade or a light hairspray to smooth flyaways, then for waves or curls apply a light curl cream to damp hair so you control the ends without making them stiff.
How can I self-check which stage of the curtain grow-out I’m in?
Take a quick measurement: compare the longest front face-framing piece to your cheekbone. If it is at or below the cheekbone, you are in final-stretch territory, if it is above the nose bridge you are early, and if it sits between nose bridge and cheekbone you are in the “styling-heavy” stage where you should not rush trims.