Growing out a stacked bob takes roughly 6 to 18 months depending on how short the back is and where you want to end up. The tricky part is not the length itself but the shape: those shorter graduated layers in the back grow out at their own pace while the sides and top keep moving, which creates a puffy, uneven silhouette that most people mistake for a bad hair day rather than a normal phase of the process. The good news is that with a clear plan, a couple of strategic trims, and a few styling tricks, you can move through each stage without ever feeling like you have to start over.
How to Grow Out a Stacked Bob: Timeline and Tips

Marcus Vickers
23 Apr 2026
What makes a stacked bob different to grow out
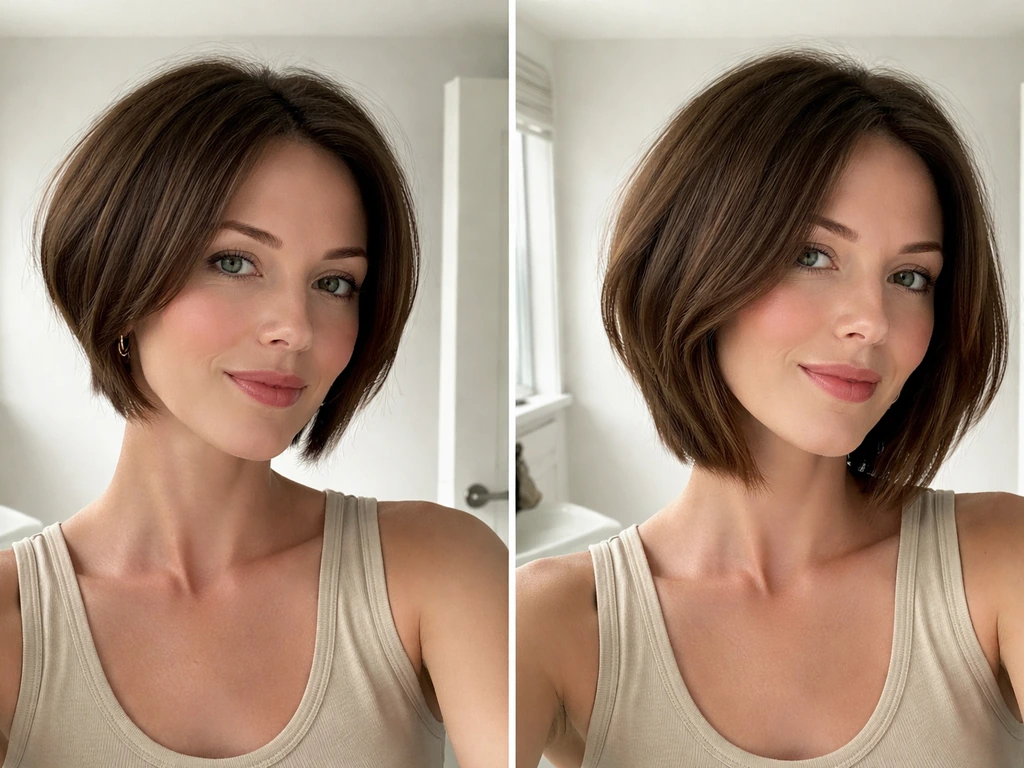
A regular bob grows out pretty predictably: it gets longer, and eventually you have a lob or something approaching shoulder length. A stacked bob is different because the whole point of the cut is the layering in the back. Those internal layers are stacked on top of each other to build volume and shape, which means the back of the haircut contains several layers at different lengths, all shorter than the outer perimeter. When those start growing, they don't just add length. They add bulk, they push outward, and they create a rounded or mushroom-shaped silhouette at the back of the head before they eventually blend in.
This is what separates the stacked bob grow-out from something like growing out a lob or a layered bob. With an angled bob, the graduation runs along the neckline, but in a stacked bob the stacking climbs higher into the crown area, so the awkward phase hits harder and lasts longer. The sides and front often grow more uniformly, so you end up feeling like your front looks fine but your back is doing something entirely different. Knowing that going in makes it a lot easier to stay the course.
Quick self-check: assess your current shape and growth goal

Before you do anything else, take two minutes and look at your hair with two mirrors so you can see the back. What you are trying to identify is where the shortest layers actually sit. In a stacked bob, the shortest point is usually somewhere between the nape and the occipital bone (the bump at the back of your skull). Everything above that has been layered and graduated to build that rounded shelf. That shelf is exactly what will give you trouble.
Then get honest about your goal. Are you trying to reach a longer bob or lob? Shoulder length? Or are you going further, toward collarbone or beyond? Each of those goals has a different timeline and a slightly different trimming strategy. Write it down or save a photo on your phone. You will need it for every stylist conversation from here on.
- Use two mirrors (or your phone camera, back-facing) to see the graduation in the back clearly.
- Identify your shortest point: nape layers are easier to blend; stacking that rides up toward the crown needs more time.
- Note whether the stacking is centered or slightly off to one side, which happens more often than people realize and affects how it grows.
- Pick a clear target length: longer bob, lob, shoulder, collarbone, or beyond. Each adds roughly 4 to 6 months to the realistic timeline.
- Check the health of your ends right now. Dry, split ends slow the visual progress even when the hair is growing fine.
Realistic grow-out timeline by stage
Hair grows somewhere between 0.5 and 1.7 cm per month on average, with most people landing around 1 cm. Scalp hair grows at an average rate of about 1 centimeter (cm) per month, with reported ranges from about 0.6 to 3.36 cm/month in a CDC/ATSDR hair growth analysis report blank" rel="noopener noreferrer">1 cm. That variation is real and it matters because it means the same goal can take 6 months for one person and over a year for another. Use the ranges below as a guide, not a guarantee.
| Stage | Approximate timeline | What's happening | Main challenge |
|---|---|---|---|
| Stage 1: Early awkward | Months 1–3 | Back layers starting to lose their crisp shape; the stacking begins to look puffy rather than sculpted | Bulk and roundness at the back, hard to style flat |
| Stage 2: Mid-length blend | Months 3–8 | Shorter back layers catching up; sides and top noticeably longer; some sections start to look uneven or "lopsided" | Visible length discrepancy between front, sides, and back |
| Stage 3: Approaching the blend | Months 6–12 | Back layers meeting the length of the outer perimeter; starts to resemble a longer, heavier bob | Thickness and heaviness at the back; potential for flat-top look |
| Stage 4: Final transition | Months 10–18+ | Hair approaching the target length; the stacking is blended or mostly grown out | Maintaining shape and removing residual bulk without restarting |
If your stacking was particularly high (riding close to the crown) or your hair grows on the slower end, expect to add 2 to 4 months to each stage. If the stacking was mostly at the nape and your hair grows quickly, you might move through Stage 1 and 2 faster than you expect. Either way, the most uncomfortable period for most people is Stage 2, roughly months 3 through 8, when the hair is long enough to feel messy but not long enough to pull back easily or lie flat without effort.
How to style each awkward phase
Stage 1 (months 1–3): calm the puff

The back is starting to lose its clean stacked shape but it has not grown out enough to lie flat. This is the "helmet head" phase for a lot of people. Your job here is to reduce visible volume at the back without fighting the texture every morning. A good blow-dry technique matters a lot: use a round brush and aim the airflow downward, not into the back of the head. Blow-drying with heat directed toward the nape rather than perpendicular to it encourages the hair to sweep down and under rather than puffing outward. A flat iron on the ends can also help if your hair is straight to wavy.
A side part instead of a center part shifts weight asymmetrically and tends to make the back look less round. A small amount of smoothing cream or a light pomade worked through damp hair before drying can reduce frizz and help the graduated layers sit closer to the head instead of fanning out.
Stage 2 (months 3–8): blend and distract
This is the genuinely awkward stage and there is no styling trick that fully disguises it. But you can make it a lot more manageable. The key moves are: use texture to your advantage, add interest at the front, and keep the back as flat as possible. Braids, half-up styles, and headbands all shift the eye toward the face rather than the back of the head. If your hair is long enough at the sides to tuck behind your ears, do it. It immediately gives a cleaner silhouette even when the back is doing something unruly.
For cowlicks in the back (very common with stacked bobs because the stacking can exaggerate natural growth patterns as it grows out), use a round brush and work the section from the point where the cowlick starts, keeping your thumb under the section while you dry. Tension and direction together will do more than product alone. Do not fight the cowlick with heat after the fact; address it while the hair is still damp.
Stage 3 and beyond (months 6+): smooth and shape
By this point the back layers are long enough that the shape starts to feel more like a heavier, longer bob. Your styling options have expanded. Straightening, loose waves, and even simple ponytails are now on the table depending on the length. The main challenge here is bulk: the layers are still there, they have just grown longer rather than disappeared, so the back of the hair can feel dense and heavy. A lightweight smoothing serum applied to damp hair before drying helps weigh it down slightly without making it look greasy. If you want waves or texture, a diffuser or scrunching technique can actually disguise remaining unevenness better than a smooth blowout.
Trimming strategy: when to hold off and when to maintain
This is the question people get most anxious about, and honestly the answer is less complicated than it feels. For the first 2 to 3 months, resist any urge to go back and clean up the shape. Every time you tidy the stacking, you are essentially resetting the part of the haircut that needs to grow most. You are not helping the process, you are restarting it.
After month 3, small maintenance trims make sense, but the goal is very specific: you are removing bulk and weight from the interior layers, not reshaping the perimeter. Trims every 4 to 6 weeks for shape maintenance are the general recommendation from hairstylists for bob-style grow-outs, but for a stacked bob that you genuinely want to grow out, stretching that to every 8 to 10 weeks is often smarter, especially in the first 6 months.
If you also want to maintain the overall shape while you learn how to grow out a bob, use the trimming strategy and timeline as your guide. When you do go in, the ask should be: "Remove some interior weight from the back layers but do not shorten the outer length. "
The one exception is if the neckline is getting ragged or the perimeter is visibly uneven in a way that is affecting your confidence daily. A small tidy of the very ends, taking off no more than 1 cm, will not meaningfully slow your progress. What kills the grow-out is when a stylist cleans up the whole back and effectively re-stacks it, which resets months of work.
Hair health and growth support
Nothing dramatically speeds up hair growth, but poor hair health can absolutely slow down the visual progress by causing breakage at the ends. The shorter layers in a stacked bob are often the most processed or heat-styled parts of the hair, and they can be brittle going into the grow-out. Keeping them healthy is the job.
Conditioning every wash is non-negotiable during a grow-out. Consumer Reports notes that silk or satin bedding can benefit hair by reducing friction, which experts say may help reduce breakage Conditioning every wash is non-negotiable during a grow-out.. Conditioning agents reduce friction during detangling, which directly reduces mechanical breakage while combing. Use a wide-tooth comb after your conditioner is applied, working from the ends upward to the roots rather than dragging through from root to tip. This small habit makes a real difference over 6 to 12 months of growth.
- Use a protein-moisture balanced conditioner suited to your hair type and apply it every wash.
- Detangle with a wide-tooth comb while conditioner is still in the hair, starting from the ends and working up.
- Reduce direct heat at the shortest layers when you can. Those layers are often the most fragile and they are the ones you need to retain most.
- Protective styles like loose braids, buns, or twists reduce daily manipulation and help you retain length you have already grown.
- Protective styles do not make hair grow faster, but they can significantly reduce the breakage that makes grow-outs feel like they are going nowhere.
- Eat enough protein. Hair is keratin, and chronically low protein intake is one of the more overlooked causes of slow-looking growth.
- Sleep on a satin or silk pillowcase or use a satin bonnet, especially during the phase when the back layers are most vulnerable to friction.
Stylist visits: how to communicate "grow out" clearly

The single most important thing you can do before sitting in a salon chair is bring a photo. Not a photo of a stacked bob you like, but a photo of the length and shape you are going toward. Print it or have it pulled up on your phone. Show it first, before the stylist even touches your hair, and say clearly: "I am growing this out toward this length and I do not want to re-stack." That last part matters. A lot of stylists will default to cleaning up the stacking because it makes the hair look tidy in the short term, but it resets your progress.
Ask your stylist to describe their plan before they cut anything. A grow-out-focused trim should involve removing interior weight (point-cutting or thinning through the back layers) and possibly softening the perimeter, but it should not involve re-graduating or re-stacking the back. If the stylist's plan sounds like it will re-create the original shape, it probably will. Trust that instinct and push back.
It also helps to be explicit about timing. Tell them you are spacing your cuts to every 8 to 10 weeks intentionally. Some stylists will suggest more frequent visits, which is sometimes genuinely helpful but can also reflect a preference for maintenance revenue rather than grow-out progress. You set the pace, not the calendar.
Confidence moves: easy daily hairstyles for the in-between phase
The awkward phase is real, but it is survivable with a short list of reliable styles. The goal is not to hide that you are growing your hair out but to have a look you actually like on the days when the back is doing something you would rather not think about.
- Half-up, half-down with a small clip or pin: pulls the sides and top up so the face is framed while the back is less of a focal point. Works well from month 3 onward.
- Texture spray and tousled finish: deliberately disheveled is much easier to pull off than forced sleek when the layers are at mismatched lengths. A little salt spray or texturizing spray scrunched through the back turns unevenness into intentional texture.
- Smooth blowout with ends tucked under: use a round brush to direct the ends inward and downward. A very small amount of smoothing cream helps hold the curl-under and reduces the puffiness at the back.
- Ear-tuck with a side part: sweep the sides behind the ears and apply a side parting. This is the simplest daily reset and works at almost every stage of the grow-out.
- Loose braid or twist at the nape: once the back is long enough (usually around month 5 or 6 for most stacked bobs), a small braid or twist pinned up at the nape keeps the shortest layers controlled and makes the whole look feel intentional.
- Headband: a wider fabric or elastic headband pushes the top and sides back, which tends to camouflage the length disparity between front and back layers very effectively.
- Accessorize the front: clips, pins, and barrettes at the temple or crown shift attention forward. This does nothing to fix the back but it redirects where the eye goes, which is half the battle.
Growing out a stacked bob is a commitment but not a complicated one. If you are wondering how to grow out a bob without losing the shape you’re aiming for, the same patience and planning approach applies grow out a stacked bob. The process is mostly about patience, a little bit of product, and being very clear with your stylist about what you actually want.
The people who end up cutting it back short are usually the ones who went in without a plan and let a trim turn into a reshape. Go in with your photo, your goal, and the words "do not re-stack," and you will be fine. The awkward phases pass faster than they feel like they will in the middle of them. If you want a related walkthrough for switching between lengths and layers, see also grow out layered bob.
FAQ
Can I straighten a stacked bob during the awkward phase without ruining the grow-out?
Yes, but only if you do it strategically. Use heat on the ends and mid-lengths, not at the roots or directly into the nape area. A quick pass to smooth frizz is fine, but frequent full-heat straightening can make the shorter interior layers dry out and snap, which makes the grow-out look uneven even when your length is on track.
What if my back looks puffy even after blow-drying, what should I try next?
When the back starts to feel bulky, reach for “movement,” not more weight. Light texturizing spray at the mid-lengths, then scrunch or braid-then-release can break up the puff while keeping the overall perimeter length. Avoid heavy waxes and thick oils, they can weigh down one section unevenly and highlight the layered contrast.
Will a bad trim actually reset my stacked bob grow-out timeline?
If you cut too much, the growth timeline will not reset, but your silhouette will. Over-trimming interior layers can eliminate the stacked lengths that need time to blend, so you end up with shorter internal pieces that stick out while the perimeter catches up. The practical limit to follow is: keep any “tidy” to the ends only, and ask for no re-graduation.
How do I decide whether I need an end tidy versus interior thinning?
Go by which area is causing the problem. If the perimeter is uneven, a small end tidy (no more than about 1 cm) can keep things wearable. If the perimeter is fine and the issue is “helmet head” bulk, focus on interior weight removal next visit, not perimeter reshaping. This distinction usually prevents the most common grow-out mistake.
Are there any partitioning or parting tricks that make the back less obvious?
Yes, side-swept styles can help immediately because they visually break up the rounded back shape. Try a deep side part and then pin or clip the shorter side in place while it sets, or use a low ponytail with a slight side tilt if your sides are long enough. This works best during the mid-stage when the back cannot lie flat yet.
Should I change my conditioner or leave-in product during the grow-out?
Usually, but you need to be careful about timing. If you are within the first 6 to 8 months and the back is still in the puffy phase, heavy conditioning that leaves hair very soft can make it fan out. Choose a lighter leave-in or smoothing serum, apply small amounts, and make sure you dry fully before styling.
What should I do if my back cowlick keeps coming back no matter what product I use?
Cowlicks can get worse when you repeatedly dry them the same way each time, because your hair starts to expect that direction. Rotate your part slightly or use a consistent direction only while damp, then set it. If a cowlick is stubborn, address it during drying with section tension, don’t rely on product after the hair is dry.
Does the plan change if I’m growing to collarbone instead of just shoulder length?
Yes, but it depends on your end goal. For shoulder length or a true lob, you typically keep the perimeter closer to what you have and let the crown layers catch up. If you’re aiming for collarbone or longer, you may eventually want fewer layers overall, but that is later, once the internal pieces have blended. Tell your stylist your end length each time so they don’t “help” too early.
How do I know when it is actually time for my next trim, not just “because it’s been X weeks”?
You might still do maintenance, but don’t schedule it on pure calendar fear. If the back is consistently messy and you cannot create a workable look, that can be a sign it is time for interior weight removal. If you can style it and the perimeter is stable, stretching to 8 to 10 weeks often keeps you from getting unintentionally re-stacked.
My stacked bob looks more uneven over time, does that mean my hair is growing slower?
Those results usually come from breakage at the ends or uneven layer blending, not from hair growth slowing down. Check for short, flyaway pieces and rough, dry ends, then prioritize conditioning with gentle detangling and reduce heat. If you see thinning at the ends, ask your stylist for an assessment at your next appointment before trimming additional length.