Growing a V-taper means coaxing the sides and back of your hair into a gradual graduation that narrows to a soft point at the nape of your neck. It takes roughly 3 to 6 months from a close cut depending on your starting length, and the key is knowing when to get a maintenance blend (to keep the shape readable), when to leave it alone, and how to style through the awkward middle weeks so you never look like you just gave up on your hair.
How to Grow a V-Taper: Step-by-Step Timeline

Marcus Vickers
7 May 2026

What a V-taper actually looks like (and how to check yours)

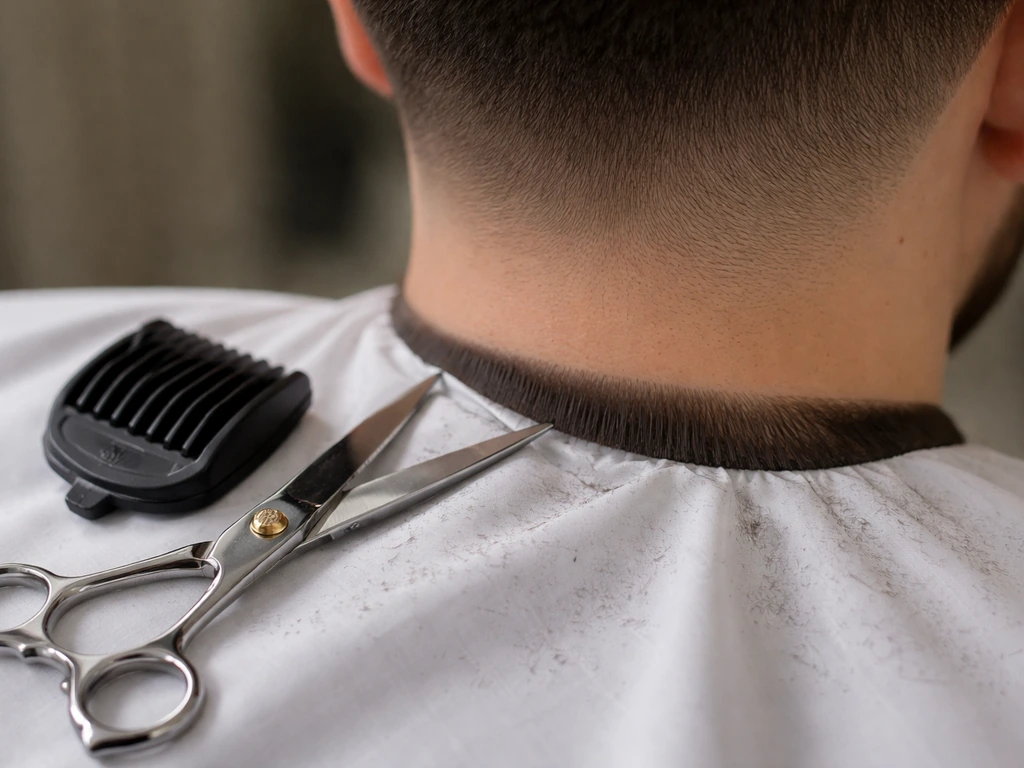
A V-taper, sometimes called a tapered V-neckline or soft-pointed neckline, is defined by a center point at the nape instead of a straight horizontal line across the back. From behind, the hairline curves inward from both sides and meets at a downward point in the middle. The sides and back graduate in length, shorter near the edges and progressively longer as you move up toward the crown. That graduation is what creates the clean, sculpted silhouette.
To check your current shape, use two mirrors or take a photo of the back of your head in good lighting. Look for three things: how defined your neckline edge is, whether the sides are carrying more bulk than the back, and whether there is already any hint of a center point at the nape. If your neckline is squared, rounded, or just fuzzy regrowth right now, that is your baseline. Write it down or take a photo you can compare to monthly. Knowing exactly where you are starting stops you from guessing your progress or over-trimming later.
The grow-out timeline: what to expect week by week
Hair grows at roughly 0. Dermatology.org notes that scalp hair growth is about 0.5 mm per day, which aligns with slow grow-out timelines like the one described here Hair grows at roughly. 5 inches (about 1.25 cm) per month, or around 2.5 mm per week. That is slow enough to feel invisible day to day, which is exactly why a written timeline helps. Here is how the growth maps to taper re-formation:
| Timeframe | Approx. growth added | What you will likely see |
|---|---|---|
| Weeks 1–2 | ~5 mm (0.2 in) | Stubble or fuzz on shaved areas; neckline edges soften |
| Weeks 3–4 | ~1 cm (0.4 in) | Sides start to show length difference vs. top; taper blurring |
| Weeks 5–8 | ~1.5–2 cm (0.6–0.8 in) | The awkward phase: sides look bulky, neckline undefined |
| Months 2–3 | ~2.5–3.5 cm (1–1.4 in) | Graduation starts to re-emerge with proper blending |
| Months 3–4 | ~4–5 cm (1.6–2 in) | V-shape at the nape becomes visible and styleable |
| Months 5–6 | ~6–7.5 cm (2.4–3 in) | Taper is established; shape is readable without product |
The hardest stretch is weeks 5 through 10. Everything looks undefined and bulky at the same time. This is normal, not a sign you need to start over. Most people cut it back during this phase and then wonder why they never seem to make progress. Push through it with a solid styling strategy (more on that below) and you will come out the other side.
Cutting and blending while you grow: the rules that protect your progress
Maintenance trims during a grow-out are about keeping the shape readable without sacrificing length. The goal is a blend, not a cut-back. Here is how to think about it:
- Get a maintenance blend every 4 to 6 weeks, not every 2. Going in too often costs you length even when a stylist is being conservative.
- Ask specifically for the neckline to be shaped into a soft V point. If you do not name the shape, most barbers default to a straight or rounded neckline.
- The sides should be blended upward into the bulk, not trimmed down. If the sides are blended shorter, the graduation disappears and you lose the taper effect.
- If you have an undercut, do not let the undercut line be touched. Every time the undercut is refreshed, you are effectively restarting the neckline grow-out.
- Layers from a previous cut can create odd-looking bulk on the sides. Ask for a light texturizing pass to blend those layers into the growing length rather than cutting them off.
- If the nape V-point is getting fuzzy but has not fully formed yet, ask for just a line clean-up on the center point only, leaving the surrounding area to keep growing.
One thing worth knowing: a taper at the back and sides is a gradual graduation in length, shorter toward the lower edge and longer as you go higher. Every time you cut that lower edge back, you lose the gradient you have built. Protect the lower half and clean up the upper blend instead.
Your grow-out plan based on where you are starting
Starting from a buzz cut or shaved head
This is actually the cleanest starting point. You have a blank slate, and the V-taper shape will emerge naturally if you guide the neckline from the beginning. At week 3 to 4, ask a barber to lightly define the V-point at the nape before it gets lost in fuzz. After that, leave the neckline alone until month 2 and focus on blending the sides into the top as they grow. You are looking at about 4 months to a well-defined taper.
Starting from a pixie cut
Pixie cuts are often cut with a tapered or very closely clipped neckline, which means the back has already been set short. Your job is to grow the neckline length while keeping the sides from ballooning before the top catches up. Get a blend at month 1 to manage any side bulk, and make sure whoever is cutting knows you are growing toward a V-taper, not maintaining the pixie shape. The neckline point can usually be shaped clearly by month 3.
Starting from a bob
A bob carries a lot of length at the neckline and can actually mask the V-shape for months. The key here is to ask for the neckline to be shaped into a V-point as the back grows past the bob line. The sides of a bob tend to be blunt, which fights the taper graduation, so ask for texturizing on the side sections to start introducing some weight removal as length builds. Growing a taper from a bob takes 5 to 6 months for the full graduation to read clearly.
Starting from an undercut
This is the trickiest starting point. The undercut has created a hard disconnection between the shaved portion and the top, and you need those two sections to grow into each other before the taper can form. Do not refresh the undercut line at any point during the grow-out. Let the shaved section grow out until it meets the length above it, then start blending.
This phase can feel especially messy between months 1 and 3. A blending pass at month 2 helps enormously. Related to this: if you are also growing out a tapered natural hair style or a tapered hairline, the same principle applies: protect the lower edges and blend upward as length returns. If you are trying to grow out a tapered hairline along with your V-taper, protect the lower edges and blend upward the same way Related to this.
If you are also wondering how to grow out tapered natural hair, focus on protecting the lower edges and blending upward as your length returns. If you are trying to grow out your hairline along with a V-taper, keep the lower edges protected and blend upward as new growth returns.
Common problems that derail V-taper growth (and how to fix them)
The sides are growing faster or bulkier than the back
This is incredibly common because the sides often have more natural density or a different growth pattern. The fix is not to cut the sides down. Instead, ask for weight removal through the side sections using texturizing scissors or point cutting, which reduces the bulk without taking away the length that feeds into the graduation. A little product (lightweight cream or gel) can also flatten the sides temporarily while the back catches up.
Cowlicks disrupting the neckline V-shape
A cowlick at the nape is one of the most frustrating obstacles for V-taper growth because it pulls the hair away from the center point and breaks the line. The practical fix is to let the hair grow slightly longer than you would otherwise in that area. Extra weight helps the cowlick lie flatter. A lightweight hold gel applied at the nape and combed through while damp trains the direction over weeks. Do not try to fight a cowlick by cutting that area short. It will spring up worse at shorter lengths.
Patchiness or uneven growth at the sides and nape
Patchiness usually comes from either uneven clipping in a previous cut or variation in your natural growth density. If one side is consistently slower, give it time rather than cutting the faster side back to match. They will even out within a cycle or two. If the nape is patchy, scalp massage and consistent conditioning (more on that below) can support blood flow and follicle health to improve fill-in over weeks 4 through 8.
Losing the V-shape during the middle grow-out
Around months 1 to 2, the defined V-point you had (or were building toward) often disappears under new growth. This is temporary. The point gets blurred, not erased. The solution is a single light clean-up of just the neckline center point at your month 2 visit, without touching the surrounding length. This re-establishes the visual anchor without costing you the progress on either side of the nape.
Temple and hairline sticking points
Temples often grow slower than the rest of the sides, which can make the taper look unfinished even when the nape is progressing well. This is worth watching especially if you are also dealing with a receding or uneven hairline. If temple growth is lagging noticeably after 3 months, a targeted scalp massage to the temple area (2 to 3 minutes daily) and a topical growth-supporting serum applied consistently can make a visible difference over 6 to 8 weeks.
The hair and scalp care routine that supports growth
Hair growth rate itself is mostly genetic, but scalp health directly affects how well each follicle performs. According to Hair (StatPearls) from NCBI Bookshelf, blank" rel="noopener noreferrer">human scalp hair grows at about 0.35 mm per day, about 1 cm per month, or roughly 15 cm per year. A clean, well-circulated scalp produces stronger growth than a congested or dry one. Here is a routine that actually makes a difference: If your goal is to how to grow back widow's peak, make sure your neckline and hairline regrowth are supported by consistent shaping and scalp care during the same grow-out window.
- Wash 2 to 3 times per week with a sulfate-free shampoo. Over-washing strips the scalp of the oils that protect follicles. Under-washing leads to product buildup that can clog pores around the follicle.
- Use a moisturizing conditioner from the mid-lengths down every wash. For shorter grow-out lengths where conditioner reaches the scalp, rinse it fully to avoid buildup.
- Do a 3 to 5 minute scalp massage before or during your wash, using your fingertips (not nails) in circular motions. This increases blood flow to the follicles and has been shown in studies to support hair thickness over time.
- Apply a lightweight scalp serum or oil (rosemary oil has the most consistent evidence among natural options) to the nape and side areas 3 to 4 times a week, focusing on any patchiness or slower-growth zones.
- Protect the nape from friction. Pillowcases made from silk or satin reduce the breakage that can make the neckline look uneven and delay taper formation.
- Stay on top of hydration and protein balance in your diet. Hair is mostly keratin (protein), and deficiencies in iron, zinc, biotin, and protein show up as slower, thinner growth within 2 to 3 months.
How to style at each stage so the taper still looks intentional
Weeks 1 to 4: work with the close crop
At this stage the taper is either freshly cut or barely forming. Use a light pomade or paste applied on dry hair and combed back or to one side to give the top some direction without making it look product-heavy. Keep the neckline as defined as possible. A sharp nape edge, even a subtle one, makes short hair look intentional rather than simply short.
Weeks 5 to 10: the awkward phase
This is the period most people want to hide. The sides are puffing out and the back is neither short nor long. The best strategy here is to use a medium-hold cream or gel to define the top with some texture and flatten the sides slightly. A deep side part works especially well at this length because it creates a deliberate visual line that distracts from the undefined sides. Avoid combing straight back, which emphasizes width. Comb diagonally from one side to create movement and length illusion.
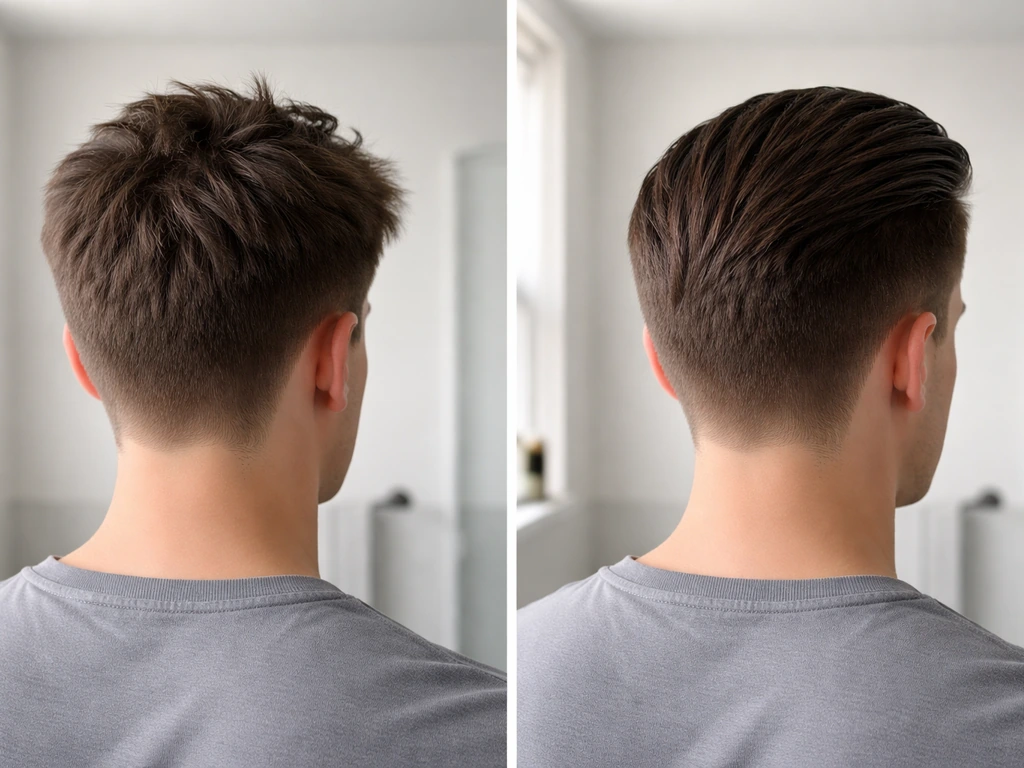
Months 2 to 3: the graduation starts showing
By now there is enough length at the top to create real texture styling. A sea salt spray or texturizing cream applied to damp hair and air-dried gives a natural finish that works with the growing taper rather than against it. The nape V-point should be visible in this window, so lean into it: keep the nape area clean (just line work, no bulk removal) and let the rest show the shape that is forming.
Months 4 to 6: the taper is readable
At this stage the graduation is clear and you have real styling options. The taper will read well with a variety of finishes: natural air-dry, a low fade blend, or a slicked-back look using a light hold pomade. The V at the nape now anchors the whole style. Keep up the 4 to 6 week maintenance blends to refine the shape without losing the length you have built. Heat tools (blow dryer on low, diffuser for curly textures) can be used once a week without significant setback if you use a heat protectant.
What to do this week and what to track going forward
If you are starting today, here is a clear action plan for the next 8 weeks and beyond:
- This week: take a back-of-head photo in good lighting and note your current neckline shape (square, round, V-hint, or undefined). This is your baseline.
- Week 1 to 2: start the scalp care routine: massage daily, sulfate-free shampoo, and if you choose to use a growth serum, begin now so you can track results at the 8-week mark.
- Week 3 to 4: if you are growing from a buzz or pixie, book a barber visit specifically to define the V-point at the nape. Show them a reference photo of the shape you want.
- Weeks 5 to 8: resist the urge to cut. This is the awkward window. Use the styling strategies above and take a weekly photo to track progress you will not notice day to day.
- Month 2: book your first maintenance blend. Brief your stylist on the specific goal: blend the sides upward, clean the nape V-point, do not cut length back.
- Months 3 to 4: reassess the taper shape. By this point you should see clear graduation at the back. Note whether the sides are even, whether the V-point is holding, and whether any patchiness has filled in.
- Month 5 to 6: the taper should be fully established. From here it is maintenance: a blend every 5 to 6 weeks to keep the graduation clean and the neckline sharp.
The whole process asks one thing above everything else: patience with the middle. The V-taper does not look like much during weeks 5 through 10, but that phase is actually where the shape is being built. Every week you hold off on cutting back, you are banking length that will become the graduation. If you are specifically working on how to grow out TWA, the same patience with the awkward middle applies as your texture and taper catch up. Track it, style through it, and the shape will come.
FAQ
How do I measure progress toward a V-taper if my hair texture is wavy or curly?
Use the photo method, but take pictures the same way each time (camera height, distance, and lighting). For curls, stretch one section gently with your fingers when comparing photos so you evaluate the neckline line, not temporary shrinkage. Mark the nape center point in the photo by circling it so you can see whether the V anchor is sharpening, not just whether the hair “looks longer.”
When should I avoid a trim even if the sides feel bulky?
Avoid cutting the lower edge back during the grow-out, especially before month 2, because that removes the gradient that creates the graduation. Instead, ask for weight removal through the sides (light texturizing or point cutting) while leaving the nape length protected. If the bulk is mostly from styling, switch your routine first (more hold at the top, less combing straight back) before you touch scissors.
Can I grow a V-taper if my nape is naturally coarse, thick, or uneven?
Yes, but plan for more “line work” than length changes. Coarse density often needs extra shaping at the center point so it reads as a V, plus consistent conditioning so the hair falls flatter over time. If one spot at the nape consistently sits higher or lower, tell your barber that you want the neckline clarified, not the whole area shortened, to avoid creating another disconnection.
What if my V-point looks good but my back still feels rounded (no center point)?
That usually means the sides are carrying weight too low. Fix it by asking for a blend that removes some bulk from the side sections upward, while keeping the lower nape region intact. Also check your styling, if your hair collapses or fans outward after drying, use a lightweight hold product at the nape and comb it into the center direction while damp so the line can set.
Is it okay to maintain the V-taper with a home trim between barber visits?
Only do micro-cleanups, meaning trimming stray hairs at the neckline center line without redefining the entire edge. Avoid “fixing” the sides at home during weeks 5 to 10 because that’s when the graduation is forming and uneven cutting can reset the timeline. If you are unsure, use styling to mask the awkward phase and wait for a professional blend.
How do I style the awkward middle if my hair won’t lay flat at the sides?
Create a controlled direction change instead of combing straight back. Use a medium-hold cream or gel, apply to damp hair, then comb diagonally from one side to build movement and reduce the appearance of width. If the sides are still puffing, add only a small amount more product at the sides and keep the top textured so the V line at the nape stays visible.
What should I tell my barber if I’m coming from a fade, undercut, or a clipper-short neckline?
Ask them to stop refreshing the disconnection line. Use clear wording like “Do not retrace the undercut or neckline shave line, blend upward as it grows.” Also request weight removal through the side sections rather than shortening the lower edge, so the graduation can re-form naturally as the shaved portion increases in length.
My neckline is patchy, what’s the best way to handle it without delaying the shape?
Don’t try to “match” patchiness by cutting one side shorter. Instead, protect the lower edges and focus on blending upward, then use consistent conditioning plus gentle scalp massage to support fill-in over time (especially around weeks 4 to 8). If a patch is from prior technique or clipping unevenly, you may need a single targeted cleanup later to re-establish the center anchor rather than repeated trims now.
How can I reduce cowlicks at the nape without making them worse?
Grow the area slightly longer than you would otherwise, then set the direction while damp. Apply a lightweight hold gel at the nape, comb it into the center position, and let it dry without disturbing. Avoid cutting that zone short, because shorter lengths tend to spring upward and break the V line more noticeably.
When is heat styling for a V-taper actually safe?
You can generally use heat once a week once the taper is at least partially formed, but keep the heat low and apply a heat protectant every time. If you notice the neckline line losing definition after heat, scale back and rely more on air-drying plus light hold, because over-drying can cause frizz and make the V-point look less readable.