Growing out men's hair without looking bad comes down to three things you control: keeping a clean shape at the sides and back even while the top grows, using the right products at the right time to make each stage look intentional, and getting strategic trims every 8 to 10 weeks that remove zero length from the top but keep the overall outline sharp. Most guys quit during the 2-to-6-inch phase because nobody told them what to actually do at each step. This guide fixes that.
How to Grow Out Men’s Hair Without Looking Bad

Marcus Vickers
26 Apr 2026
Know why it looks bad (and what to fix)
Hair doesn't grow as one uniform mass moving upward. Different zones of your scalp grow at slightly different rates, follicles point in different directions, and areas around the crown often have whorls or cowlicks that make the same length look totally different depending on where it is on your head. That's why one side of your hair looks fine while the other is doing something weird, or why the crown sticks up no matter what you try.
The main reasons a grow-out looks bad are almost always one of these four things:
- The outline has gone soft. The sides and back have fuzzed out, making the whole head look shapeless rather than intentionally grown.
- The top is adding bulk without direction. Hair is piling up at the crown with no styling to give it shape or movement.
- Cowlicks are winning. Without the right blow-dry technique or product, a crown cowlick will look like a mistake rather than texture.
- The length is in no-man's land. At roughly 2 to 4 inches, hair is too long to sit flat on its own but too short to fall with any weight, so it just puffs outward.
Once you know which of these is your specific problem, it becomes much easier to fix. Most of this article is dedicated to solving each one. And it's worth being honest up front: there's always going to be a stage that feels slightly off. The goal isn't to skip the awkward phase entirely, it's to move through it looking like a person who made a choice, not a person who forgot to get a haircut.
Your grow-out timeline: what to expect at each length
Hair grows roughly half an inch per month on average, so plan your expectations around that. Starting from a buzz cut or very short crop, here's what each stage actually looks like and how to manage it:
| Stage | Approximate Length | Timeframe from Buzz | What You're Dealing With | Main Focus |
|---|---|---|---|---|
| 1 – Short stubble/crop | Under 1 inch | Weeks 1–6 | Patchy texture, lines fading, inconsistent coverage | Clean up the outline; leave the top alone |
| 2 – Early awkward | 1–2 inches | Months 2–4 | Top sits up and refuses direction; sides get fluffy | Side taper maintenance; start adding product |
| 3 – Peak awkward | 2–4 inches | Months 4–8 | Hair is too short to fall, too long to cooperate; cowlicks very visible | Styling technique matters most here; barber shaping critical |
| 4 – Getting somewhere | 4–6 inches | Months 8–12 | Weight starts to help; styles like textured quiff or slicked-back become possible | Moisture and hold products; consider layers to reduce bulk |
| 5 – Shoulder-approaching length | 6+ inches | 12+ months | Mostly there; managing bulk and split ends | Conditioning routine, occasional trims to clean up ends |
The 3-to-6-month window is the one that breaks most grow-outs. The hair is long enough to look unkempt but short enough that you can't pull it back or do anything dramatic with it. This is the stage where the hair starts looking unkempt but you can still shape it with styling, and the same approach is what helps when you need to learn how to grow long hair without looking stupid.
This is exactly where the barber strategy and styling routine below become your most important tools. If you’re trying to get past the awkward stage, the right barber strategy and styling routine make the whole process feel intentional instead of accidental how to grow your hair past the awkward stage.
Barber/trim strategy to keep shape while you grow
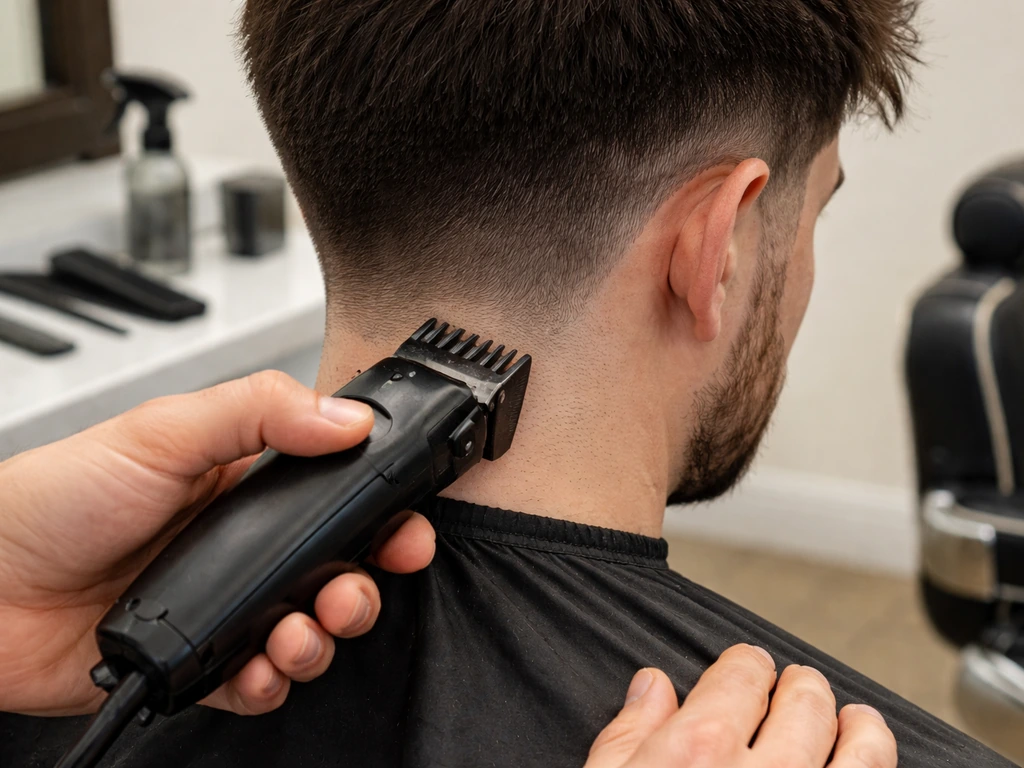
The single biggest mistake guys make is avoiding the barber entirely because they're afraid of losing length. You don't need to avoid trims. You need to change what you're asking for.
For most grow-outs, aim for a shape-up visit every 8 to 10 weeks. Some sources suggest stretching to 12 weeks if your ends are healthy and you're not dealing with a fade, but if you started with something sharp like a skin fade or a very defined neckline, you'll want to go in closer to every 6 to 8 weeks just for the outline. Fades blow out visibly in days, so if you let a faded side go too long, the entire haircut starts to look shapeless.
Here's exactly what to tell your barber at each stage:
- "Don't touch the top. Just clean up the outline, neckline, and around the ears." (Stages 1 and 2)
- "Take nothing off the length. Blend the sides so they're not puffing out, and soften the transition between sides and top." (Stage 3)
- "Trim a quarter inch or less off the ends only to remove any splitting, and give me some shape through the top to reduce bulk without losing length." (Stage 4)
- "I want to keep growing, so just clean up the ends and thin out any areas that are getting too thick." (Stage 5)
If your barber wants to go shorter, be direct: tell them you're growing it out and the goal is shape, not shortening. A good barber will respect that. If they keep pushing a shorter cut, find one who has experience with grow-outs. It's a legitimate speciality.
Styles that make every awkward stage look intentional
The styles that work best during a grow-out share one thing: they give the hair direction. Hair without direction just sits there looking like it doesn't know what it's doing. Here's what actually works at each stage.
Stage 1 and 2 (under 2 inches): clean lines carry everything
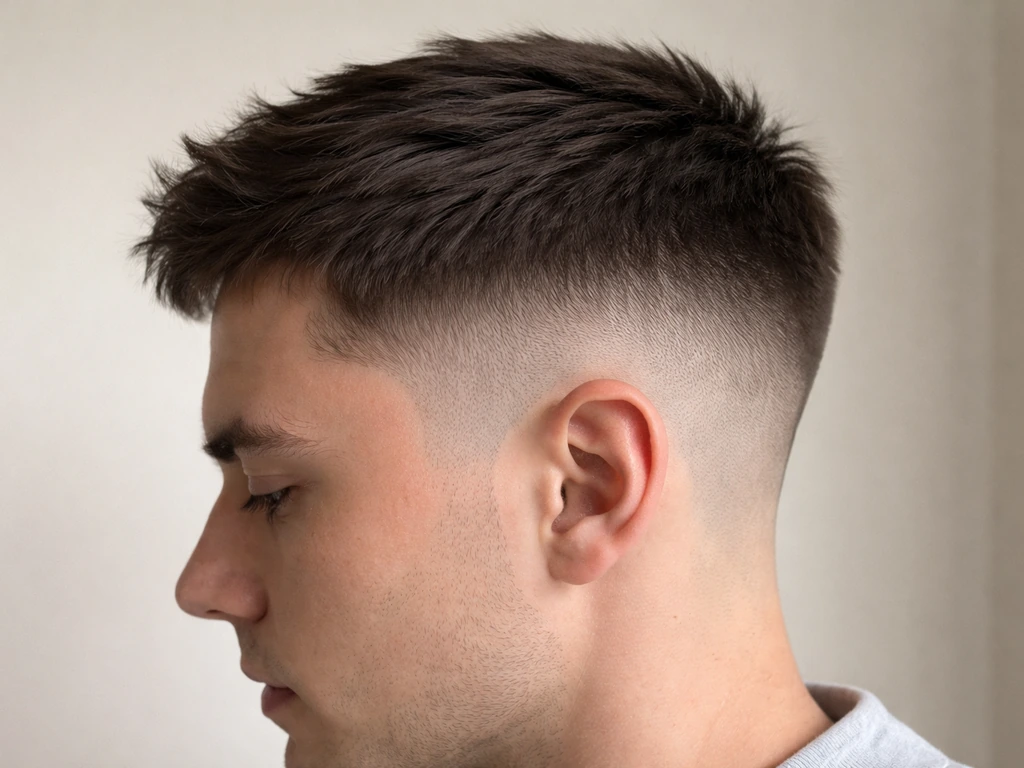
At this length, the style is basically the shape of the cut itself. A short textured crop with a low fade or a tapered side keeps things looking intentional even as growth starts to come in. Push the top slightly forward or to one side with a matte clay rather than leaving it flat, which tends to look more accidental than styled.
Stage 3 (2 to 4 inches): give the hair a job
This is the hardest range. The styles that save you here are all about picking a clear direction and committing to it. A side-swept look works well because you're using the hair's own weight (even if it's limited) to create a line. A textured quiff works if your hair has any natural lift. Slicking back becomes possible if you use paste or clay applied when hair is about 60% dry, which helps grip the hair and hold the direction you've chosen. Forward-swept fringe can also mask how much growth is actually at the top.
Stage 4 (4 to 6 inches): weight starts working for you
At this stage, gravity becomes your friend. A curtain part, longer textured layers, or a loose side part all start to look genuinely good rather than just managed. If your hair has any wave or texture, this is the stage where you can start encouraging that instead of fighting it. A small amount of leave-in conditioner applied mid-strand to ends (not the roots) adds definition without grease.
Managing cowlicks and bulk at the crown
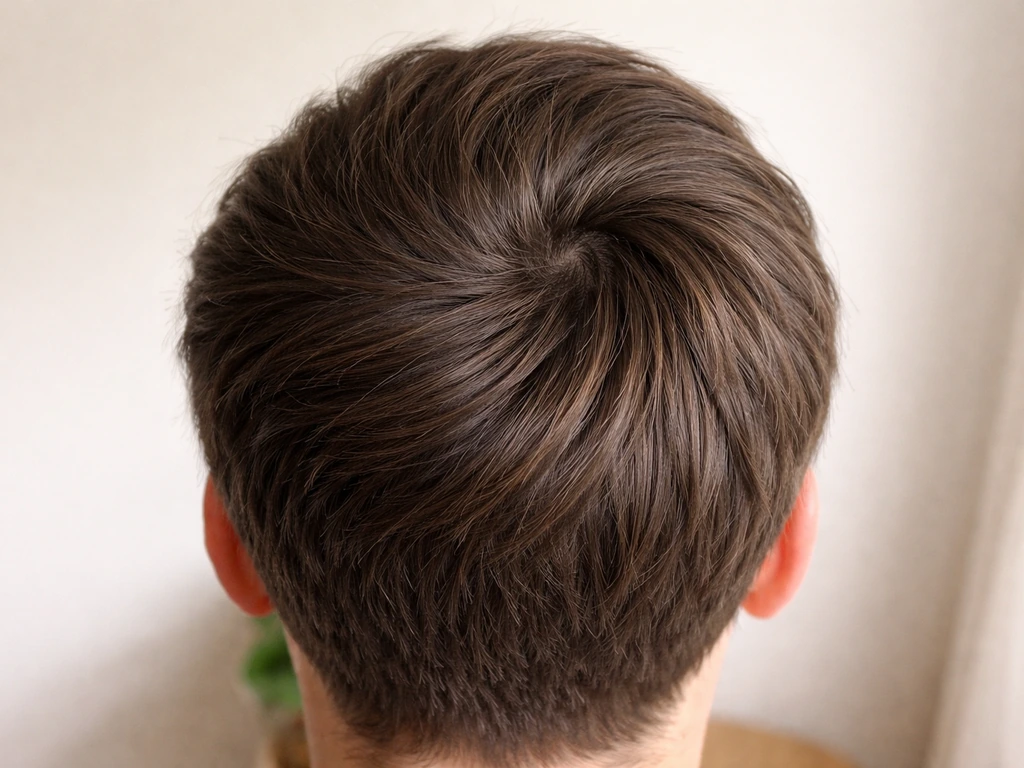
Cowlicks are a growth pattern issue, not a styling failure. The follicles in that area are literally pointing in a different direction from the ones around them, which is why the same brush technique that works everywhere else stops working there. The most reliable fix is a [blow-dry with controlled direction](https://www. healthline.
com/health/beauty-skin-care/cowlick): comb or hold the section the way you want it to go, then use a low-speed setting to set the hair in that direction. A brush that lets you apply pressure under the section while drying helps a lot. Do this while hair is still damp, not bone dry, because you're essentially resetting the direction before the hair cools and sets. Finish with a light hold product to keep it in place.
Bulk at the crown is a separate issue from a cowlick but often gets blamed on one. If your top is getting puffy and rounded, your barber can use point-cutting or texturizing to remove weight from that area without touching the length. Ask for it specifically.
Product and styling routine (simple, repeatable)
You don't need many products, but you do need the right ones for your hair type. Using a heavy product on fine hair is one of the fastest ways to make a grow-out look worse, not better.
| Hair Type | Best Product Type | When to Apply | Where to Apply |
|---|---|---|---|
| Fine or thin | Lightweight spray or water-based leave-in | On damp hair, before blow-drying | Mid-strand to ends only, not roots |
| Medium/normal | Matte paste or clay | At 60% dry for slick-back; on damp for texture | Work through palms first, then mid-lengths and ends |
| Wavy or thick | Light cream or serum leave-in | After towel drying, before styling | Mid-strand to ends; scrunch in for wave definition |
| Coarse or very thick | Thicker balm or gel | On damp hair, section by section | All over from root to tip, focusing on control |
The daily routine that works across most grow-out stages looks like this: wash or rinse hair, towel dry until damp but not dripping, apply your leave-in or conditioning product from mid-strand to ends (never the roots unless your hair is very coarse), blow-dry with direction using your hands or a brush, then finish with a small amount of hold product worked through your palms before running through the hair. That's it. Spending 10 minutes doing this consistently will do more for your grow-out than any specific product.
One tip worth calling out: if your hair keeps falling forward awkwardly, try applying paste or clay when the hair is still around 60% dry rather than fully dry. If you’re already focused on getting past the awkward stage, the styling steps in this grow-out routine are a great next comparison point grow out hair without awkward stage. Drier hair is already set in one position and harder to move. At 60% dry, you can actually guide it where you want it to go, and the product bonds to the direction you've chosen.
Special cases: undercuts, bangs/fringe, patchy regrowth, colored hair
Growing out an undercut
Undercuts are probably the most frustrating starting point for a grow-out because the disconnect between the very short sides and longer top gets more visible before it gets less visible. The key is blending. Every 6 to 8 weeks, ask your barber to bring the undercut up and soften the line between the shaved or very short sides and the longer top. You're not losing the length on top, you're gradually eliminating the hard contrast between zones. This takes several visits, but eventually the sides catch up enough that the difference becomes a taper rather than a shelf.
Growing out bangs or fringe
Fringe hits an especially awkward point around the nose-to-mouth range, where it's too long to style forward without looking overgrown and too short to sweep cleanly to either side. At this stage, side-sweeping with a bit of product is your best option. Blow-drying the fringe to one side while it's damp, using your fingers or a brush with some pressure to set it, will train the hair over time. If you have a cowlick in your fringe, this blow-dry technique is especially important because letting it air dry in whatever direction it wants will just reinforce the wrong pattern. Once bangs get past chin-adjacent length, they start to integrate into the overall style more naturally.
Patchy or uneven regrowth
If your regrowth is uneven, and this is very common, there's a reasonable chance it's being driven by natural growth patterns rather than a bad previous cut. Follicles in certain areas grow at angles that make them appear longer or shorter than neighboring areas even at the same growth stage. The honest answer is that the uneven look often corrects itself as hair gets longer and weight smooths things out. In the meantime, a skilled barber can adjust the cut to account for those patterns rather than cutting everything to one uniform length that will just look uneven again in a month.
Colored or bleached hair
If you've got color or bleach in your hair, regrowth creates a visible line between the natural color at the root and the treated length. How much this bothers you depends on the contrast. Dark roots on light hair are very visible; lighter roots on darker dye are less so. Options include: a root-blurring toner applied at each trim, transitioning to a balayage or highlights approach that disguises the line of demarcation, or simply embracing the two-tone look as an intentional contrast, which can actually look sharp if you keep everything else clean. Bleached or color-treated hair also tends to be more fragile, so leave-in conditioner becomes even more important here to maintain manageability and reduce breakage.
Quick troubleshooting + next steps plan
If you're not sure what to do right now based on where your hair currently is, use this as your decision framework:
| If your hair is at this stage | Do this this week | Book your next barber visit |
|---|---|---|
| Under 1 inch (buzz/very short crop) | Use a matte clay to push the top in one direction; get neckline and outline cleaned up | In 6 weeks for a shape-up only |
| 1–2 inches (early grow-out) | Start a daily blow-dry routine with direction; use a lightweight product; ask barber for taper cleanup only | In 8 weeks for blend and outline |
| 2–4 inches (peak awkward stage) | Commit to a direction (side-sweep or slicked-back); apply product at 60% dry; cowlick? Blow-dry with pressure while damp | In 8 weeks for shaping and weight removal at crown, no length off top |
| 4–6 inches (getting there) | Introduce leave-in conditioner mid-strand to ends; experiment with a curtain part or textured style; let waves or texture work for you | In 10 weeks for end trim only (quarter inch or less) |
| 6+ inches (almost there) | Focus on conditioning to avoid split ends; consider layers to reduce bulk; don't skip the ends trim or you'll get splitting | In 8–10 weeks for shape and ends cleanup |
The most important thing you can do this week, regardless of what stage you're at, is book a barber appointment specifically framed around growing out, not cutting back. If you want a full plan for the long haul, this pairs well with the same timeline and styling choices in how to grow out your hair and still look good. Tell them upfront what you're doing and what you want the end result to look like. A barber who understands the goal will give you a completely different set of recommendations than one who assumes you want a maintenance cut.
Growing out men's hair without looking bad isn't about finding a magic trick. It's about staying consistent with a simple routine, keeping the outline clean even when the length is messy, and giving each stage of growth a clear direction rather than just letting it happen to you. Split ends cannot be permanently repaired, so the only true fix is cutting them off, while certain products can only temporarily seal their appearance.
The guys who make it through to longer hair aren't the ones with the best genetics. They're the ones who didn't give up in month four. If you're looking to go even further with this, there's also a lot of crossover with broader strategies around staying professional during a grow-out and managing the transition at work or in more formal contexts, which deserves its own attention beyond just the physical styling.
Here are practical ways to grow your hair out while still looking professional at work and in more formal settings looking professional during a grow-out.
FAQ
How do I style a grow-out if my hair is fine or gets oily fast?
Use product, but apply less than you think. For fine or thin hair, start with a pea-sized amount of matte clay or paste, warm it in your palms, then run it through mid-strand to ends only, finishing by lightly brushing or raking from the sides toward the direction you want. If your roots look flat or greasy after a day, you are using too much or placing it too high.
What should I do if my hair keeps changing direction after I style it?
Try “direction at 60%” rather than waiting for fully dry. After washing, towel dry to damp, blow-dry while you hold the section where you want it to go, then apply a small amount of hold product when the hair is still about 60% dry. Fully dry hair often becomes hard to move, so the style locks in the wrong way.
My crown looks puffy and round, but I don’t think it’s a cowlick. What can a barber do?
If your sides look bulky while the top is still short, ask your barber for weight removal that preserves length, for example point-cutting or light texturizing at the sides and crown. The goal is to sharpen the outline and reduce roundness without thinning the entire top or creating uneven contrast later.
How often should I get my undercut blended, and what should I ask for?
For an undercut grow-out, schedule blending visits every 6 to 8 weeks and describe the problem as a “hard zone contrast” rather than asking for a shorter cut. You want the barber to gradually soften the line between the short sides and top so the difference turns into a taper instead of staying a visible shelf for months.
Can I use a blow-dryer every day while growing out my hair?
Yes, but only if you keep the outline crisp. Use a low setting and dry while guiding in one direction, then finish with light hold. Avoid aggressive heat and close-to-scalp drying that can dry out the hair, making flyaways worse during the awkward stage.
How often should I wash my hair during the grow-out?
Wash frequency depends on oil and product buildup, not the calendar. If you are using paste or clay daily, consider washing every 1 to 3 days to prevent residue from making hair limp or dull. If your scalp stays clean longer, stretching a bit is fine, just rinse thoroughly before styling.
Is it better to trim every 6 to 8 weeks or every 12 weeks for a clean grow-out?
If you started with a sharp skin fade or a very defined neckline, don’t stretch appointments too far, because the contrast grows quickly. A practical rule is to go closer to every 6 to 8 weeks for outline control, and treat 12 weeks as only for longer, more forgiving starting cuts with healthy ends.
Why do cowlicks keep ruining my sides even when I use the right product?
Some cowlicks will not behave with brushing alone, because the follicles are angled. Use a section-and-hold approach: comb the section into position while damp, blow-dry on a low speed to set direction, then lock in with a light product. If you let it air-dry, it will usually reinforce the wrong pattern.
How should I adjust my routine if I have bleach or color in my hair?
If you have bleached or dyed hair, lean more on leave-in conditioning and gentler styling. Use a smaller amount of product, focus on mid-strand to ends, and be careful with heat intensity. The goal is manageability and breakage reduction, because brittle hair will not hold direction as well and can look patchy as it grows.
My hair is growing unevenly, is that always because my barber cut it wrong?
If regrowth looks uneven, first consider growth-pattern differences. Before assuming the last haircut was wrong, give it time, because weight and length can smooth out the appearance. Meanwhile, a good barber can alter the cut to account for patterns so it looks intentional even while it catches up.
What exactly should I say to my barber if I’m trying to grow out my hair?
Keep the goal simple: tell your barber you want shape and outline, not a shorter refresh of the top. Use wording like “growing it out, remove bulk and clean the sides,” and ask for a grow-out plan tied to your current length. If they still push shorter, it is a red flag.